I'm back for another quick, catch-up post. Back in April I spent a day hanging out with Lynn McMasters to model for her. She was (or still is) working on a pattern for turbans for various time periods. She has lots of friends who model for her millinery, including, on occasion, me.
If you follow Lynn on Facebook at her page, "Out of a Portrait" you've seen this photos before, as well as pics of her other fabulous models and hats. If you're a member of Facebook and don't follow Lynn, scoot on over there and follow here to get the scoop on her up-and-coming hat patterns.
Turban No. 1:
This one is based on a late 18th century headdress. I can't recall the name or artist of the portrait that Lynn used as a model. The outfit was provided by me.
Turban No. 2:
Jumping forward over a century, I don't recall what time period Lynn attaches to this turban, but given the hairstyle she probably means
Turban No. 3:
Still in the Jazz Age. This one features a fun sash and crazy feathers. Lynn made the dress.
Turban No. 4:
1920s or '30s. This one came in two pieces. The "dress" is one of my favorite sari's, creatively wrapped.
Lastly: this is not a turban, but Lynn needed photos of this really cool, lace-brim hat.
Showing posts with label hats. Show all posts
Sunday, June 7, 2015
Saturday, June 7, 2014
Post-WWI Day Hat
I'm back!
Yup, I took yet another hiatus from this blog to take care of "stuff." I'm back for at least for the summer, though, and hopefully free to do some fab costuming and crafting.
Before I delve into the latest update in my costume collection, I'd like to make an announcement: last March (yes, it's been that long), the hosting for my website, claudinedemontigny.com, was up for renewal. Since I have practically no time to maintain the site, I let the hosting expire. There are still links from this blog to the website, and I'll change those eventually, but in the meantime don't be surprised if you get a "page not found" error.
Ok! Back to the business of costuming. My latest costume thing is this gorgeous post-World War I hat, not made by me but by Lynn McMasters.
It's based on her "Post WWI, Late Teens / Early 20's" hat pattern. You can find more information on that pattern here.
I don't actually recall the genesis of this hat. I think at the time she had just released the pattern, and suddenly she says: I'm making you a hat! That was quite a few months ago.
I forget what exactly the fabric is (charmeuse, I think), but the lace is vintage and I'm pretty sure she made the cord and tassels herself.
Anyway, 'nuff said, I'll just be quiet now so you can enjoy the photos.
Yup, I took yet another hiatus from this blog to take care of "stuff." I'm back for at least for the summer, though, and hopefully free to do some fab costuming and crafting.
Before I delve into the latest update in my costume collection, I'd like to make an announcement: last March (yes, it's been that long), the hosting for my website, claudinedemontigny.com, was up for renewal. Since I have practically no time to maintain the site, I let the hosting expire. There are still links from this blog to the website, and I'll change those eventually, but in the meantime don't be surprised if you get a "page not found" error.
Ok! Back to the business of costuming. My latest costume thing is this gorgeous post-World War I hat, not made by me but by Lynn McMasters.
It's based on her "Post WWI, Late Teens / Early 20's" hat pattern. You can find more information on that pattern here.
I don't actually recall the genesis of this hat. I think at the time she had just released the pattern, and suddenly she says: I'm making you a hat! That was quite a few months ago.
I forget what exactly the fabric is (charmeuse, I think), but the lace is vintage and I'm pretty sure she made the cord and tassels herself.
Anyway, 'nuff said, I'll just be quiet now so you can enjoy the photos.
Sunday, May 27, 2012
New Hat Pins
I've added some new hat pins in my etsy shop, and relisted a bunch. I have a large batch that still needs photographing, including a handful that lean decidedly more steampunk-ish. I have no idea when I'll get around to listing those...hopefully soon.
Here are the ones that went online today. The ones that are made from antique buttons look marvelously close to originals.
Here are a couple more that I haven't listed, because I'm keeping them (for now).
Here are the ones that went online today. The ones that are made from antique buttons look marvelously close to originals.
| Rhinestone Snowflake, 12" |
| Yellow Pearls and Sparkles, 12" |
| Aurora Borealis Rhinestones, 12" |
| Autumn in the Vineyard Pair, 10" |
| Autumn in the Vineyard, Large Medallion, 12" |
| Large green dome. |
| Small green dome. |
| Art Nouveau pair. |
| Large Art Nouveau Medallion |
Wednesday, December 21, 2011
1870 Hat by Lynn McMasters
I'm proud and privileged to be the owner of another custom hat by Lynn McMasters, milliner, friend, and occasional mentor (the last one was a really wonderful 1880s straw hat). In this post you'll also be treated...or horrified...by photos of yours truly! I'm not fond of having my photo taken. :)
This hat is the View D from Lynn's 1870-1880 Bustle Hat Pattern (eep! also featuring yours truly...I keep forgetting about that). Lynn based this view on several illustrations from around 1870.
I've got a big fat braid pinned to the back of my head to support the hat. There's a hat pin holding it on, but Lynn and I discussed attaching one or two combs or clips that will really hold it on.
The hat will got with a walking dress from around 1875 that, well, exists in my head...someday, hopefully SOON, I'll actually make the dress.
Finally I can't go without giving a plug to my friend Lynn. Making custom hats is something she does on the side; her primary business is making excellent hat patterns. Check them out here, or got to www.lynnmcmasters.com and click on "Pattern Orders" at the top. She's even got instructions on manipulating straw braid and blocking buckram! Even if you have no interest in home millinery, stop by her site and check out her amazing work.
This hat is the View D from Lynn's 1870-1880 Bustle Hat Pattern (eep! also featuring yours truly...I keep forgetting about that). Lynn based this view on several illustrations from around 1870.
I've got a big fat braid pinned to the back of my head to support the hat. There's a hat pin holding it on, but Lynn and I discussed attaching one or two combs or clips that will really hold it on.
The hat will got with a walking dress from around 1875 that, well, exists in my head...someday, hopefully SOON, I'll actually make the dress.
Finally I can't go without giving a plug to my friend Lynn. Making custom hats is something she does on the side; her primary business is making excellent hat patterns. Check them out here, or got to www.lynnmcmasters.com and click on "Pattern Orders" at the top. She's even got instructions on manipulating straw braid and blocking buckram! Even if you have no interest in home millinery, stop by her site and check out her amazing work.
Sunday, December 18, 2011
Too much shopping...er, fun, at the Dickens Fair
Last weekend was my yearly visit to the Great Dickens Christmas Fair in San Francisco. My costume was the same old, same old 1868 gown I've had for years, so I'm not going to talk about that. Instead, I'm going to talk about the lovelies I bought during my visit!
For several years I've admired the feather arrangements and ornaments by PiumaMia Feather Creations. This year, I decided I wanted a feather ornament to put in my hair for the office holiday party. I picked out this collection of blue feathers, flowers, and clear crystals.
But buying one gave me the encouragement, for better or worse(!), to buy another! So I also bought this large arrangement with red cock feathers, peacock eyes, black ostrich plumes, red flowers and copper leaves. This one works great at so many different angles.
I also paid a visit to Morgyn Owens-Celli of Strawbenders, and picked up this utterly FABULOUS straw hat. It's a modern design, but I find that it works for 1900 or 1930 or 1940 or 1950, depending on how I wear it. I really need to get photos of it on my head, but wasn't set up to take proper photos.
Unrelated to shopping, my 1830s bonnet also had its first outing, on the head of my friend Sahrye (this is her blog, check it out, she's extremely talented and creative!)
Sahrye made her FABULOUS late 1830s gown, inspired by the movie "Young Victoria." Read more about this amazing gown at her blog, It Came From The Stash!.
For several years I've admired the feather arrangements and ornaments by PiumaMia Feather Creations. This year, I decided I wanted a feather ornament to put in my hair for the office holiday party. I picked out this collection of blue feathers, flowers, and clear crystals.
![]() | |
| Hair clip in shades of blue and clear crystals, by PiumaMia Feather Creations. |
![]() |
| Red and black feather clip or pin by PiumaMia Feather Creations. |
I also paid a visit to Morgyn Owens-Celli of Strawbenders, and picked up this utterly FABULOUS straw hat. It's a modern design, but I find that it works for 1900 or 1930 or 1940 or 1950, depending on how I wear it. I really need to get photos of it on my head, but wasn't set up to take proper photos.
![]() |
| Straw and feather hat by Strawbenders. |
Unrelated to shopping, my 1830s bonnet also had its first outing, on the head of my friend Sahrye (this is her blog, check it out, she's extremely talented and creative!)
![]() | |
| The very talented Sahrye, in a late 1830s gown by her, and wearing my 1830s bonnet. |
Sahrye made her FABULOUS late 1830s gown, inspired by the movie "Young Victoria." Read more about this amazing gown at her blog, It Came From The Stash!.
Sunday, August 7, 2011
Costume Collge Recap
Costume College ended nearly a week ago, and I've been so abominably busy that I haven't had time to write about it! Of course, it was a BLAST. There is nothing quite equal to a full weekend spent among fellow costumers. I always come away overwhelmed by the creative energy, and with sore cheeks from continually grinning at the fabulousness I see everywhere.
Classes: I managed to land FOUR limited attended classes, but while I learned some new and nifty things, I've decided that trying to get as many limited classes as possible is not the best Costume college strategy. I missed some really great unlimited classes, and also missed circulating and socializing (my favorite Costume College activity). I also taught a class this year, which made me too anxious to enjoy a class or two beforehand (but I'm not dissuaded from teaching again next year).
But anyway, here's what I created over the weekend.
Friday I spent the whole deal making a pair of Medieval turnshoes with instructor Kathryn Wolters.
The uppers are microsuede, I believe, the soles are leather, and the interior is cotton or a cotton blend. The tiny buckle is hand-cast pewter. They're built over three-quarter insoles, because my feet would hate me if I ran around in these with no support.
I would have finished these in class, but was stymied by the silly little straps. The last bit only took a few more minutes after class.
Saturday mid-day I took Boutis Provençal with Natalie Meyer. This is a technique similar to trapunto, but it leaves no holes in the back of the fabric. It was new to me, and I picture interesting possibilities with it.
This I did not finish until several days after Costume College, and it took a very long time, despite that it's only about five inches square. I'll probably work this sampler into a thrown pillow or hand bag in the future.
Saturday afternoon I taught my class, Basic Lucet Weaving. It went...ok, I suppose. It could have gone better, and I got some ideas about how to do it better next time.
Sunday morning...early...I took Medieval and Renaissance Thread-Covered Buttons with Christine Megowan.
Sunday afternoon I took Make a Calash Bonnet with Janea Whitacker.
Unfortunately, this is exactly as far as I got. With only about three hours of class time, and doing all stitching by hand (and running in and out to collect my display from the exhibit room and visit the dealer room), I only managed to finish two channels and to attached the lining (pink) to the exterior (green). Oh well, onto the "to-do" pile it goes.
Classes: I managed to land FOUR limited attended classes, but while I learned some new and nifty things, I've decided that trying to get as many limited classes as possible is not the best Costume college strategy. I missed some really great unlimited classes, and also missed circulating and socializing (my favorite Costume College activity). I also taught a class this year, which made me too anxious to enjoy a class or two beforehand (but I'm not dissuaded from teaching again next year).
But anyway, here's what I created over the weekend.
Friday I spent the whole deal making a pair of Medieval turnshoes with instructor Kathryn Wolters.
![]() |
| Medieval Turnshoes. |
I would have finished these in class, but was stymied by the silly little straps. The last bit only took a few more minutes after class.
Saturday mid-day I took Boutis Provençal with Natalie Meyer. This is a technique similar to trapunto, but it leaves no holes in the back of the fabric. It was new to me, and I picture interesting possibilities with it.
![]() |
| Boutis Provençal sampler. |
Saturday afternoon I taught my class, Basic Lucet Weaving. It went...ok, I suppose. It could have gone better, and I got some ideas about how to do it better next time.
Sunday morning...early...I took Medieval and Renaissance Thread-Covered Buttons with Christine Megowan.
![]() |
| From left to right: vertical wrap, horizontal wrap with half-exposed spines, basket woven,outside loop, inside loop (names made up by me). |
![]() |
| Pieces of a calash bonnet. |
Thursday, June 30, 2011
A Rose By Any Other Name...is Called Ribbon
One more jump back in time: late February, 2011. I decided I wanted to learn to make ribbon flowers. After a little experimenting, I grabbed some 3" wide double-sided ribbon and made these:
The wider the ribbon, the bigger the flower! These monsters measure about 8" across. That's my hand in the second photo, to give you an idea of just how large these are.
I bought this ribbon while in China last year, to decorate a 1900s Edwardian wireframe hat. More on that, soon....
1886 Hat and Handbag
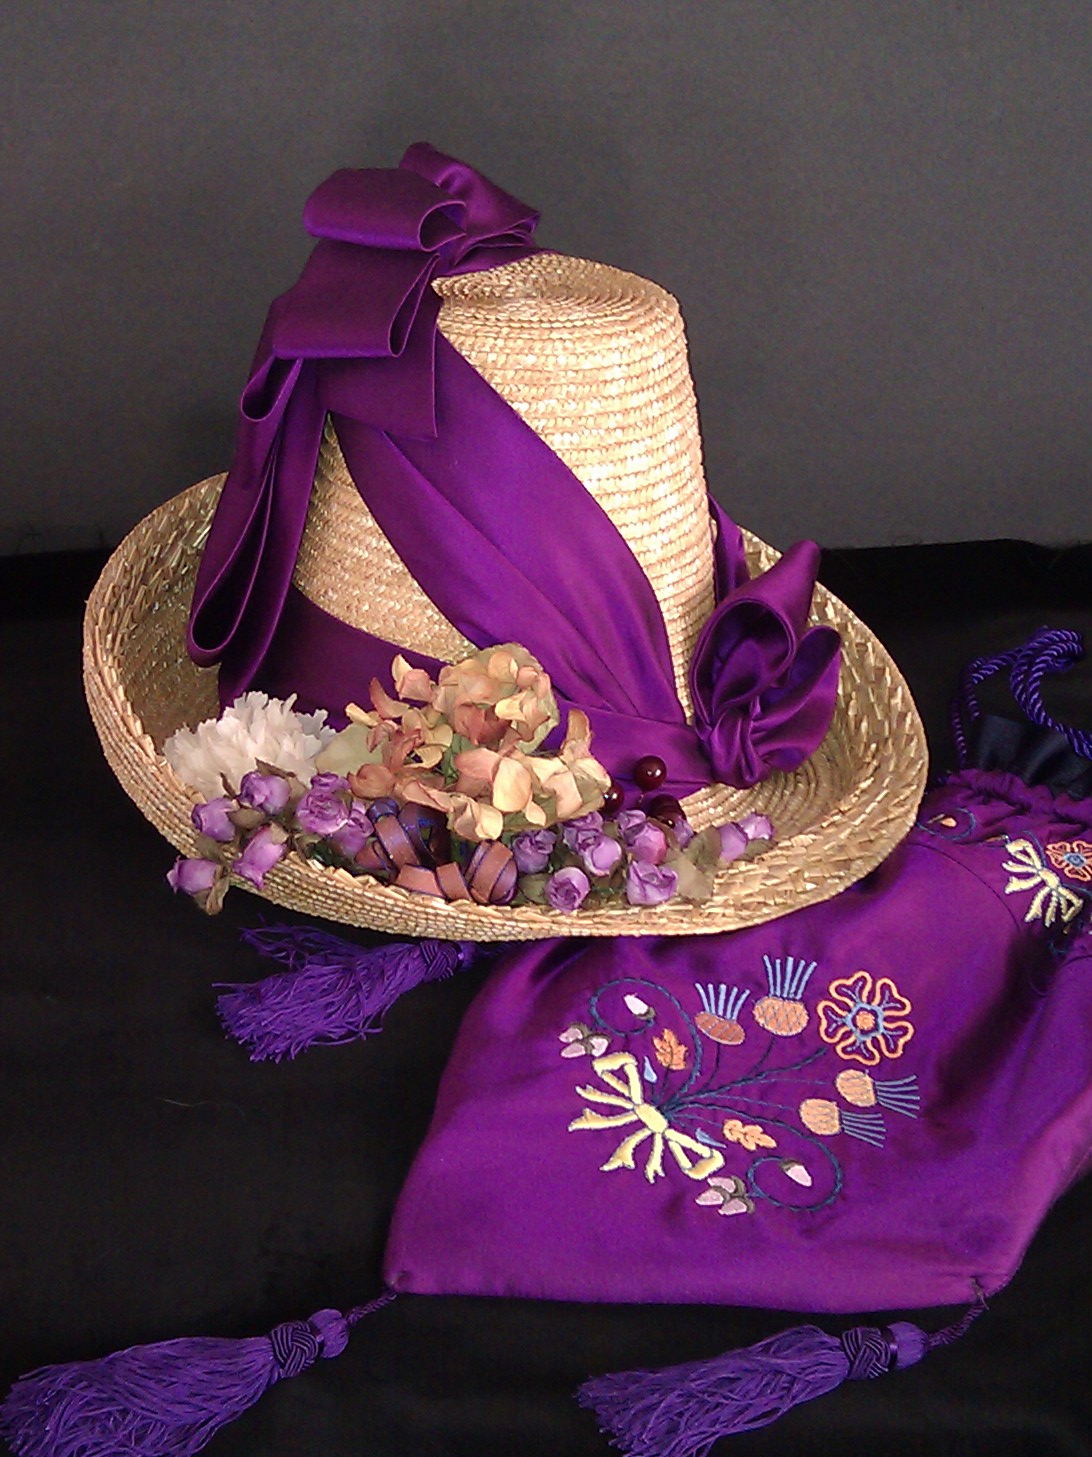
I'm going to start by hopping around a bit, chronologically speaking, working backwards through projects I've completed recently before going forwards with stuff I'm working on now. First up is a hat and matching handbag from 1886, completed in May, 2011.
I have a summer gown for 1886, completed in 2008. I've always wanted an "upside down flower pot" style hat for this outfit. It is now 2011 and I still didn't have a hat. So, I commission my friend (and I like to say, mentor) Lynn McMasters to make me a hat. I sent her some purple flowers that I had bought 2 years ago for this hat, and this illustration from Godey's Lady's book; it's from the 1880s, but I don't have an exact date:
and this is the result:
Lynn custom blocked the crown separate from the brim, then attached them to each other. She then applied straw that was woven into points. All I have to say is: SQUEEEEEEE!!! It's perfect. :)
When Lynn gave me the hat, she also gave me extra pieces of the purple sateen. I figured there was enough to make a simple handbag, which is something else this outfit really needed. And, of course, I'm never able to leave well enough alone, so I covered it with a purchased machine embroidery pattern:
It's lined with purple linen left over from the gown's underskirt. The tassels and cord I already had from an earlier, aborted attempt to making a handbag like this. The bottom edge is wired, so that it maintains the triangular shape.
Projects rarely ever (some would say never) go together exactly like you want. Every project teaches me something, how to do something right, or how to not do something again. This handbag, made in a mad rush over just a few hours, definitely taught me a few things. So, here's my first installment of "lessons learned:"
What worked:
Hmmm...well, it holds all my stuff.
What didn't work (so well):
1. It's BIG. It's more like a small workbag than a handbag.
2. For fabric I had only two corners with a long diagonal cut, and two wide bias strips. I decided the corners by themselves wouldn't make a big enough bag (see bullet #1), so pieced the bias strips to the diagonal cut...but only after I embroidered the bias strips. Lesson learned: the embroidery might have gone maybe slightly better if I had pieced before doing the embroidery.
The bias strips were too narrow for any embroidery hoop I have, so I used a Magna Hoop (which I've had for years, and this was the first time I've used it). The hoop did a decent job hold down the ends of the strip, but the fabric still pulled above and below the flowers, where the hoop wasn't really holding it. The side I call the "front" looked ok after a good pressing, but on the side I call the "back" some of the colors misaligned. Lesson learned: I probably would've gotten better results if I had basted the fabric to the stabilizer.
OH WELL. The bag is done, and does it's job just fine.
I have a summer gown for 1886, completed in 2008. I've always wanted an "upside down flower pot" style hat for this outfit. It is now 2011 and I still didn't have a hat. So, I commission my friend (and I like to say, mentor) Lynn McMasters to make me a hat. I sent her some purple flowers that I had bought 2 years ago for this hat, and this illustration from Godey's Lady's book; it's from the 1880s, but I don't have an exact date:
![]() |
| Godey's Lady's Book, 1880s |
Lynn custom blocked the crown separate from the brim, then attached them to each other. She then applied straw that was woven into points. All I have to say is: SQUEEEEEEE!!! It's perfect. :)
When Lynn gave me the hat, she also gave me extra pieces of the purple sateen. I figured there was enough to make a simple handbag, which is something else this outfit really needed. And, of course, I'm never able to leave well enough alone, so I covered it with a purchased machine embroidery pattern:
It's lined with purple linen left over from the gown's underskirt. The tassels and cord I already had from an earlier, aborted attempt to making a handbag like this. The bottom edge is wired, so that it maintains the triangular shape.
Projects rarely ever (some would say never) go together exactly like you want. Every project teaches me something, how to do something right, or how to not do something again. This handbag, made in a mad rush over just a few hours, definitely taught me a few things. So, here's my first installment of "lessons learned:"
What worked:
Hmmm...well, it holds all my stuff.
What didn't work (so well):
1. It's BIG. It's more like a small workbag than a handbag.
2. For fabric I had only two corners with a long diagonal cut, and two wide bias strips. I decided the corners by themselves wouldn't make a big enough bag (see bullet #1), so pieced the bias strips to the diagonal cut...but only after I embroidered the bias strips. Lesson learned: the embroidery might have gone maybe slightly better if I had pieced before doing the embroidery.
The bias strips were too narrow for any embroidery hoop I have, so I used a Magna Hoop (which I've had for years, and this was the first time I've used it). The hoop did a decent job hold down the ends of the strip, but the fabric still pulled above and below the flowers, where the hoop wasn't really holding it. The side I call the "front" looked ok after a good pressing, but on the side I call the "back" some of the colors misaligned. Lesson learned: I probably would've gotten better results if I had basted the fabric to the stabilizer.
OH WELL. The bag is done, and does it's job just fine.
![]() | |
| At GBACG's "Renoir's Boating Picnic", 11 June 2011 |
Subscribe to:
Posts (Atom)