Showing posts with label 18th century. Show all posts

Monday, August 13, 2018

Fly Fringe Redux

Clever and talented butterball_bunny has been posting pics on Instagram of fly fringe she's making, so now I have fly fringe on the brain.

I started some fly fringe AGES ago...maybe three years ago?

Some bow tie flies made from Japanese cotton floss.

I thought I had silk floss, but if I do I have no idea where it's go to. The flies pictures above are made from Japanese cotton. It takes a lot of work to make the flies super fluffy, so this is not really a great material for fly fringe.

Some flies I made today, along with my bone tatting shuttle.

I'm also trying to figure out how to use a tatting shuttle to put the knots where I want them. I don't recall where or when I got this bone shuttle -- probably Costume College some years ago -- and I've never tatted a darn thing.

The plan is to eventually weave these bow tie flies into a tape. Naturally, I've picked a style of fly that will requires dozens upon DOZENS for even a yard of fringe. Stay tuned.

What's up with this blog: oy, it's been a very, very long time since I've added anything to this blog. Truth is, I'm just not a very good blogger. The other truth is that my creative endeavors have become even more sporadic and random than ever. I post (sporadically) on Instagram, so hop on over there if you're curious about what I've been up to.

Saturday, August 29, 2015

House Cleaning

I think that I'm a typical costumer, in that, over time, I've accumulated a lot of costuming "stuff." I managed to clear out a few things at the GBACG Costumers Bazaar last weekend, but still have many extra bits that need to go. So, I've set up shop at Bonanza, and listed many costuming accessories, including some of the things you see below. A link to my Bonanza shop also appears in the pane on your right.

Here's a preview of some of the things I've listed. Funnily enough, they're pretty much all left from workshops I've taken or taught.

Edwardian-style parasol.

18th century embroidered neckerchief.

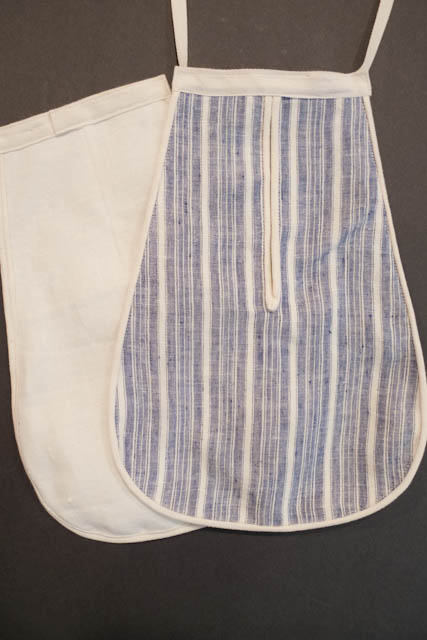
18th century fancy pocket.

18th century fancy pocket.

18th century linen pocket.

18th century linen pocket.

18th century linen pocket.

What is Bonanza:
Bonanza advertises itself as an alternative to eBay. I find that it's a bit more of a cross between eBay and Etsy. It's a marketplace for folks like you and me to buy and sell stuff. Like Etsy, sellers set up a shop.

Why am I using Bonanza:
Frankly, Bonanza has a much simpler and affordable fee structure than eBay or Bonanza. I'm not a very active seller, and it can take me a long time to sell things. So I chose to use Bonanza because listing and maintaining listings for a long time is easy and affordable.

Saturday, July 5, 2014

These are not the trimmings I meant (French Gown c. 1780)

Now for a post about something I did actually make myself.

Zone Front French Gown c. 1780. Trimmed with floral garlands for Bal Di Carnivale.

In late 2013, the Greater Bay Area Costumer's Guild (GBACG) announced that in February it would host a Carnivale themed Venetian ball. I decided this was the excuse I needed to make a French gown that I planned years ago.

The gown is loosely based on this well-known, pink and frothy number house at the Kyoto Costume Institute (KCI):

French Gown c. 1780. Kyoto Costume Institute.
This gown is interesting because it has a zone front. It's the only sacque-back gown I'm aware of that has a zone front. The floral decorations are interesting as well, and are apparently painted silk.

The ribbon is wired, so to make it fit pulled the wire to gather it in strategic places.

I made my version out of a purple and gold striped damask, and used the pattern I had developed for the red french gown I made a few years ago. That saved loads of time. I don't remember the last time I had a dress go together so fast.

I got the stripes symmetrical, but didn't try to match the back of the neckline.

Yet I still ran out of time to  make and attached the trimmings, which were also supposed to be loosely based on the KCI gown, though embroidered instead of painted. A week before the event I decided that there was no way I was going to get the trims done (and still sleep and go to work). So, I trotted off to Michael's, the craft store. I bought four plastic floral garlands, several handfuls of plastic floral sprigs, and several spools of gold wired ribbon, and got creative.


The trimmings are plastic floral garlands and sprigs, creatively safety-pinned on.

Because 1) I was in a hurry, and 2) I wanted to be able to get these garlands off easily later, everything is attached with safety pins.

The bodice front closes with two hook sand bars.

The ribbon was safety-pinned also.
The original pattern is JP Ryan's, and I've deviated from the pattern's instructions by skipping the back lacing (I put in a big tuck) and using lacing strips.

The front laces under the stomacher, as according to the pattern.

I also wanted to be able to get into it mostly by myself, so the stomacher is tacked on on one side, and attaches with hooks and bars on the other side.

The stomacher is tacked to the bodice on one side, and attaches with hooks and bars on the other side.

Finally, I had wanted to make new sleeve ruffles, but...you know...ran out of time. So I put on my old faux-whitework sleeve ruffles.


My old faux-whitework sleeve ruffles finished the gown.

I will some day finish the trims I had planned, as well as the sleeve ruffles (I'm going to attempt machine whitework on mesh). I've already taken all the trims off, now just need to find the time to finish the embroidery and get it stitched on.

I also styled a new wig for this outfit, and will have to do a post on it later.

Here's a few pics of the gown in action.


Saturday, October 22, 2011

Paddle Loom

It's been dreadfully and boringly quiet here. Truth is, I haven't been working on anything new. So, instead I'll talk about something old.

Back in September of 2010 I acquired a paddle loom.

Paddle loom with matching shuttle, made from
curly maple. It technically doesn't have a "paddle"
because I wanted it to be as short as was practicable.
I got the idea from Janea Whitacker from Colonial Williamsburg. At Costume College 2010, she had a box loom with her. I decided I wanted something that took up less space, so opted for just the standalone heddle, generally called a paddle loom. The paddle loom also allowed me to have more "dents" (the slots and holes), since the box looms I found used narrower heddles. Mine was made by Jonathan Seidel (http://www.jkseidel.com/) and is a gorgeous curly maple.

I set to weaving what I had on hand: DMC pearl cotton and DMC cotton 6-ply embroidery floss.

First (or second?) experiment. DMC pearl cotton
warp and weft, using 15 warps. The resulting tape
is about 3/8" wide.
My first experiments used 13 and 15 warps, and I experimented with different numbers of plies for the weft. I also experimented with different warp patterns.

The upper tape is DMC pearl cotton warp and weft. The lower
tape is DMC 6-ply embroidery floss (using random
colors I wanted to get rid of). I used a full 6 plies for the weft.
So what can you weave with a paddle loom? I wove myself a pair of stocking garters.

A pair of stocking garters, in three shades of pink.
Yes, they only match in color, and mismatch in weave. I couldn't resist trying a different warp pattern for each one. These are about 41 warp threads wide, making them about 3/4" wide. With that many warp threads, the challenge with a paddle loom is to keep the tensions even. I invented a setup that lets me control the warp tension, and eventually I'll have to do a blog writeup about it. Here I also used 3 plies for the warp, which made the tape flatter.

These are made from DMC 6-ply embroidery floss. For the
weft I used 3-ply. They have 41 warp threads (I think)
and are about 3/4" wide.
I've used these garters a couple of times now, and they do work quite well.

The one thing I haven't succeeded at yet is doing a pick-up pattern. I really want to try this one from  WeaveZine. I think pick-up patterns work best if one uses different weights for the warp threads an so far I haven't had a chance to try it. But someday....

I surfed the web a bit in writing this post, and see that there are some great looking table-top looms available. Box looms (as seen on Jonathan Seidel's website) and paddle looms like mine have some historical backing, so if you're interested in doing historic demonstrations, those might be more appropriate. If you want to be able to weave wider wares, you may want to consider a table-top loom. If you really just want to save space (like I do) and maybe also some money, go for the paddle loom.

Sunday, October 2, 2011

18th Century Embroidered Pockets - On Etsy

I just listed four pairs of embroidered pockets on Etsy.


These are what were left from a workshop I lead at Costume College 2009, in which the class made pairs of pockets. I offered embroidered fronts as an option, and what the students didn't take I sold to friends and fellow costumers. These four have been sitting around as unfinished panels since then, and since I'm in a fit of housecleaning, I made them up and now they're on Etsy. Stop by and take a look...tell your friends...these gotta go!

If you're curious what all the designs looked like, I have a gallery of them at my website. I don't have current plans to produce any more of these — but you never know where my short attention span may land....

Sunday, August 7, 2011

Costume Collge Recap

Costume College ended nearly a week ago, and I've been so abominably busy that I haven't had time to write about it! Of course, it was a BLAST. There is nothing quite equal to a full weekend spent among fellow costumers. I always come away overwhelmed by the creative energy, and with sore cheeks from continually grinning at the fabulousness I see everywhere.

Classes: I managed to land FOUR limited attended classes, but while I learned some new and nifty things, I've decided that trying to get as many limited classes as possible is not the best Costume college strategy. I missed some really great unlimited classes, and also missed circulating and socializing (my favorite Costume College activity). I also taught a class this year, which made me too anxious to enjoy a class or two beforehand (but I'm not dissuaded from teaching again next year).

But anyway, here's what I created over the weekend.

Friday I spent the whole deal making a pair of Medieval turnshoes with instructor Kathryn Wolters.

Medieval Turnshoes.
The uppers are microsuede, I believe, the soles are leather, and the interior is cotton or a cotton blend. The tiny buckle is hand-cast pewter. They're built over three-quarter insoles, because my feet would hate me if I ran around in these with no support.

I would have finished these in class, but was stymied by the silly little straps. The last bit only took a few more minutes after class.

Saturday mid-day I took Boutis Provençal with Natalie Meyer. This is a technique similar to trapunto, but it leaves no holes in the back of the fabric. It was new to me, and I picture interesting possibilities with it.

Boutis Provençal sampler.
This I did not finish until several days after Costume College, and it took a very long time, despite that it's only about five inches square. I'll probably work this sampler into a thrown pillow or hand bag in the future.

Saturday afternoon I taught my class, Basic Lucet Weaving. It went...ok, I suppose. It could have gone better, and I got some ideas about how to do it better next time.

Sunday morning...early...I took Medieval and Renaissance Thread-Covered Buttons with Christine Megowan.

From left to right: vertical wrap, horizontal wrap with half-exposed spines, basket woven,outside loop, inside loop (names made up by me).
Sunday afternoon I took Make a Calash Bonnet with Janea Whitacker.

Pieces of a calash bonnet.
Unfortunately, this is exactly as far as I got. With only about three hours of class time, and doing all stitching by hand (and running in and out to collect my display from the exhibit room and visit the dealer room), I only managed to finish two channels and to attached the lining (pink) to the exterior (green). Oh well, onto the "to-do" pile it goes.

Monday, July 25, 2011

Mid-1800s Wig

I spent a few hours yesterday styling this half-wig.


I don't really know how to work hair, and this is NOT what I set out to make. I'm starting to hate doing hair. I'm afraid it'll all fall apart if I try it on. Argh. Ok, whiney rant over.

My goal was to make something smaller than what I wore at Evening at Le Petit Trianon. Yes, I've been so busy that I forgot to do a segment on that wig. My friend Gailynne constructed it, and it's awesome both in appearance and scale! I'll chat it up when I get back from Costume College.

This is a half-wig, so it sits behind the hairline, and that hump will be on my head about where it is on the block. I read up on styling in Vintage Hairstyling by Lauren Rennells (specifically, how to create a '60s beehive and '40s "victory rolls").


Bleh. This wig looks like DUDE hair. Seriously. Rant over.

Thursday, July 21, 2011

What's Underneath: Half-Boned Stays c. 1760

The last layer underneath my 1750 Court Gown is a set of stays (more photos here):


Yes, I KNOW the lowest layer should be a shift...I don't have one...it's on the list...I'll get to it eventually!!!

Front laced stays are not common, but not unheard of. My old stays lace in back only, and are fully boned, so this was an attempt to do something completely different. Front lacing really does make putting this on super easy.

I started with the Butterick pattern, 4254, because the shape of the pieces are, essentially, documentable. I suspect this pattern is based on an illustration in Norah Waugh's Corsets & Crinolines but I don't have the book handy, and can't check.

Aside from the the approximate correct shape of the pattern pieces, the pattern was BAD. It had the typical "Big 3" problem, in that for my measurements it expects to be worn with back edges touching. The bigger problem, though, was that it's extremely short. My body runs a tiny bit short from bust to waist to hip, and it was waaay to short for me. I started with one size smaller than the pattern recommended, added length, removed tabs, moved the shoulder tabs...it's not really the same pattern anymore. I went through three mockups (and one expert fitting consultation) before I was satisfied.


It's made of two layers of linen canvas, heavily starched, and one layer of what I think is an upholstery linen (it's quite thick ).To get the look of hand-stitched channels, I used a heavy linen thread on the exterior (35/2 from Burnley and Trowbridge), lighter cotton thread for the bobbin. I used the same heavy linen thread for the eyelets.The boning is "artificial whalebone" (aka German Plastic).


The binding is natural pigskin.

Since I'm teaching a class on lucet weaving at Costume College this year, I felt I had to put rubber to the road, so the speak. So, the straps and front of the stays are laced with standard lucet cord, made from cotton crochet cord, and the back is laced with double lucet cord. I think the cord is certainly sturdy enough for this application...I just need to get all the stretch out.


I feel like I've been making these stays for 10 years...that's when I bought the tomato red linen that makes up the exterior. They have, of course, evolved in those years (for instance, I had originally planned to hand stitch the whole thing, and Butterick 4254 didn't even exist back then) and despite making the first mock-up two years ago, it took me until March of this year to actually CUT the red linen. Costumer's sewing block? Nah, I've just had so many other things to do, and have a great set of stays already...but the old stays has issues...hence, new stays!

Wednesday, July 20, 2011

What's Underneath: Quilted Petticoat and Pannier c. 1750

Egads, I have a lot going on in the next two weeks! But I have two more posts related to the 1750 Court Gown, so I'll get them out lickity-split.

Here are the pannier and quilted petticoat that go under the gown. First, the pannier (these and more photos here):


For a pattern I used the illustration in Jean Hunnisett's Period Costume for Stage & Screen: Patterns for Women's Dress 1500-1800. I did shorten it, since apparently I'm not as tall as the typical stage actress.


The fabric is silk taffeta, flat-lined it with a heavy weight silk organza. The hoops are modern hoopsteel; I would have like to use a natural, period material (such as basket cane) but that was proving to be too much of a pain, so I gave up.

Control ties and hoop channels.
The hoop channels, waistband, ties, and trims around the ruffle are all polyester ribbon, either grosgrain or double-faced satin, in the same shade of blue. I tried to find a silk ribbon that matched the blue stripe in the fabric, but this poly ribbon was the best match I could find. C'est la vie.

Hem ruffle and trim.
The bows along the ruffle are "butterfly pull bows." When I was a kid, I had some pull bows for gift wrapping. A little of 'net surfing (first to figure out what the heck these bows were called), and I reverse engineered how to make them. I made mine with just four loops; commercial gift wrap bows have eight to twelve. The bows come off, too. I just used the pull ties to tie them onto loops stitched onto the pannier.

This is my tester, so it's sloppy.
Inside are two pull ties.
Pull the ties and gather up the main ribbon.
And we have a bow!


Side hook.
I made the pannier to be tied on, but it's really difficult to tie it on tight enough on my dress form (it would be a little easier on the body, because I can sit down and thus alleviate the weight). So, on each side, I tied a loop in the back tie and tied a heavy hook onto the front tie. Problem solved! It' much easier to put on that way.

Bum pad.

Hunnisett suggests putting a pad in the back, so I gave it a shot. The effect is to tilt the pannier back, and I liked it, because it made the front of the pannier flatter.


Over the pannier goes a quilted petticoat (more photos here):


It's made from a single king-sized quilt, and yes, it's a little short but it does it's job (hiding the ridges made by the pannier's hoops) so I can't be bothered.


Period quilted petticoats don't have batting from hem to waist; the batting normally ends a few inches below the waist. I find this quite logical, because it makes the waist less chunky, and easier to pleat into the waistband. So, I pulled the quilting stitches out of the top of each panel, removed the batting, then re-quilted the area. Yeah, seriously tedious. But I'm very pleased with the result. I also removed the batting from the seam allowance at the side seam, before doing a modified fell seam.


The quilted petticoat is easily the heaviest part of the whole garment, heavier than the pannier. But it does give the gown an excellent shape and look, and, really, well fitted stays help to carry the weight.