Showing posts with label victorian. Show all posts

Sunday, December 28, 2014

New York Society Tea 2014

Yesterday the Greater Bay Area Costumer's Guild hosted its not-quite-annual New York Society Tea at The Palace Hotel, San Francisco. This event is often also called the Bustle Tea, since the time frame is late Victorian. No fewer than two of my sewing buddies have birthdays between Christmas and New Years, and both of them wanted to be costumed for their birthdays. So we decided to make this year's tea a bit of a birthday party.

An afternoon spent with my gal pals, in costume, is always a blast, even more so after going nuts for weeks on end getting a new frock ready. More on that later.

But who wants to read me talking? Just enjoy the photos!

The two birthday girls, Ms. G and Sahrye.
Noelle and Mia.
Ms. D and Ms. H.
Total attendance was something near 50.
Mr. Hal and your friendly neighborhood blogger.
Birthday girl, Sahrye.

You may recognize Sahrye's dress as Mina Harker's dress from Bram Stoker's Dracula. Sahrye did an awesome version of the dress. She blogs over at It Came From the Stash! Head over there to read more about this fantastic dress.

I love Mia's dress above for how absolutely period it looks. Small wonder, here's the dress she used as a model:
Victorian Wedding Dress  Date: 1879 Culture: American Brooklyn Museum Costume Collection at The Metropolitan Museum of Art, Gift of the Brooklyn Museum, 2009; Gift of Mrs. Thomas W. Hotchkiss, 1939
Dress, 1879, at the Metropolitan Museum of Art.


Ms. H provides our obligatory anachronistic moment.
Tea was followed by shenanigans in the bar.
Lastly, here's yours truly.

More chit-chat on this dress (and what is up with my hair) will come later. Right now I need to rescue my house from multiple weeks of frantic sewing.

Wednesday, December 24, 2014

Button Confessions

I confess: I love covered buttons.

Well, truthfully, I love all fussy, hand made buttons. But since I have an embroidery machine, covered buttons are the easiest for me to make quickly.

Here's a set I stitched up last weekend:

Embroidered covered buttons, ready to cut out. I made more than I think I need because there was space in the hoop. And it never hurts to have spare.
My plan was to make these up using the technique I learned from Nancy Nehring and her book, but I only had twelve period accurate bone button molds. In the above photo you can see that I planned for twenty buttons. So I got a bunch of who-cares-what-they-look-like, slightly domed plastic buttons and went to town. Best to save my bone molds for when the center hole matters.

Instead of more authentic bone molds, I used cheap plastic buttons to cover.
I've used the packaged covered button kits in the past, with both fantastic and disastrous results. The old-fashioned technique, though, has given me consistent results, so I stuck with that.

Clip, clip, stitch, stitch. These go together pretty quick, for me at least.
It took me less than a day (stitching around my full time job) to make all 26 buttons.

Seriously awesome, right? And really easy.

These buttons are going onto my current project, which is getting its first wearing at the GBACG New York Society Tea next weekend. A full post on the outfit will come. Stay tuned!

Thursday, June 30, 2011

1886 Hat and Handbag

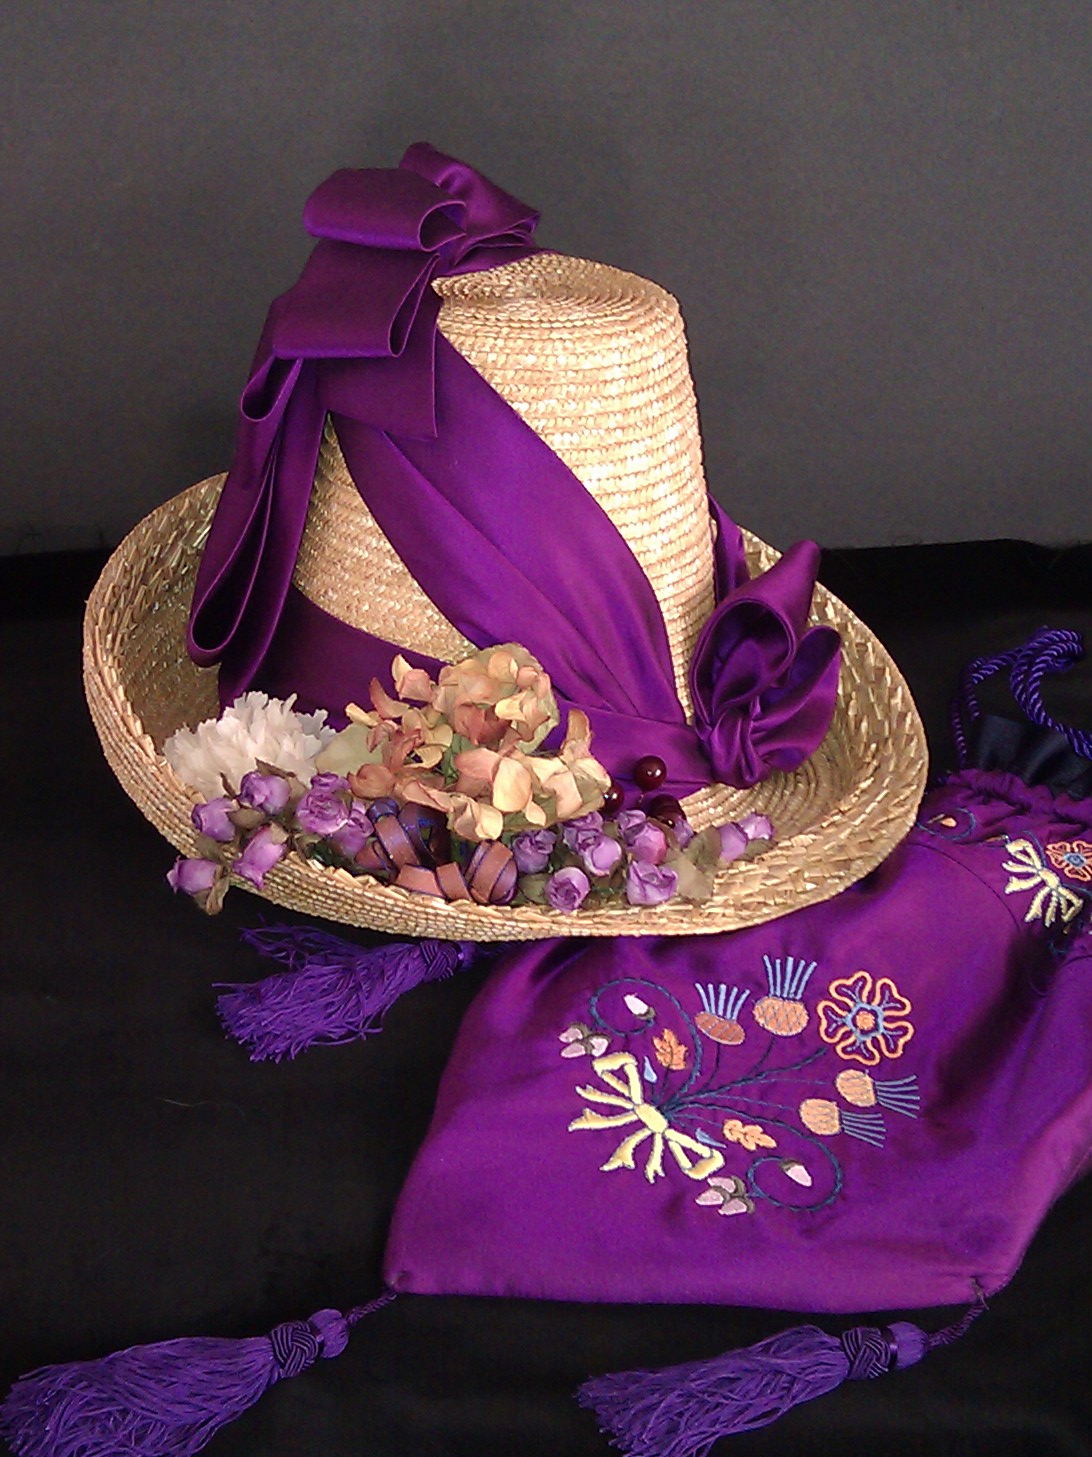
I'm going to start by hopping around a bit, chronologically speaking, working backwards through projects I've completed recently before going forwards with stuff I'm working on now. First up is a hat and matching handbag from 1886, completed in May, 2011.


I have a summer gown for 1886, completed in 2008. I've always wanted an "upside down flower pot" style hat for this outfit. It is now 2011 and I still didn't have a hat. So, I commission my friend (and I like to say, mentor) Lynn McMasters to make me a hat. I sent her some purple flowers that I had bought 2 years ago for this hat, and this illustration from Godey's Lady's book; it's from the 1880s, but I don't have an exact date:

Godey's Lady's Book, 1880s
and this is the result:


Lynn custom blocked the crown separate from the brim, then attached them to each other. She then applied straw that was woven into points. All I have to say is: SQUEEEEEEE!!! It's perfect. :)

When Lynn gave me the hat, she also gave me extra pieces of the purple sateen. I figured there was enough to make a simple handbag, which is something else this outfit really needed. And, of course, I'm never able to leave well enough alone, so I covered it with a purchased machine embroidery pattern:


It's lined with purple linen left over from the gown's underskirt. The tassels and cord I already had from an earlier, aborted attempt to making a handbag like this. The bottom edge is wired, so that it maintains the triangular shape.

Projects rarely ever (some would say never) go together exactly like you want. Every project teaches me something, how to do something right, or how to not do something again. This handbag, made in a mad rush over just a few hours, definitely taught me a few things. So, here's my first installment of "lessons learned:"

What worked:

Hmmm...well, it holds all my stuff.

What didn't work (so well):

1. It's BIG. It's more like a small workbag than a handbag.

2. For fabric I had only two corners with a long diagonal cut, and two wide bias strips. I decided the corners by themselves wouldn't make a big enough bag (see bullet #1), so pieced the bias strips to the diagonal cut...but only after I embroidered the bias strips. Lesson learned: the embroidery might have gone maybe slightly better if I had pieced before doing the embroidery.

The bias strips were too narrow for any embroidery hoop I have, so I used a Magna Hoop (which I've had for years, and this was the first time I've used it). The hoop did a decent job hold down the ends of the strip, but the fabric still pulled above and below the flowers, where the hoop wasn't really holding it. The side I call the "front" looked ok after a good pressing, but on the side I call the "back" some of the colors misaligned. Lesson learned: I probably would've gotten better results if I had basted the fabric to the stabilizer.

OH WELL. The bag is done, and does it's job just fine.

At GBACG's "Renoir's Boating Picnic", 11 June 2011