Showing posts with label handbags. Show all posts

Tuesday, November 25, 2014

Early 20th Century Fat Bottom Purses

OK, I confess, I'm a lazy blogger.

I haven't posted in a while, not because I've been too busy to craft, but because I just haven't felt like it. I know, terrible. In fact, I've been ding quite a lot of crafting, mostly knitting and on and off mad sewing.

Here's something I finished since my last post: a pair of silk clasp purses that I've assigned to the early 20th century.

Silk purses with brass clasps and chains.
I got it into my head to make a clasp purse over -- *ahem* -- two and a half years ago. I need more period hand bags, and I hadn't made a purse on a frame before.

They're shaped with a fat bottom to accommodate plenty of stuff.
I was enamoured with a fat bottom shape, and made these large enough for my on-the-large-side phone.

It fits a sub-phablet phone in a bulky case.
Of course the clasp had to be big enough, too.
Yes, my phone is a Tardis. It's bigger on the inside.
So, I bought the materials and embroidered the sides, and (like many of my projects) put them aside.

Fast forward to last fall, and I'm trying to clear off my work table. I finally sat down and threw these together. Though after so long, and despite having the pattern I drew handy, I forgot that I had given them a 3/8" seam allowance. So, well, their shape is not exactly what I had intended.

Exterior is duchess silk. Interior is taffeta. Brass frame and chain, rayon embroidery, glass beads.
The outsides are duchess silk and the insides are taffeta. The clasp and chain are brass and the embroidery is rayon.


The one without the fringe is going to Lynn McMasters, who made the beaded fringe.

One unfinished project done, umpteen more to go!

Thursday, June 30, 2011

Let's call it a 1920's Ribbon Handbag

Jumping back in time again, to the beginning of March 2011: I found a really cute vintage handbag on etsy.com. The seller said it was from the 1920s, so I'm just going with that.

It sold while I was waffling over buying it.

Hmph, well I WANTS, it. I have a ton of 1 and 1/2" wide, blue double-sided satin ribbon leftover from another project. I paired it with white double-sided ribbon, and made this:


My version is taller than the original (I like to have plenty of room for my crap). The base of the original looks egg-shaped to me, but mine is just an oval.

The ribbons in the original were probably stitched together by hand. I used a stitch on my machine that resembles a feather or fern stitch:


Now, dummy me used a tearaway stabilizer for this; tearing the stabilizer out caused the stitches to distort! Lesson learned: I could've used a washaway stabilizer. It's poly ribbon. IT CAN GET WET.

P.S. this last photo also shows that I completely flubbed making french knots. Sheesh.


1886 Hat and Handbag

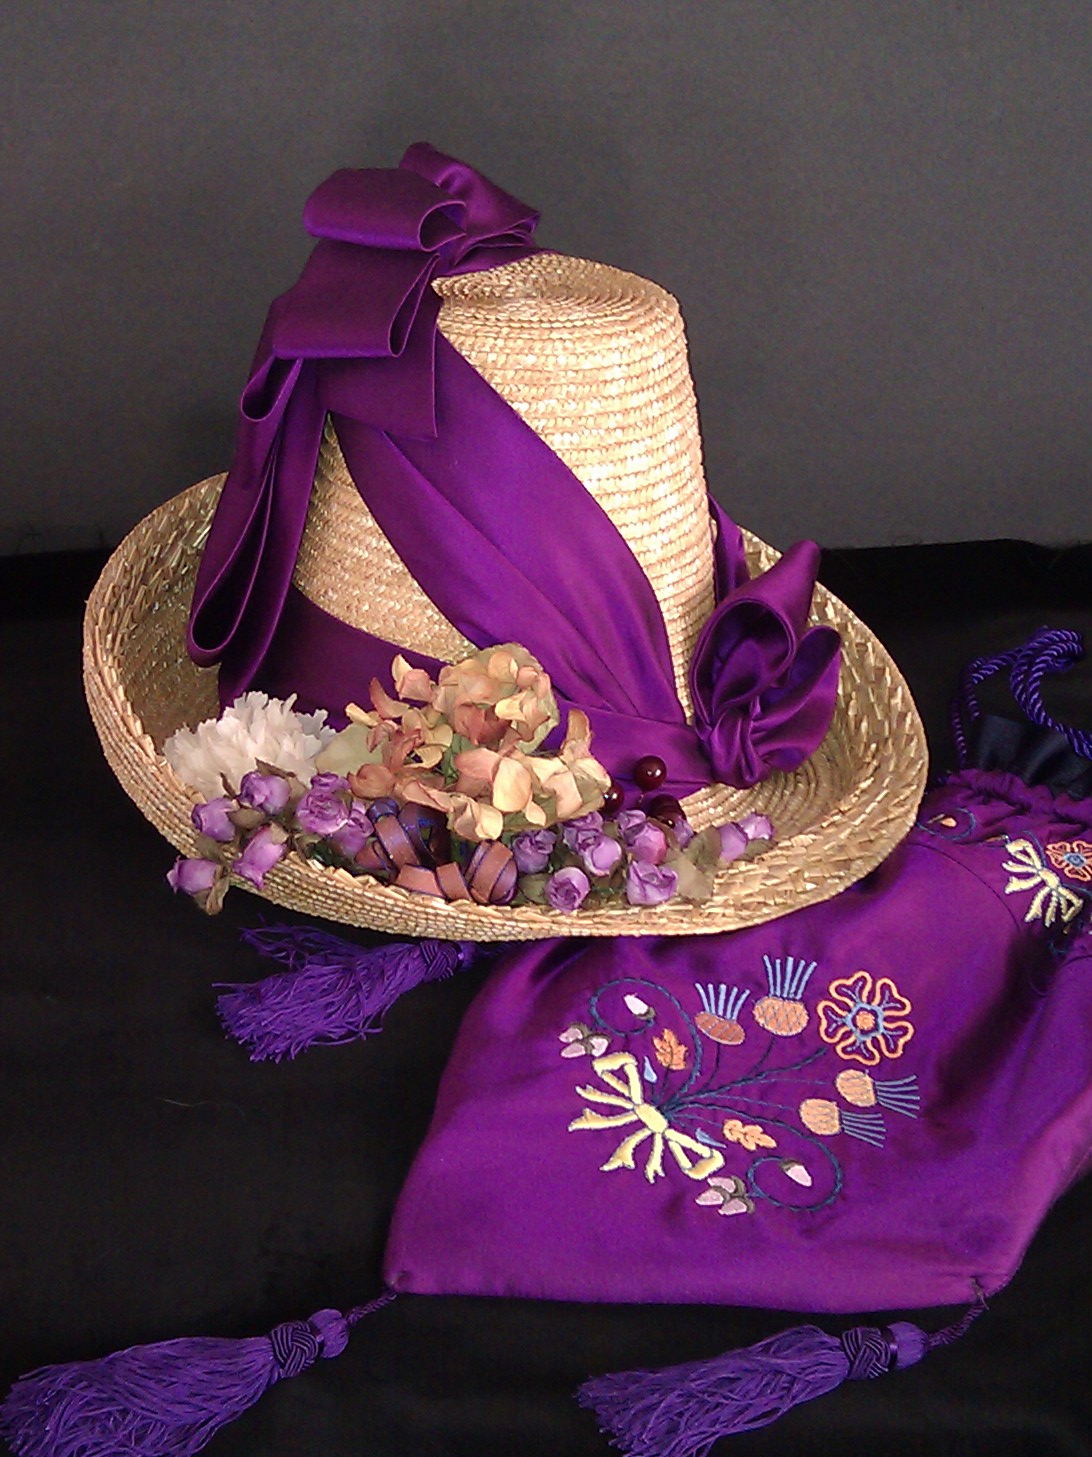
I'm going to start by hopping around a bit, chronologically speaking, working backwards through projects I've completed recently before going forwards with stuff I'm working on now. First up is a hat and matching handbag from 1886, completed in May, 2011.


I have a summer gown for 1886, completed in 2008. I've always wanted an "upside down flower pot" style hat for this outfit. It is now 2011 and I still didn't have a hat. So, I commission my friend (and I like to say, mentor) Lynn McMasters to make me a hat. I sent her some purple flowers that I had bought 2 years ago for this hat, and this illustration from Godey's Lady's book; it's from the 1880s, but I don't have an exact date:

Godey's Lady's Book, 1880s
and this is the result:


Lynn custom blocked the crown separate from the brim, then attached them to each other. She then applied straw that was woven into points. All I have to say is: SQUEEEEEEE!!! It's perfect. :)

When Lynn gave me the hat, she also gave me extra pieces of the purple sateen. I figured there was enough to make a simple handbag, which is something else this outfit really needed. And, of course, I'm never able to leave well enough alone, so I covered it with a purchased machine embroidery pattern:


It's lined with purple linen left over from the gown's underskirt. The tassels and cord I already had from an earlier, aborted attempt to making a handbag like this. The bottom edge is wired, so that it maintains the triangular shape.

Projects rarely ever (some would say never) go together exactly like you want. Every project teaches me something, how to do something right, or how to not do something again. This handbag, made in a mad rush over just a few hours, definitely taught me a few things. So, here's my first installment of "lessons learned:"

What worked:

Hmmm...well, it holds all my stuff.

What didn't work (so well):

1. It's BIG. It's more like a small workbag than a handbag.

2. For fabric I had only two corners with a long diagonal cut, and two wide bias strips. I decided the corners by themselves wouldn't make a big enough bag (see bullet #1), so pieced the bias strips to the diagonal cut...but only after I embroidered the bias strips. Lesson learned: the embroidery might have gone maybe slightly better if I had pieced before doing the embroidery.

The bias strips were too narrow for any embroidery hoop I have, so I used a Magna Hoop (which I've had for years, and this was the first time I've used it). The hoop did a decent job hold down the ends of the strip, but the fabric still pulled above and below the flowers, where the hoop wasn't really holding it. The side I call the "front" looked ok after a good pressing, but on the side I call the "back" some of the colors misaligned. Lesson learned: I probably would've gotten better results if I had basted the fabric to the stabilizer.

OH WELL. The bag is done, and does it's job just fine.

At GBACG's "Renoir's Boating Picnic", 11 June 2011