I'm back for another quick, catch-up post. Back in April I spent a day hanging out with Lynn McMasters to model for her. She was (or still is) working on a pattern for turbans for various time periods. She has lots of friends who model for her millinery, including, on occasion, me.
If you follow Lynn on Facebook at her page, "Out of a Portrait" you've seen this photos before, as well as pics of her other fabulous models and hats. If you're a member of Facebook and don't follow Lynn, scoot on over there and follow here to get the scoop on her up-and-coming hat patterns.
Turban No. 1:
This one is based on a late 18th century headdress. I can't recall the name or artist of the portrait that Lynn used as a model. The outfit was provided by me.
Turban No. 2:
Jumping forward over a century, I don't recall what time period Lynn attaches to this turban, but given the hairstyle she probably means
Turban No. 3:
Still in the Jazz Age. This one features a fun sash and crazy feathers. Lynn made the dress.
Turban No. 4:
1920s or '30s. This one came in two pieces. The "dress" is one of my favorite sari's, creatively wrapped.
Lastly: this is not a turban, but Lynn needed photos of this really cool, lace-brim hat.
Showing posts with label LynnMcMasters. Show all posts
Sunday, June 7, 2015
Saturday, June 7, 2014
Post-WWI Day Hat
I'm back!
Yup, I took yet another hiatus from this blog to take care of "stuff." I'm back for at least for the summer, though, and hopefully free to do some fab costuming and crafting.
Before I delve into the latest update in my costume collection, I'd like to make an announcement: last March (yes, it's been that long), the hosting for my website, claudinedemontigny.com, was up for renewal. Since I have practically no time to maintain the site, I let the hosting expire. There are still links from this blog to the website, and I'll change those eventually, but in the meantime don't be surprised if you get a "page not found" error.
Ok! Back to the business of costuming. My latest costume thing is this gorgeous post-World War I hat, not made by me but by Lynn McMasters.
It's based on her "Post WWI, Late Teens / Early 20's" hat pattern. You can find more information on that pattern here.
I don't actually recall the genesis of this hat. I think at the time she had just released the pattern, and suddenly she says: I'm making you a hat! That was quite a few months ago.
I forget what exactly the fabric is (charmeuse, I think), but the lace is vintage and I'm pretty sure she made the cord and tassels herself.
Anyway, 'nuff said, I'll just be quiet now so you can enjoy the photos.
Yup, I took yet another hiatus from this blog to take care of "stuff." I'm back for at least for the summer, though, and hopefully free to do some fab costuming and crafting.
Before I delve into the latest update in my costume collection, I'd like to make an announcement: last March (yes, it's been that long), the hosting for my website, claudinedemontigny.com, was up for renewal. Since I have practically no time to maintain the site, I let the hosting expire. There are still links from this blog to the website, and I'll change those eventually, but in the meantime don't be surprised if you get a "page not found" error.
Ok! Back to the business of costuming. My latest costume thing is this gorgeous post-World War I hat, not made by me but by Lynn McMasters.
It's based on her "Post WWI, Late Teens / Early 20's" hat pattern. You can find more information on that pattern here.
I don't actually recall the genesis of this hat. I think at the time she had just released the pattern, and suddenly she says: I'm making you a hat! That was quite a few months ago.
I forget what exactly the fabric is (charmeuse, I think), but the lace is vintage and I'm pretty sure she made the cord and tassels herself.
Anyway, 'nuff said, I'll just be quiet now so you can enjoy the photos.
Wednesday, December 21, 2011
1870 Hat by Lynn McMasters
I'm proud and privileged to be the owner of another custom hat by Lynn McMasters, milliner, friend, and occasional mentor (the last one was a really wonderful 1880s straw hat). In this post you'll also be treated...or horrified...by photos of yours truly! I'm not fond of having my photo taken. :)
This hat is the View D from Lynn's 1870-1880 Bustle Hat Pattern (eep! also featuring yours truly...I keep forgetting about that). Lynn based this view on several illustrations from around 1870.
I've got a big fat braid pinned to the back of my head to support the hat. There's a hat pin holding it on, but Lynn and I discussed attaching one or two combs or clips that will really hold it on.
The hat will got with a walking dress from around 1875 that, well, exists in my head...someday, hopefully SOON, I'll actually make the dress.
Finally I can't go without giving a plug to my friend Lynn. Making custom hats is something she does on the side; her primary business is making excellent hat patterns. Check them out here, or got to www.lynnmcmasters.com and click on "Pattern Orders" at the top. She's even got instructions on manipulating straw braid and blocking buckram! Even if you have no interest in home millinery, stop by her site and check out her amazing work.
This hat is the View D from Lynn's 1870-1880 Bustle Hat Pattern (eep! also featuring yours truly...I keep forgetting about that). Lynn based this view on several illustrations from around 1870.
I've got a big fat braid pinned to the back of my head to support the hat. There's a hat pin holding it on, but Lynn and I discussed attaching one or two combs or clips that will really hold it on.
The hat will got with a walking dress from around 1875 that, well, exists in my head...someday, hopefully SOON, I'll actually make the dress.
Finally I can't go without giving a plug to my friend Lynn. Making custom hats is something she does on the side; her primary business is making excellent hat patterns. Check them out here, or got to www.lynnmcmasters.com and click on "Pattern Orders" at the top. She's even got instructions on manipulating straw braid and blocking buckram! Even if you have no interest in home millinery, stop by her site and check out her amazing work.
Thursday, June 30, 2011
1886 Hat and Handbag
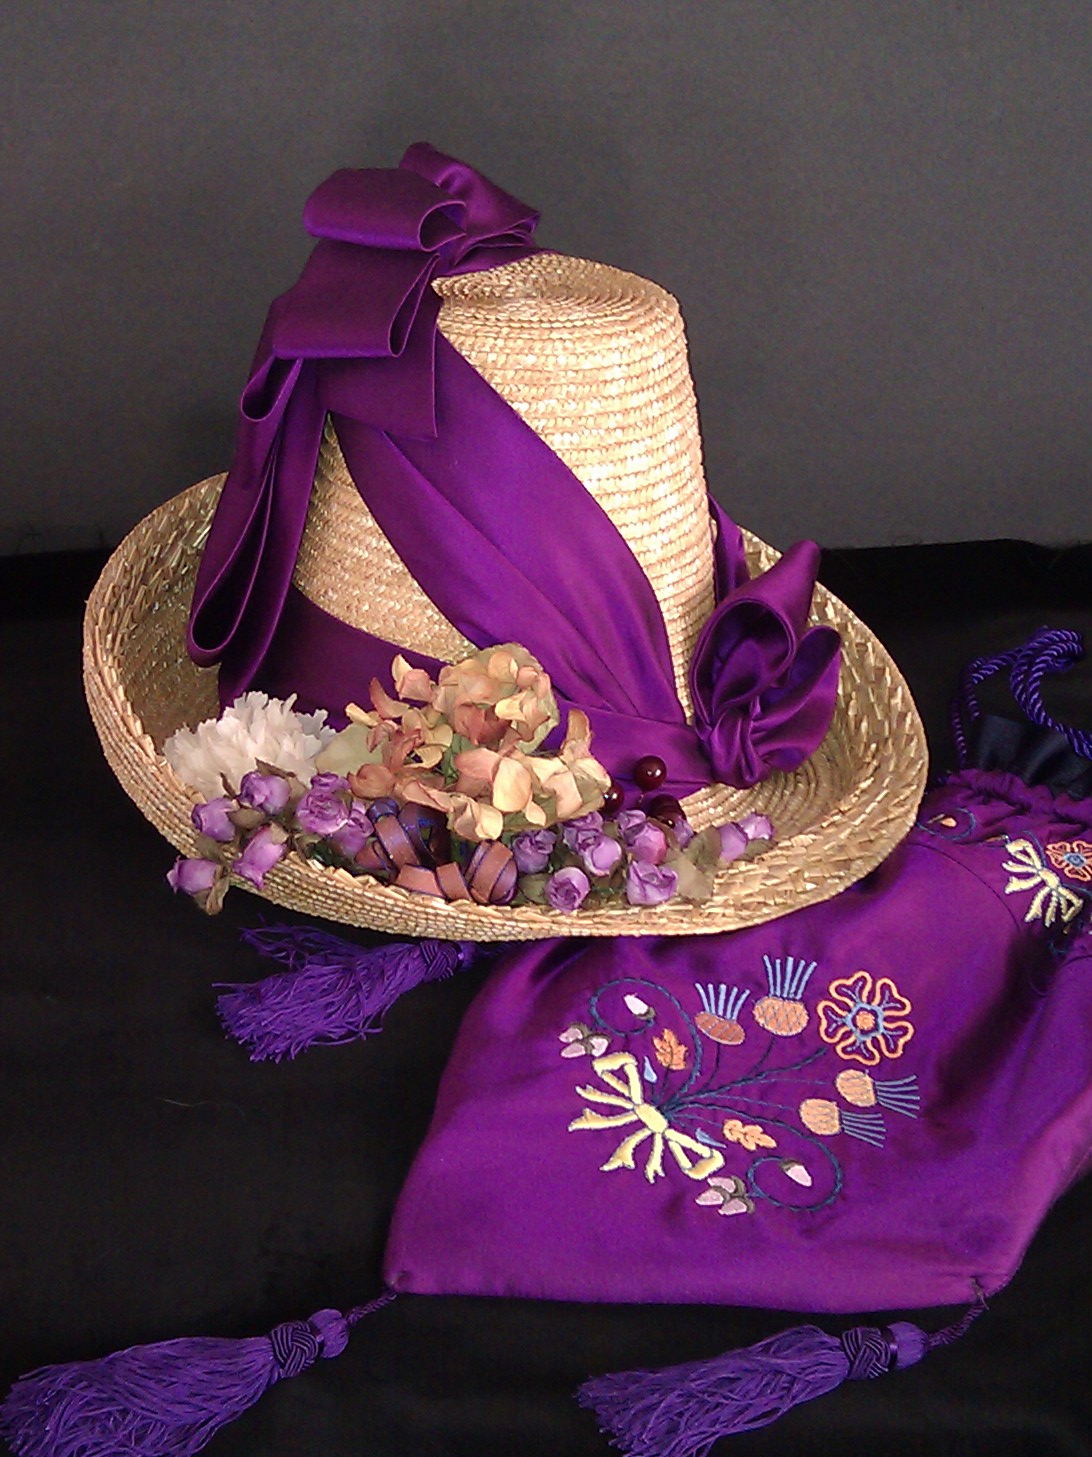
I'm going to start by hopping around a bit, chronologically speaking, working backwards through projects I've completed recently before going forwards with stuff I'm working on now. First up is a hat and matching handbag from 1886, completed in May, 2011.
I have a summer gown for 1886, completed in 2008. I've always wanted an "upside down flower pot" style hat for this outfit. It is now 2011 and I still didn't have a hat. So, I commission my friend (and I like to say, mentor) Lynn McMasters to make me a hat. I sent her some purple flowers that I had bought 2 years ago for this hat, and this illustration from Godey's Lady's book; it's from the 1880s, but I don't have an exact date:
and this is the result:
Lynn custom blocked the crown separate from the brim, then attached them to each other. She then applied straw that was woven into points. All I have to say is: SQUEEEEEEE!!! It's perfect. :)
When Lynn gave me the hat, she also gave me extra pieces of the purple sateen. I figured there was enough to make a simple handbag, which is something else this outfit really needed. And, of course, I'm never able to leave well enough alone, so I covered it with a purchased machine embroidery pattern:
It's lined with purple linen left over from the gown's underskirt. The tassels and cord I already had from an earlier, aborted attempt to making a handbag like this. The bottom edge is wired, so that it maintains the triangular shape.
Projects rarely ever (some would say never) go together exactly like you want. Every project teaches me something, how to do something right, or how to not do something again. This handbag, made in a mad rush over just a few hours, definitely taught me a few things. So, here's my first installment of "lessons learned:"
What worked:
Hmmm...well, it holds all my stuff.
What didn't work (so well):
1. It's BIG. It's more like a small workbag than a handbag.
2. For fabric I had only two corners with a long diagonal cut, and two wide bias strips. I decided the corners by themselves wouldn't make a big enough bag (see bullet #1), so pieced the bias strips to the diagonal cut...but only after I embroidered the bias strips. Lesson learned: the embroidery might have gone maybe slightly better if I had pieced before doing the embroidery.
The bias strips were too narrow for any embroidery hoop I have, so I used a Magna Hoop (which I've had for years, and this was the first time I've used it). The hoop did a decent job hold down the ends of the strip, but the fabric still pulled above and below the flowers, where the hoop wasn't really holding it. The side I call the "front" looked ok after a good pressing, but on the side I call the "back" some of the colors misaligned. Lesson learned: I probably would've gotten better results if I had basted the fabric to the stabilizer.
OH WELL. The bag is done, and does it's job just fine.
I have a summer gown for 1886, completed in 2008. I've always wanted an "upside down flower pot" style hat for this outfit. It is now 2011 and I still didn't have a hat. So, I commission my friend (and I like to say, mentor) Lynn McMasters to make me a hat. I sent her some purple flowers that I had bought 2 years ago for this hat, and this illustration from Godey's Lady's book; it's from the 1880s, but I don't have an exact date:
![]() |
| Godey's Lady's Book, 1880s |
Lynn custom blocked the crown separate from the brim, then attached them to each other. She then applied straw that was woven into points. All I have to say is: SQUEEEEEEE!!! It's perfect. :)
When Lynn gave me the hat, she also gave me extra pieces of the purple sateen. I figured there was enough to make a simple handbag, which is something else this outfit really needed. And, of course, I'm never able to leave well enough alone, so I covered it with a purchased machine embroidery pattern:
It's lined with purple linen left over from the gown's underskirt. The tassels and cord I already had from an earlier, aborted attempt to making a handbag like this. The bottom edge is wired, so that it maintains the triangular shape.
Projects rarely ever (some would say never) go together exactly like you want. Every project teaches me something, how to do something right, or how to not do something again. This handbag, made in a mad rush over just a few hours, definitely taught me a few things. So, here's my first installment of "lessons learned:"
What worked:
Hmmm...well, it holds all my stuff.
What didn't work (so well):
1. It's BIG. It's more like a small workbag than a handbag.
2. For fabric I had only two corners with a long diagonal cut, and two wide bias strips. I decided the corners by themselves wouldn't make a big enough bag (see bullet #1), so pieced the bias strips to the diagonal cut...but only after I embroidered the bias strips. Lesson learned: the embroidery might have gone maybe slightly better if I had pieced before doing the embroidery.
The bias strips were too narrow for any embroidery hoop I have, so I used a Magna Hoop (which I've had for years, and this was the first time I've used it). The hoop did a decent job hold down the ends of the strip, but the fabric still pulled above and below the flowers, where the hoop wasn't really holding it. The side I call the "front" looked ok after a good pressing, but on the side I call the "back" some of the colors misaligned. Lesson learned: I probably would've gotten better results if I had basted the fabric to the stabilizer.
OH WELL. The bag is done, and does it's job just fine.
![]() | |
| At GBACG's "Renoir's Boating Picnic", 11 June 2011 |
Subscribe to:
Posts (Atom)