Showing posts with label lessons learned. Show all posts

Sunday, October 27, 2013

Manhattan 1950s Ballgown

Hey look! I've been sewing! Yeah, go ahead and say it: "what, you still do that?!"

Yup, I had a good excuse. I got invited to a swanky, black tie wedding in New York City, and decided I should go 1950s, full, bell skirt and all. Or at least 1950s-inspired, since I don't really know that much about the 1950s. I really didn't feel like going shopping for something new, and equally didn't feel like just pulling something out of the closet. And what the heck, I sew, so off I went. Now, I've known about this wedding since March, and, of course, only really started planning about a month and a half beforehand. And stitching? Started about three weeks beforehand. But I got on the plane to NYC with a wearable gown, only plus some basting stitches that you can't see anyway (and less a whole lotta sleep).

Below is the story of this gown, from the initial design to the wearing, including some serious dressmaking drama that I know all of you that do this sort of thing are intimately familiar with. This is a very long post, so grab a cup of coffee and get comfy, or just skip ahead to the photos.

The Design

After some surfing I decided that I wanted a gown that looks like a certain Lyn Ashworth wedding gown, dissected here by me (you can find a photo of it on one of my Pinterest boards here):
Analysis of a wedding gown by Lyn Ashworth. The gown consisted of a satin bodice with a dropped waistline, gathered chiffon skirt over at least one additional layer of skirt, and a sheer overbodice down to the mid-torso and with forearm-length sleeves. Not illustrated are fabric flowers at the waistline and on the shoulder.
I decided to go with navy, appropriate for an evening wedding in a hotel and in stark contrast to bridal white. Fabrics were easy: duchess satin for the bodice, chiffon for the outer skirt layer, taffeta for the under skirt layer, and organza for the overbodice thingy. Trick was finding all those different fabrics in the same shade of blue. I lucked out at Thai Silks, which had the navy blue I was looking for in chiffon and charmeuse (which isn't satin but has the same shine and when flat-lined with organza would have similar body). I went with their navy taffeta also, though it has a noticeable yellow cast that isn't present in the other fabrics -- under the chiffon it wouldn't really matter. The organza I knew I could get from Pure Silks.

But I wasn't done yet with the design. I've had in it my head for a while to do something in the vein of this Alexander McQueen gown, worn by Jessica Chastain at the 2012 Oscars:

Jessica Chastain in Alexander McQueen
at the 2012 Oscars.
Photo by Glamour Magazine.
McQueen did a whole line in this style, which you can see most of in one of my Pinterest boards (just scroll, you can't miss them). But that's a lot of embroidery, even by machine, and I had limited time. Not to mention that I was just going to a wedding, not the Oscars. And you can see there's an obvious clash between this look and the design of the gown.

But I wanted embroidery, so I figured I'd do the embroidery first and then decide what exactly I'd do with the overbodice thingy. For the embroidery I went with patterns by My Fair Lady, who sells through the website Secrets of Embroidery. As I've mentioned in earlier posts, I rarely digitize embroidery from scratch. That just takes too much time, and it's a lot faster to just work with designs digitized by someone else. Granted, it's tough to find period-appropriate designs that can pass for hand embroidery (depending on the embroidery technique, it's sometimes just impossible). But for this gown it didn't really matter.

The Undergarments

Strapless gown means some kind of strapless support. Frankly, all the strapless and/or backless bras I've worn in the past kind of suck. I debated corsetting (not quite the right silhouette) and building a foundation into the gown (didn't really have the time for that). I decided to just see what I could find online, and happened upon What Katie Did, a shop that reproduces vintage undergarments. Their "Glamour Merry Widow" was just what I was looking for:

Postcard courtesy of What Katie Did, showing the merry widow similar to the one I bought from them (mine isn't as long). My figure isn't as "vivacious" as the model's, but the merry widow sure does show off what I have!
The full skirt I was shooting for also required some kind of support. I figured, heck, I should be able to buy a crinoline petticoat; after all, there are plenty of folks who dress in vintage, and plenty of modern bridal gowns call for skirt support.. So I tried and tried to find a ballroom-length crinoline petticoat. I found plenty of bridal petticoats, but the ones that had anywhere near the shape I was after all had hoops. I even bought one, and it'd be great for doing an 1860s era gown, but it was just WAY to full for what I had in mind.
A four-hoop bridal petticoat I bought on eBay. It has a great shape for the 1860sbut it's HUGE and too rigid for the 1950s.
So, I gave in and made a crinoline petticoat:
Ballgown length crinoline petticoat I made in a day. The first layer is a cotton A-line skirt with three rows of nylon net ruffles, gathered to the yoke. The second layer is about 215 inches of nylon tulle, also gathered to the yoke. The hem of the first layer has nylon horsehair braid in the hem for additional uumph.
I quickly drafted up a yoke from a skirt pattern I had laying around, and used a shorted version of the lining from the Vogue pattern I discuss below to make an under layer. I gathered three rows of nylon net with the gathering foot for my sewing machine and attached them to the under layer, which I did in cotton to avoid having anything scratchy around my legs. I then gathered about 215 inches (in circumference) to the yoke, both for more fluff and to soften the humps from the net. The cotton under layer also has nylon horsehair braid in the hem. The end result is floof but with softness. I'm pretty happy with the result.

The Pattern

I could have patterned this gown from scratch, but again, I really didn't have the time. Conveniently, Vintage Vogue has a pattern that was almost exactly what I needed, except the neckline, which was easy to change:
Vintage Vogue 1094
I modified and mocked up just the bodice, and here is where I have to tell you: it is NICE having friends who sew. I had a great deal of difficulty getting my dress form into the merry widow at the same proportions as myself. The dress form, a Uniquely You, and I have -- ahem! -- strayed from each other in size over the course of the last decade. I ran over to Ms. G's house and she and Ms. H did an excellent fitting. A week later (and one week before the wedding) I did a second fitting in the gown's lining with Ms. H and Ms. S and BAM! had a perfect fit. Or so I thought.

The Drama

In my rush to finish this gown I made an essential mistake. For the gown's lining I used a linen-cotton blend for its weight and breathe-ability. But guess what? Linen and cotton, alone or in combination, stretches a bit on grain. Silk, especially organza, DOES NOT.

With a zipper pinned into the left side seam I could squeeze into the lining after the second fitting. So, I went ahead and embroidered the front and back pieces (stitching through both the charmeuse and organza as well as heavy tearaway stabilizer -- I did NOT want any puckering in the stitches!); basted the charmeuse to the organza; cut out the pieces; sewed up the darts; attached front to back; attached both skirt layers; set in the zipper; and tried it on...

...and it didn't fit.

It didn't find by a lot. I was at T-minus two days before leaving for NYC, and there was no way I could make the bodice fit, even by letting the side seams out as much as possible. Though now would have been an appropriate time to throw the damn thing into a corner in utter frustration, I calmly evaluated the situation. The front fit great, with the side seams in the right place. The back (which went through the most fitting changes) was just too narrow from the waist up. I was starting to see how the gown would look when finished, and I just couldn't give up. There was nothing to do but to redo the back.

I added nearly two inches to the side seams, in an angle from the waist. I cut out a new lining first, to make sure the back still fit smoothly. It wasn't really a big deal to re-embroider the back, and once again baste the organza and charmeuse layers together. The tedious bit was detaching and re-attaching the gathered skirts. That done, and zipper pinned in, I tried it on again...

...and it still didn't fit, but this time it was only by barely half an inch. I let both side seams out as far as they'd go, keeping in mind that I still needed to put in the lining, and tried it on again...voilá, it fit.

The lesson learned here is this: do your fittings in fabric with the same amount of stretch as your fashion fabric. Or don't, but add ease to your finished, fitted pattern, or plenty of fitting allowance in the seams of the exterior of the bodice. I knew all of this, but in my rush figured things would just work out. Things did work out, but backtracking and redoing cost me many hours of sleep.

The Evolution of the Design

Even though I love the look of the McQueen gown, I decided to go with a much less ostentatious amount of embroidery. That amount of embroidery just wouldn't have been right for this particular gown. Along the way I also decided that covering the embroidery with a sheer fabric was silly. My sewing buddies agreed, and the overbodice disappeared from the design.
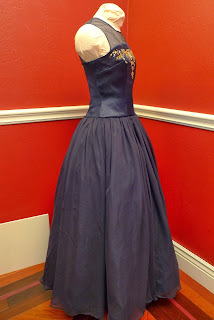
But I didn't want a purely strapless gown. It would've looked fine, but just wasn't what I was going for. So, while the above drama was going on, I patterned out and stitched up a sleeveless, crew-neck bodice that only went down to the underbust line and opened center back. I wanted the center back to gap, and so closed it with only one button at the top, with a second false button for symmetry. In an episode of min-drama, it took me an hour to make both covered buttons; I put a layer of cotton under the organza exterior, to hide the shiny button dome, and all that fabric is a tight squeeze behind the button back.

The Accessories

The complete ensemble must have accessories, of course, starting with shoes.
 
Satin pumps by Nina.
I found a just PERFECT pair of satin pumps, which were pretty darn comfortable and in a height that I'm pretty used to wearing.

I also needed a clutch, just something large enough to carry my cellphone, a room key, and lipstick. I found this on Etsy:
Purse by RokkiHandbags on Etsy.
The purse is lined with cotton, closes with a magnetic snap,
and has a number of card pockets.
Yup, it's an old book cover converted into a clutch purse. The book here is The Ruling Passion by Henry Van Dyke, copyright 1913, which I have never heard of, but I thank his publisher for the color and layout of the cover, which now has a new life as a purse.

And I absolutely ADORE it. Not only does it match the dress just right, and not only is it just the right size for what I wanted to carry -- it's funky, clever, and unique. I love products that have a flair of different about them, that take a wild detour away from mainstream. This purse is exactly my style.

The Finished Ensemble

The evening before I had to get on the plane I did the hand-stitching required to set in the lining (but left behind some basting stitches) and wrestled a hem onto the taffeta layer (the chiffon layer got its hem earlier, accompanied by a great deal of swearing). I even managed to pack before collapsing into bed.

Here's the finished gown, photographed after I got home:

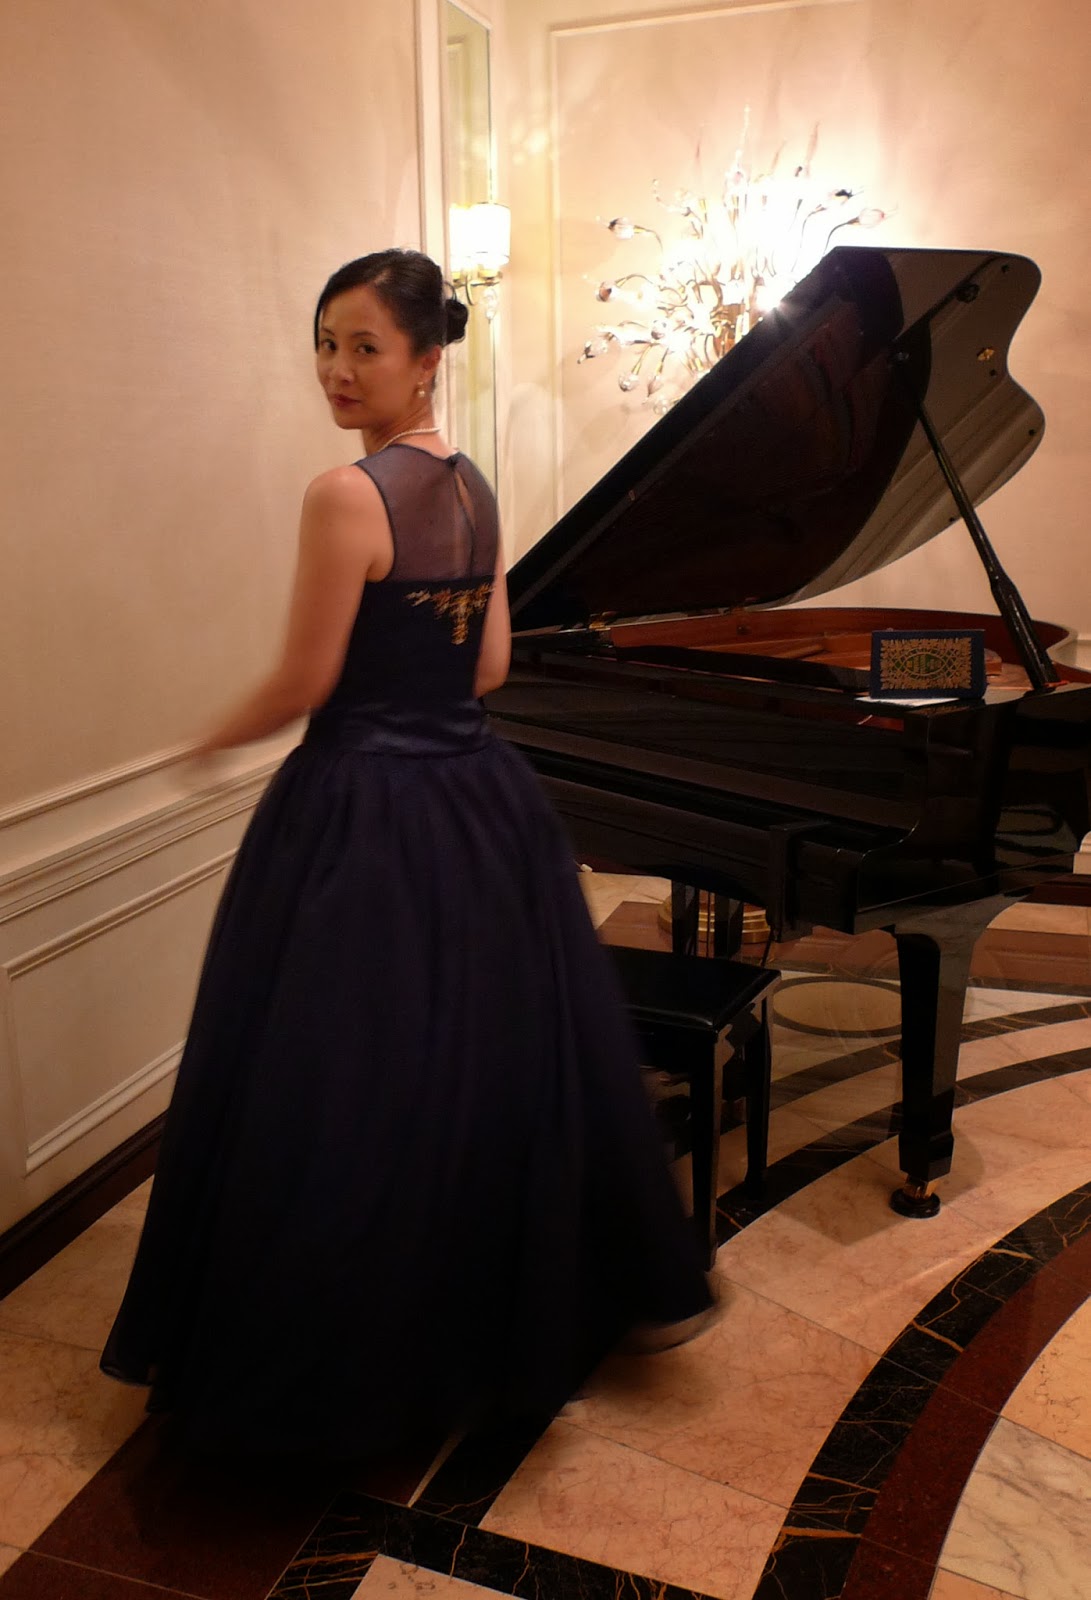
And here's the dress in action. I had my hair and make-up done at a local salon, with astounding results: my hair remained perfect and comfortable for over 10 hours! I also had a fun game of "find the bobby pins" at the end of the night; I pulled 29 out of my hair. The salon was Miano Viel, if you're interested, and my stylist's name was Rebecca, who gets my hearty recommendation.


The dress has quite a few "oh well, I'm just going to have to live with thats" but as far as I'm concerned, the dress was a success by virtue of having been wearable by the time of the event. I did receive quite a few compliments, so I must have done good. Best of all: it felt really good to be stitching again! So, stay tuned for more to come.

P.S. if I ever, propose working with chiffon again...just shoot me quickly and put me out of my misery.

Sunday, September 2, 2012

Learning Card Weaving, Part 2

Ok, I'm back, with another quick post about my card weaving project.

When I left off, I had gotten my warp wrapped around my improvised warp beam, and had strung up the cards. I just had to secure the warps to my "cloth beam" and then I could get started weaving.

The "cloth beam" is just another clamp. I rather
lazily secured the warps with a medium Gem clip.
They weren't super secure, but good enough for
me to get started.
For this project I'm using size 10 cotton crochet thread (probably Aunt Lydia's brand; I don't have the labels anymore), because I have a lot of it laying around (it's my favorite thread for lucet work). I'm using the same thread for the weft, in red to match the selvedge edges.

When I started weaving, scroll frame arms tended
to pivot and cause slack in the warps. I flipped
the clamp around, which helped but didn't
eliminate the pivoting.
I had several objectives with this project:

1. Could I get the warps properly rolled onto a warp bar?

The warps here are 80 inches long, which makes them only slightly longer than the 72 inch warps for my pink stocking garters. The stocking garters have 37 warps, though, whereas this project has 64! Anyway, with the exception of the pivoting problem, I got a very satisfactory wrap round my improvised warp bar.

2. Can I really work a pattern where the cards rotate only one way?

I don't think so, but I must be missing something. After I had woven about a foot, the warps behind the cards had turned into ropes.

By turning the cards only one way, the warps
got twisted to the point where I couldn't move
the cards back any more.
Candace Crockett, in her book Card Weaving (I have a copy, and it's quite excellent) suggests untwisting the warps. I'm thinking, after all the time it took me to roll up the warps (and it really did take a while), do I really want to unroll them? My conclusion was, what's the worst that could happen, and I went ahead and unrolled the warps. Well, the worst didn't happen, but pretty near: I ended up with a twisted, snarly mess that I was not going to be able to get back onto the bar (I have no photo evidence of this...it's too embarrassing). I soldiered on and just wrestled with the twisty mess, replace the scroll frame with the clamp by itself and clipping the warps to the clamp's bar. Needless to say, I had an issue with keeping even tension.

Also: I decided I should just turn the cards in the reverse direction.

Two turnaround points, where I reversed the turning
direction of the cards.

There's probably something I'm not understanding yet, but so far I'm not sure you can work a pattern where the cards only turn one direction. At least not with a piece that's this long.

Anyway, my third goal was to get a better understanding of how card weaving works.

My fourth goal is to find a solution for Laura's weaving problem, which she talks about partway through this post. I don't think I have an answer yet.

In the meantime, the piece is done!
The back side looks nice, too!

The color combination makes me think of traffic signs, but I'm still quite fond of it. I hereby dub this piece: "The Road Goes This Way!"

I got the pattern from eqos at Deviantart (she calls this one "Korba"). Check her out, she generously gives these patterns away.

I was aiming for 60 inches and ended up just one inch short. The weave is tight but not totally consistent; I think that once I can keep the warp evenly tensioned, I can achieve better consistency.

But I must find a solution to Laura's problem....

Friday, August 31, 2012

Learning Card Weaving, Part 1

My blog has gone rather idle, sorry about that! Ever since I got back from Costume College, I've been utterly swamped. My hands haven't been idle, despite how busy I am.

My latest thing has been card weaving, aka tablet weaving, aka inkle weaving (though I think "inkle weaving" really means weaving with an inkle loom, with or without cards, so that might be a bit of a misnomer).

This is just a quick post to show Laura (aka Rocking the Frock) my improvised loom (and my equally improvised photo box).

Improvised card weaving loom, using two clamps and part
of an embroidery scroll frame.
Laura is reproducing the gown worn by Eleonora di Toledo as painted by Bronzino. She's considering weaving the gold and silver trim on the gown herself. I'm hoping to help her out by figuring out a way to for her to do it by card weaving.

Warps wound around a dowel and cards loaded.
At one end I've got the warps wrapped around one of the two dowels from a scroll frame for embroidery. I clamped the sides of the frame to a scrap of board I had laying around. The pink paper is something like heavy construction paper, somewhat similar in weight to grocery bags. I'm not sure what it is exactly, since it came from a roll a contractor left at my house. The Gem clips are keeping the cards (sixteen, for this pattern) under control while I load them.

In-progress warping, not quite ready to weave yet.

At the other end I have the warps wrapped around the bar of another clamp. I still need to tighten up the warps before I get started actually weaving. I'm using a pair of not-separated restaurant take-away chop sticks to keep the warps under control in the mean time.

By my next post I'll probably have woven this piece. I'll talk more about the process then. Stay tuned!

Saturday, November 5, 2011

Restored Parasol, c. 1900

There's nothing like a deadline to get you hopping on a project, right??


I needed a parasol for an outdoor event today...then, of course, today was completely overcast and verging on RAIN, so the parasol stayed home. Poo. Ah well, at least the parasol is now DONE.


This parasol's canopy was originally the subject of this earlier post I wrote, outlining the process of doing a large machine embroidery. The base fabric is medium weight linen, and the embroidery is cotton quilting thread on top, polyester sewing thread underneath.


I bought the frame a number of years ago, and it came to me completely bare, except for the  disintegrating remnants of silk wrapping that padded the spreader joints. These I removed and replaced with scraps of linen from the canopy. The frame also had rust around the top, and a little at the rib tips, which I painted over, partly for aesthetic reasons and partly to avoid the rust from spreading. The handle is some mystery wood and the shaft is a single piece of bamboo.

Since I was in a rush, I was just going to finish attaching the canopy and use the parasol. Buuut I couldn't leave well enough alone, so I also finished the "rosette" above the slider, and the "scrunchie" around the finial (I've made up those terms; I don't really know what they would've been called for real).


In reality, the most challenging part of restoring this parasol was that it was missing the cap that parasols often (but not always) have at the top of the finial. I sacrificed a slightly expensive (but real metal) pen to make this final cap. I'd like to find a better solution, but for now, this will do.


The parasol's handle didn't need any work. I cleaned it, back when I bought the parasol, with some wood furniture cleaner, but have otherwise left it alone.


So what's with the date of this parasol? It's really challenging to pin a parasol to a precise year, let alone an exact decade. There are a number of factors that one can use to establish a date (such as the rib construction, the style of spanner joints, the overall length, and the size and shape of the canopy), but when it comes down to it, there was never only one style of parasol in existence in any given year. Sure, there may have been a general look that was in fashion, but within that look there would have been plenty of room for variation, and who's to say that someone didn't offer styles that were just not in fashion It's not like the 1890s or 1910s had only ONE style of shoe. We know that just wasn't true.

Anyway! By my estimation, this parasol might have been built anywhere from 1890 to 1910, so I've labeled it with a date smack in the middle.

Lastly: what have I learned from restoring this parasol? First: the canopy is heavy. All the surviving canopies I've seen that aren't silk or lace have been fine, light cotton. Next time I do a canopy like this, I'll use cotton instead. Second: the "skirt" around the edge of the canopy doesn't really work. It tends to flip up when I open the parasol. I honestly don't think I've seen a skirt like this on a surviving canopy; skirts tend to be cut in crescents that leave the rib tips exposed. Now I think I know why!

Wednesday, August 10, 2011

Machine Embroidery for a Large Parasol: Step-by-Step

I've gotten a couple of requests to explain the process of doing machine embroidery. In this post I'll go through the steps, using as an example the embroidery for a parasol canopy. Restoring this particular parasol is something I've been working on in fits and starts for years and hey, it's time to get it done.

To manipulate embroidery designs, I use a popular software application called Embird (www.embird.com). It's immensely powerful, and quite a bit more affordable than the software put out by the sewing machine companies. I can arrange embroidery designs right on my machine, but I find using a computer far easier, flexible, and more accurate.

For this project, the first step was to scan the pattern for the canopy's panels (the process of making the pattern isn't relevant here, so I won't get into it). I uploaded the scan into Embird, and created an outline of stitches out of it. This is so that I know what area to fit the embroidery into; I won't actually stitch out the outline in this case, because it won't fit into the hoop and isn't strictly necessary (it would merely be handy).

Outline of the canopy panel (blue triangle), over the hoop (tan area), in Embird.
It doesn't actually fit in the hoop, I'm only using it to figure out how
to place the designs. I'll erase the outline from the final design.
Next, I picked the designs I want to have go onto the panel. These designs are from OESD (www.embroideryonline.com). I use purchased designs whenever I can. I've created designs from scratch before (a process called "digitizing") but doing so can be very time consuming. So, I try to find patterns that will do the job before I consider digitizing something from scratch. Here, I already had these patterns from earlier projects, so only had to pick what I wanted.

The design contains five purchased elements (four pictured here) from OESD.
Since I already had these elements, I didn't need to digitize any from scratch.
The next step is to arrange and duplicate the design elements. I shrank or grew the elements to fit the space, both of which can be troublesome. The software is good, but not perfect. When you grow a design, it may not increase or add stitches quite right, which creates distortions. When you shrink a design, it may not reduce the stitch sizes right. Shrinking is more difficult, because it can result in super-dense areas that can't be stitched out. Here, I had to futz with the rightmost elements, to shrink them and reduce the stitch count (and the oak leaves still ended up too dense. Oh well.)

When arranging these elements, I tried to place them so that the jumps between them are really short or insignificant. My machine trims jump stitches on the right side, but not on the wrong side. Thus, jumps on the wrong send will get stitched over, making them harder to remove. So, since I need the wrong side to look as clean as possible, I tried to keep the jumps short.

At this point I checked that trimming codes and stop codes were in the right places. This design is all one color, so I wanted no stops. I also made it trim almost all (but not all) the jumps.

You'll also notice fine blue and red lines running down the middle of the hoop. These indicate the right and left areas of the hoop. With this large hoop, the machine stitches all of one side, then all of the other, so the design needs to be placed such that stitches from one side don't overlap into the other.

The finished design. I grew some elements and shrank others to get them
to fit the space, checked the trimming and stop codes, and checked
the left-to-right placement in the hoop.
Normally, you would now check that the design is ok, by doing a stitch out, on scrap fabric, of all or part of the design (it's a good idea to test elements you grew or shrank). I confess to being rather impatient with this project, however, and forging ahead.

The base fabric for the canopy was a medium weight, cream linen.

The base fabric for the canopy: medium weight, cream linen.

For the top thread, I used a cotton quilting thread. I figure this approached what might have been done historically. Also, it has a slightly heavier weight than sewing thread, closer to that of rayon embroidery thread (but without the shine of rayon). For the bobbin I used a poly sewing thread. Generally, I embroideries come out better if the bobbin thread is really light weight, and thus there's specialty "bobbin thread" for machine embroidery. As far as I know, however, it only comes in white and black, which wouldn't work here, since I expect the back side of the embroidery to be seen.

Left: poly sewing thread, for the bobbin.
Right: cotton quilting thread for the top.
The next step is to hoop the fabric and stabilizer. Since I expect the wrong side of the embroidery to be seen, I used a water soluble stabilizer underneath the fabric.

Layering order when hooping: lower hoop, stabilizer (water
soluble in this case), fabric, and upper hoop.
And away we go!

The machine goes to work.
For the first panel, I hung around and
kept an eye on it, but after the first
I wandered off and did other things.
After one side finished, I rotated the hoop and continued on the other side.

After one half is done, rotate the hoop
and do the other half.
And now the whole thing is done.

Finished front side.
Finished back side.
Before I popped it out of the hoop, I trimmed any remaining jump stitches on the front side, and also the jump stitches and dangly threads from the back side. Leaving the fabric in the hoop keeps it taut and makes this step go faster. My favorite tools for trimming are a pair of long tweezers and short thread snips: the tweezers raise the thread from the fabric, and the thread snips can get close to the surface of the fabric.

Tools for cleaning up extra threads: tweezers and
thread snips.
Once I cleaned up jumps and loose threads, I removed the fabric from the hoop, I trimmed away extra stabilizer, re-hooped, and started the next repeat. I was stitching along the selvedge edge of the fabric, so once I had four repeats, they went into my kitchen sink for a short soak, and then over a rack to dry; once dry, they were ready to cut out.

Four panels getting a soak to remove the stabilizer.
And that's it!

Except: I need the other four panels to complete the canopy.

This, it turns out, is a large design, with over 55,000 stitches. Frankly, that quantity of stitches takes a long time to stitch out. I also learned that with this large hoop (the largest that fits the machine), the embroidery arm moves more slowly than it does with smaller hoops. Thus, each panel took a veeeery long time to stitch out, approximately THREE hours of stitch time. That's stitch time, which excludes time to change bobbins, rotate the hoop, and deal with broken threads (It happens. Often. You learn to live with it.) And I needed EIGHT panels!

I had wanted to finish this parasol before a certain date. I totally failed. So, I say lesson learned: pay attention to the stitch count! I could have simplified the design, and some areas are still too dense, which didn't cause problems but means the time wasted on unnecessary stitches.

I'm going to wrap this project up soon. As of this writing, I still need the eighth panel. I also need to do the restoration work the frame needs. When all of that is done, I'll report back. Stay tuned.

Thursday, June 30, 2011

Let's call it a 1920's Ribbon Handbag

Jumping back in time again, to the beginning of March 2011: I found a really cute vintage handbag on etsy.com. The seller said it was from the 1920s, so I'm just going with that.

It sold while I was waffling over buying it.

Hmph, well I WANTS, it. I have a ton of 1 and 1/2" wide, blue double-sided satin ribbon leftover from another project. I paired it with white double-sided ribbon, and made this:


My version is taller than the original (I like to have plenty of room for my crap). The base of the original looks egg-shaped to me, but mine is just an oval.

The ribbons in the original were probably stitched together by hand. I used a stitch on my machine that resembles a feather or fern stitch:


Now, dummy me used a tearaway stabilizer for this; tearing the stabilizer out caused the stitches to distort! Lesson learned: I could've used a washaway stabilizer. It's poly ribbon. IT CAN GET WET.

P.S. this last photo also shows that I completely flubbed making french knots. Sheesh.