Showing posts with label 20th century. Show all posts

Saturday, August 29, 2015

House Cleaning

I think that I'm a typical costumer, in that, over time, I've accumulated a lot of costuming "stuff." I managed to clear out a few things at the GBACG Costumers Bazaar last weekend, but still have many extra bits that need to go. So, I've set up shop at Bonanza, and listed many costuming accessories, including some of the things you see below. A link to my Bonanza shop also appears in the pane on your right.

Here's a preview of some of the things I've listed. Funnily enough, they're pretty much all left from workshops I've taken or taught.

Edwardian-style parasol.

18th century embroidered neckerchief.

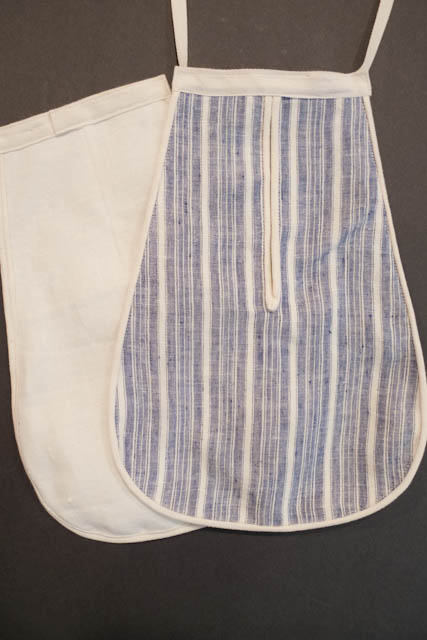
18th century fancy pocket.

18th century fancy pocket.

18th century linen pocket.

18th century linen pocket.

18th century linen pocket.

What is Bonanza:
Bonanza advertises itself as an alternative to eBay. I find that it's a bit more of a cross between eBay and Etsy. It's a marketplace for folks like you and me to buy and sell stuff. Like Etsy, sellers set up a shop.

Why am I using Bonanza:
Frankly, Bonanza has a much simpler and affordable fee structure than eBay or Bonanza. I'm not a very active seller, and it can take me a long time to sell things. So I chose to use Bonanza because listing and maintaining listings for a long time is easy and affordable.

Tuesday, November 25, 2014

Early 20th Century Fat Bottom Purses

OK, I confess, I'm a lazy blogger.

I haven't posted in a while, not because I've been too busy to craft, but because I just haven't felt like it. I know, terrible. In fact, I've been ding quite a lot of crafting, mostly knitting and on and off mad sewing.

Here's something I finished since my last post: a pair of silk clasp purses that I've assigned to the early 20th century.

Silk purses with brass clasps and chains.
I got it into my head to make a clasp purse over -- *ahem* -- two and a half years ago. I need more period hand bags, and I hadn't made a purse on a frame before.

They're shaped with a fat bottom to accommodate plenty of stuff.
I was enamoured with a fat bottom shape, and made these large enough for my on-the-large-side phone.

It fits a sub-phablet phone in a bulky case.
Of course the clasp had to be big enough, too.
Yes, my phone is a Tardis. It's bigger on the inside.
So, I bought the materials and embroidered the sides, and (like many of my projects) put them aside.

Fast forward to last fall, and I'm trying to clear off my work table. I finally sat down and threw these together. Though after so long, and despite having the pattern I drew handy, I forgot that I had given them a 3/8" seam allowance. So, well, their shape is not exactly what I had intended.

Exterior is duchess silk. Interior is taffeta. Brass frame and chain, rayon embroidery, glass beads.
The outsides are duchess silk and the insides are taffeta. The clasp and chain are brass and the embroidery is rayon.


The one without the fringe is going to Lynn McMasters, who made the beaded fringe.

One unfinished project done, umpteen more to go!

Sunday, May 27, 2012

New Hat Pins

I've added some new hat pins in my etsy shop, and relisted a bunch. I have a large batch that still needs photographing, including a handful that lean decidedly more steampunk-ish. I have no idea when I'll get around to listing those...hopefully soon.

Here are the ones that went online today. The ones that are made from antique buttons look marvelously close to originals.

Rhinestone Snowflake, 12"
Yellow Pearls and Sparkles, 12"
Aurora Borealis Rhinestones, 12"
Autumn in the Vineyard Pair, 10"
Autumn in the Vineyard, Large Medallion, 12"
Here are a couple more that I haven't listed, because I'm keeping them (for now).

Large green dome.
Small green dome.
Art Nouveau pair.
Large Art Nouveau Medallion

Friday, December 2, 2011

Inside the Parasol, Part 1

The parasol canopy that's featured in my earlier workshop posts on parasol restoration (Part 1 and Part 2) wasn't turning out as good as I wanted, so I took it off. This gives me a chance to talk about some of the innards of the parasol canopy. Fair warning: this is going to be a rather pedantic post, but I find these details just SO interesting, and if you're an aficionado of parasols, then hopefully you will, too.

Today I'll be discussing two common features you'll find underneath a parasol canopy. For lack of being able to find consistent terminology, I call these the "donut" and "joint wraps." More on terminology in a moment. I say they are "common" specifically because they are not universal, or at least there is no way for me to prove that they are universal. In the dozens and dozens of parasols I've seen either in person or online, however, I see them more often than not, and thus feel safe to conclude that they are common.

Ok! So first: the "donut" (I'm going to keep putting it in quotes to underscore that this is terminology I made up). This is a circle of fabric or leather that sits between the ribs and the canopy.

Fabric donut (cotton) on an 1890-1910 parasol.
When made of fabric, it's often (but not always) the same fabric as the canopy.

Donut that is made from some sort of canvas. The canopy
was silk taffeta. The parasol is from 1870-1890.


My guess is that the primary purpose for the "donut" is to protect the canopy from the metal, moving parts of the frame. I've also found that it's sometimes used as an anchor to stitch the canopy to, around the base of the parasol tip.

Remnants of a leather donut on an 1855-1870 parasol.
 Another purpose I've found served by the "donut" is to hide the spring mechanism of pagoda parasols. I've seen one "donut" that had this function that was enormous. This was on a friend's parasol, and unfortunately I don't have a photo.

Vinyl donut on a modern parasol (note the plastic top notch).

The Fox Umbrella Company ("Keeping you dry since 1968") calls this thing an "inside cap". I've also seen it called a rosette, but I like to think of rosettes as gathered, scrunchy rings of fabric, and the "donut" is invariably a flat, circle.

Here is the "donut" I put on the workshop frame:

Reproduction donut made from silk taffeta.
It's the same powder-blue silk taffeta as the canopy. It's a little big for the scale of the frame, but I can't be bothered to do anything about it. Now, fraying is completely historically accurate. But I hate fraying, so this little ring was completely soaked in fray check. Don't hate.

Next: "joint wraps." These are bits of fabric, also commonly the same as the canopy, that are wrapped around the point where the spanner ribs meet the canopy ribs.

Remnants of silk joint wraps on an 1890-1910 frame (this one).
The Fox Umbrella Company calls these "prevents," and, indeed, their purpose appears to be to prevent the canopy from rubbing the metal at the joint. On older frames, where this joint could have some sharp edges, this was probably quite necessary. Newer frames, however, (say, 1875 and later) have pretty clean joints, and I would think the "joint wrap" isn't as necessary. But tradition is hard to overcome, and I have an 1910-ish frame that was refurbished sometime after the invention of nylon and the commercialization of plastic that has vinyl "joint wraps."

Canvas wrap from the 1870-1980 parasol picture above.
I've found that "joint wraps" come in two styles: either a simple oval of fabric, as seen immediately above and below, or a tidily folded bit of fabric, as seen two photos up.

Cotton wrap on the 1890-1910 parasol pictured above.
Loosely and broadly speaking, the folded type of "joint wraps" that I have found are made from silk, because, well, an oval of silk would fray away. Both styles, though, are attached the same way: doubled thread wrapped a few times above the joint and a few times below.

Here are the "joint wraps" on the workshop parasol:

Fold silk taffeta joint wraps.
I've attached them with doubled Gütermann silk thread in a matching color (from ye old big box store), with a simple knot at the first stitch and last.


And that's the end of today's lecture.

I've ambitiously labeled this post "Part 1" because I figure I'll be talking more about the innards of parasols in the future. I just find them so ridiculously interesting, but I'll try to focus my posts on restoration issues. Anyway, I'm done for tonight, but I'll leave you with a teaser of where the workshop parasol is going:


Thursday, June 30, 2011

Let's call it a 1920's Ribbon Handbag

Jumping back in time again, to the beginning of March 2011: I found a really cute vintage handbag on etsy.com. The seller said it was from the 1920s, so I'm just going with that.

It sold while I was waffling over buying it.

Hmph, well I WANTS, it. I have a ton of 1 and 1/2" wide, blue double-sided satin ribbon leftover from another project. I paired it with white double-sided ribbon, and made this:


My version is taller than the original (I like to have plenty of room for my crap). The base of the original looks egg-shaped to me, but mine is just an oval.

The ribbons in the original were probably stitched together by hand. I used a stitch on my machine that resembles a feather or fern stitch:


Now, dummy me used a tearaway stabilizer for this; tearing the stabilizer out caused the stitches to distort! Lesson learned: I could've used a washaway stabilizer. It's poly ribbon. IT CAN GET WET.

P.S. this last photo also shows that I completely flubbed making french knots. Sheesh.