Showing posts with label trims. Show all posts

Monday, August 13, 2018

Fly Fringe Redux

Clever and talented butterball_bunny has been posting pics on Instagram of fly fringe she's making, so now I have fly fringe on the brain.

I started some fly fringe AGES ago...maybe three years ago?

Some bow tie flies made from Japanese cotton floss.

I thought I had silk floss, but if I do I have no idea where it's go to. The flies pictures above are made from Japanese cotton. It takes a lot of work to make the flies super fluffy, so this is not really a great material for fly fringe.

Some flies I made today, along with my bone tatting shuttle.

I'm also trying to figure out how to use a tatting shuttle to put the knots where I want them. I don't recall where or when I got this bone shuttle -- probably Costume College some years ago -- and I've never tatted a darn thing.

The plan is to eventually weave these bow tie flies into a tape. Naturally, I've picked a style of fly that will requires dozens upon DOZENS for even a yard of fringe. Stay tuned.

What's up with this blog: oy, it's been a very, very long time since I've added anything to this blog. Truth is, I'm just not a very good blogger. The other truth is that my creative endeavors have become even more sporadic and random than ever. I post (sporadically) on Instagram, so hop on over there if you're curious about what I've been up to.

Tuesday, August 11, 2015

Costume College 2015

Time for a brief Costume College recap.

I didn't make any new costumes for Costume College this year, and I didn't want to go without costumes, so I brought the three most recent things I've made or acquired.

At the Friday Night Social, I wore a 1950s-inspired cocktail dress. I made this for a special occasion in March, and will do a separate post on it later.

1950s-inspired silk cocktail dress, with my best attempt at a '60s bouffant.
For part of Saturday I wore the 1920s ensemble Lynn McMasters made for her new turban pattern. I'm really lucky that Lynn likes to use me as one of her models. I'm not super fond of having my photo taken, but frankly I'll do anything Lynn asks.

1920s party dress designed and constructed by Lynn McMasters. Photo courtesy of Val Labore. She blogs over at Time Traveling in Costume. Val is funny and creative, go check her out!

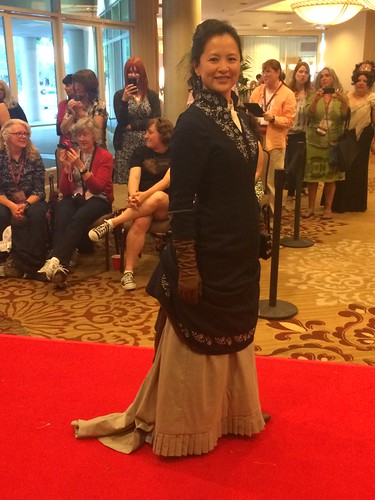
And finally, for the red carpet walk prior to the Gala, I wore the gown I made for the Bustle Tea last year. It has some updates, and deserves a full blog post (which I'll get to sometime soon).


Costume College 2015
Photo courtesy of Noelle Paduan. See more at her Flickr.
Other highlights from Costume College include: seeing the ladies from The Tudor Tailor again, for the first time since I attended a workshop with them back in 2007; the always fabulous Cathy Hay; seeing some of the Web's most beautiful and talented costumers in person; lectures with fantastic folks like Jennifer at Historical Sewing, Ithylwyn, Amanda Irwin, Rory Cunningham, Heath Hammond, who I think said he was affiliated with the English Warbow Society, and many others; the goodies I had not meant to buy but that came home with me anyway; and, of course, catching up with everyone in my costuming "family," I love you guys, your talent, and your endless creativity.

Jane Malcom-Davies of The Tudor Tailor with your author.

Jennifer of Festive Attyre (as the Grey Lady from Harry Potter) with Merja of Before the Automobile (which has got to be one of the best blog names ever).
Goodies from The Tudor Tailor! An autographed copy of "The Tudor Child," a copy of "The King's Servants," a pamphlet titled "'And her black satin gown must be new-bodied': The Twenty-First Century Body in Pursuit of the Holbein Look," and an updated edition of their "gable hood" pattern. All of these, except the pamphlet, can be had from their website.

More from The Tudor Tailor! My understanding is that this fan was used by the interpreters at Hampton Court Palace, and before that this was a prop in the movie "Shakespeare in Love." For real. Ray Fiennes may have touched it.

And yet more from The Tudor Tailor! I believe the necklace an earrings were used by the interpreters at Hampton Court. The necklace needed a minor repair, so I got it for a steal. The lace is just-to-die-for reproduction Reticella that can also be had from their website.

From Dawn Sklar, the trims and buttons vendor. I normally reject ribbon trims because they look too machine made and modern, but this one is pretty darn passable. Stay tuned, this may some day soon appear on an 18th century dress....
Antique rhinestone parure that I picked up in an antiques shop in Santa Barbara. I don't have a date for this set, and I'd wager a guess that it's no older than the 1950s, but it could pass for Edwardian. Besides, it's blue, it's pretty, and so it's MINE.

Saturday, July 5, 2014

These are not the trimmings I meant (French Gown c. 1780)

Now for a post about something I did actually make myself.

Zone Front French Gown c. 1780. Trimmed with floral garlands for Bal Di Carnivale.

In late 2013, the Greater Bay Area Costumer's Guild (GBACG) announced that in February it would host a Carnivale themed Venetian ball. I decided this was the excuse I needed to make a French gown that I planned years ago.

The gown is loosely based on this well-known, pink and frothy number house at the Kyoto Costume Institute (KCI):

French Gown c. 1780. Kyoto Costume Institute.
This gown is interesting because it has a zone front. It's the only sacque-back gown I'm aware of that has a zone front. The floral decorations are interesting as well, and are apparently painted silk.

The ribbon is wired, so to make it fit pulled the wire to gather it in strategic places.

I made my version out of a purple and gold striped damask, and used the pattern I had developed for the red french gown I made a few years ago. That saved loads of time. I don't remember the last time I had a dress go together so fast.

I got the stripes symmetrical, but didn't try to match the back of the neckline.

Yet I still ran out of time to  make and attached the trimmings, which were also supposed to be loosely based on the KCI gown, though embroidered instead of painted. A week before the event I decided that there was no way I was going to get the trims done (and still sleep and go to work). So, I trotted off to Michael's, the craft store. I bought four plastic floral garlands, several handfuls of plastic floral sprigs, and several spools of gold wired ribbon, and got creative.


The trimmings are plastic floral garlands and sprigs, creatively safety-pinned on.

Because 1) I was in a hurry, and 2) I wanted to be able to get these garlands off easily later, everything is attached with safety pins.

The bodice front closes with two hook sand bars.

The ribbon was safety-pinned also.
The original pattern is JP Ryan's, and I've deviated from the pattern's instructions by skipping the back lacing (I put in a big tuck) and using lacing strips.

The front laces under the stomacher, as according to the pattern.

I also wanted to be able to get into it mostly by myself, so the stomacher is tacked on on one side, and attaches with hooks and bars on the other side.

The stomacher is tacked to the bodice on one side, and attaches with hooks and bars on the other side.

Finally, I had wanted to make new sleeve ruffles, but...you know...ran out of time. So I put on my old faux-whitework sleeve ruffles.


My old faux-whitework sleeve ruffles finished the gown.

I will some day finish the trims I had planned, as well as the sleeve ruffles (I'm going to attempt machine whitework on mesh). I've already taken all the trims off, now just need to find the time to finish the embroidery and get it stitched on.

I also styled a new wig for this outfit, and will have to do a post on it later.

Here's a few pics of the gown in action.


Monday, December 26, 2011

Yet Another Cockade Tutorial (Part 2)

In this post I'm going to show you a few things you can do with the technique you learned in Part 1 of this series. These photos are imperfectly categorized, but as you read along you should get the idea.

Hopefully this will give you some ideas so that you can go and make your own unique cockades!

1. Tail variations.

In Part 1 I chose to tuck the tails of the ribbon into a loop so that they don't show. Here are a few cockades where I left the tails dangling out.
Two cockades with their tails left out. Both ribbons are
1 inch wide, and the loops are 2 inches long.
Closer view. I like the tails to separate, and they tend to
want to stay stacked on top of each other (which is
another look worth trying).
This one has the tails left out and every third loop is extra
long. 1 inch wide ribbon with 2 inch long loops.
2. Ribbon width variation.

In this variation I've used a wider ribbon, but the length of the loops are the same: two times the ribbon width. A wider ribbon, of course, results in a larger cockade.

An unfinished cockade made from 1 and 1/2 inch wide
ribbon, with loops 2 times the ribbon width. This is a very
large cockade, measuring almost 6.5" across. The cockade
from the Part 1 tutorial is pictured for comparison.
3. Loop length variation.

In this variation I changed the loop length to one times the ribbon width. With the one inch ribbon, this made a wonderfully springy little cockade.

The loops on this cockade are 1 times the ribbon width (so,
1 inch here). It's finished with two brass beads stacked on
top of each other.
This one looks great from the back, and would have worked
equally well with the back as the front.
4. Stacking variations.

I made another cockade with a one inch ribbon, with two inch loops, but instead of attaching it to the felt, I stitched the loops to each other.

Don't cut the thread after making the loops. Instead of
stitching the loops directly to the felt, after pinning them
to each other (Step 5 in Part 1) stitch the loops to each other.
I made another cockade from a much wider ribbon (two and a quarter inches wide).

This cockade is made from a massive 2 and 1/4 inch wide
ribbon. The loops are 3 inches long (yeah, that's not really
a multiple of the ribbon width, but it worked for the look
I was after).
The back side of this one also looks really great.
I then stacked one on top of the other, and stitched the back sides of the top cockade to the bottom cockade.
I stitched the smaller cockade on top of the bigger one and
finished it with a brass button.
This one also has a lot of potential on the back side (sorry,
photo came out a bit dark).
Here are a couple where I added a ruffle instead of stacking multiple cockades.

The unfinished cockade here is a 1 and 5/8 inch ribbon with
1 inch loops (ok, I'm ignoring the proportions again). To the
back of it I've stitched a simple knife-pleated ruffle.
This cockade is made from 1 and 1/2 inch ribbon with
1 and 1/2 inch loops. The lower layer is loops cut and sewn
individually to the back, a total cheat to save ribbon.
I also attached the tails separately. It's finished with a
brass button.
And that covers all the cockades I've made in experimenting with this technique. There are a few other variations I want to try, so stay tuned for future pics.And please share any cockades that you've made! I love to see other people's creativity.

Saturday, December 24, 2011

Yet Another Cockade Tutorial (Part 1)

There are quite a few tutorials on the web that explain how to make a cockade. So why am I adding another? For a simple and selfish reason: I figured out a method that works for me, and when I wanted to show some friends I couldn't remember the details anymore, and had to figure it out all over again! Hence, this post is as much for my own reference as perhaps to teach anyone who happens upon it.

Anyway! My method is based on a tutorial I found at instructables.com, with tweaks and additional steps to make the process easier. Here's what you need:

1. Ribbon. I'm using a one inch wide grosgrain in this tutorial, and suggest you use a ribbon at least one inch wide for your first cockade. I haven't tried any other type of ribbon for this type of cockade, and imagine satin and wired ribbons would work just fine, but for the first time grosgrain is the easiest material to use.

2. A small piece of felt. I'm using a polyester eco-felt, made from recycled materials.

3. A ruler and air soluble pen, or chalk, or anything that will come out without water.

4. Thread to match the ribbon, thread wax, and a sharp needle. If you haven't gotten into the habit of waxing hand sewing thread, I highly recommend it. It helps keep the thread from tangling around itself.

5.  Lots of sharp pins. I like using steel silk pins because they are VERY sharp, and don't leave any mark after they come out.
One inch wide striped grosgrain ribbon.
I like using striped ribbons, because the stripes
make interesting shapes in the finished cockade.

Step 1: mark fold points on the ribbon.

Mark folds on the ribbon.  I'm making 2" long folds here.
Leave a generous tail, at 3-4 times the length of the folds.
I'm experimenting with measurements in multiples of ribbon width, the way Candace Kling does for flower making. Here I'm using 2 times the ribbon width, so my folds are two inches long. The air soluble marker was a bit hard to see in the photo, so I've gone over them digitally. Since the marks will fade, I only make about a dozen marks or so, and mark more as I go along.

Step 2: fold the loops of the cockade and pin them together.

First fold and pin.
Second and third fold, makes your second loop. Pin.
Many folds later, I have 4 loops (counting on the left side).
In this step you make the loops of the cockade. I'm right handed, so I keep the roll of ribbon to my right. I make two folds at once, one to the left, one to the right, so that I have one loop, when you look at the left side. Pin each loop to the previous loops. After the first loop, there isn't really any way to pin through all the layers, so I pin through just enough to keep the top loop in place.
Finished stack of loops. Leave a generous tail
at the beginning and end.
I find 10 to 12 loops makes a nice cockade. Sixteen is great for a denser cockade. More than 18 is probably overkill.

Step 3: stitch the loops to each other.

For this step I use a matching thread, doubled up and knotted at the ends (for demonstration purposes, and laziness, the thread here is white). Pass the needle through the tail and through both layers of the first loop, close to the corner. Secure the thread.

Start by going through the bottom tail and the first loop.
Secure the thread by passing the needle between
the threads and under the knot.
Finish by pulling taught.
For the remainder of this step, you are essentially back stitching each loop to the previous loop.

Pass the needle through the first and second loops,
close to the corner. Be sure to go through all layers.

Pass the needle through the second and third loops.
Repeat, two loops at a time, until you've gone through
the whole stack and the end tail.
Take an extra stitch through the last loop and the bottom tail, to secure the thread. Do not cut the thread off!

Step 4: remove the pins and connect the start and end. 

Remove all the pins.
Pinch the tails together and stitch through both twice.
At this point you can tie off the thread.
Yes, the thread has mysteriously changed color here. I needed a better photo of this step, so took one of a cockade I made after the one in this tutorial.

What to do with the tails: you can leave them hanging out, and trim them at an angle in or a dove tail. Here I made another loop from one of the tails, folded the other
tail inside, and stitched the end of the outer tail to the inner.

One tail is folded into an additional loop and the other
tail is tucked inside. I then stitched the outer tail to the
inner near the cut end.
Step 5: arrange the loops.

Turn the cockade over so that the stitches are on the underside.
Arrange the loops so that they're all going in the same direction.
At this point I like to pin the loops to each other so that
they are spaced evenly.
This is the bottom side of the cockade, but note that this
can also be your top side, which results in a slightly
different style.
Step 6: attach the felt and finish the center.

A piece of felt on the back of the cockade supports the loops and helps them maintain their spacing. It also gives you a foundation to, say, attach a pin back or a clip, something to stitch to if you want to attach it permanently to something.
Cut a circle of felt smaller than the cockade.
Pin the felt in place and whip stitch it in place.
Finish by putting something in the center to cover up
the hole. Fancy buttons, beads, or flowers work well.
Here I've used a pearl bead.
And now we're done! I hope this tutorial is clear. I welcome any and all feedback, and am happy to edit this tutorial so that it works for everyone.

This is now an abominably long post, so I will end. In Part 2 I'll talk about a few variations, and show you some of the cockades I've made in the process of learning this technique.

Happy stitching!