Showing posts with label 1750. Show all posts

Wednesday, July 20, 2011

What's Underneath: Quilted Petticoat and Pannier c. 1750

Egads, I have a lot going on in the next two weeks! But I have two more posts related to the 1750 Court Gown, so I'll get them out lickity-split.

Here are the pannier and quilted petticoat that go under the gown. First, the pannier (these and more photos here):


For a pattern I used the illustration in Jean Hunnisett's Period Costume for Stage & Screen: Patterns for Women's Dress 1500-1800. I did shorten it, since apparently I'm not as tall as the typical stage actress.


The fabric is silk taffeta, flat-lined it with a heavy weight silk organza. The hoops are modern hoopsteel; I would have like to use a natural, period material (such as basket cane) but that was proving to be too much of a pain, so I gave up.

Control ties and hoop channels.
The hoop channels, waistband, ties, and trims around the ruffle are all polyester ribbon, either grosgrain or double-faced satin, in the same shade of blue. I tried to find a silk ribbon that matched the blue stripe in the fabric, but this poly ribbon was the best match I could find. C'est la vie.

Hem ruffle and trim.
The bows along the ruffle are "butterfly pull bows." When I was a kid, I had some pull bows for gift wrapping. A little of 'net surfing (first to figure out what the heck these bows were called), and I reverse engineered how to make them. I made mine with just four loops; commercial gift wrap bows have eight to twelve. The bows come off, too. I just used the pull ties to tie them onto loops stitched onto the pannier.

This is my tester, so it's sloppy.
Inside are two pull ties.
Pull the ties and gather up the main ribbon.
And we have a bow!


Side hook.
I made the pannier to be tied on, but it's really difficult to tie it on tight enough on my dress form (it would be a little easier on the body, because I can sit down and thus alleviate the weight). So, on each side, I tied a loop in the back tie and tied a heavy hook onto the front tie. Problem solved! It' much easier to put on that way.

Bum pad.

Hunnisett suggests putting a pad in the back, so I gave it a shot. The effect is to tilt the pannier back, and I liked it, because it made the front of the pannier flatter.


Over the pannier goes a quilted petticoat (more photos here):


It's made from a single king-sized quilt, and yes, it's a little short but it does it's job (hiding the ridges made by the pannier's hoops) so I can't be bothered.


Period quilted petticoats don't have batting from hem to waist; the batting normally ends a few inches below the waist. I find this quite logical, because it makes the waist less chunky, and easier to pleat into the waistband. So, I pulled the quilting stitches out of the top of each panel, removed the batting, then re-quilted the area. Yeah, seriously tedious. But I'm very pleased with the result. I also removed the batting from the seam allowance at the side seam, before doing a modified fell seam.


The quilted petticoat is easily the heaviest part of the whole garment, heavier than the pannier. But it does give the gown an excellent shape and look, and, really, well fitted stays help to carry the weight.

Tuesday, July 19, 2011

1750 Court Gown Part 3: Taking It Off

In this post I'll take the gown off the dress form and show how it's put together. As before, you can find high res photos, and many more of them, at my website.

I used J.P. Ryan's pattern, and modified most of it. This wasn't because of any problem with the pattern, in fact, far from it. Patterns are drafted to fit someone, and because of my physical attributes, that someone isn't me. Moreover, I needed to change the back to work with the pattern in the fabric (I simply had to have symmetry) and the pattern was meant to go over J.P.'s pocket hoops, not a big pannier. I do love J.P.'s patterns: they're well researched and meticulously drafted, and I've used them to make now five garments with super-happy-happy results.

First, the stomacher comes off.


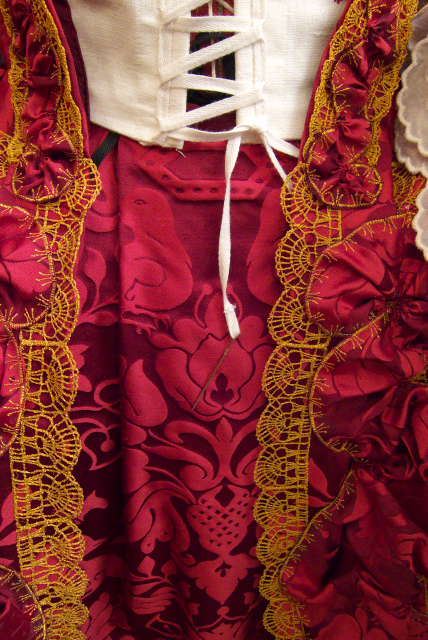
Underneath the stomacher is an under stomacher, which is what keeps the bodice on the body. This is part of J.P.'s pattern and I think it's great, because it makes the bodice very stable. Here also you can see pattern cheat #1: instead of stitching eyelets to lace it shut, I used securely attached strips of cotton tape. I learned this method from Jennifer at Festive Attyre years ago (and, indeed, used it on my facsimile of her Italian working class dress; you'll find her explanation on this page). And because I can't leave well enough alone, I decorated the blank space on the under stomacher with a fancy machine stitch (technically, not embroidery since it doesn't require my machine's embroidery arm).


And to make my life easier, I attached a tapestry needled to the lacing tape.


Here's the stomacher:


I wanted to try something different, so I cut out a section of the fabric featuring the birds, since I wanted to emphasize the "love birds" theme in the fabric. I painted just enough to fill the stomacher, using Neopaque silk paints from Dharma Trading. It was mostly like doing "paint by numbers", followed by some shading to give everything some dimension. I had some coverage problems with the yellow and orange, but all the other paints went on smashingly. I don't know the last time that I actually painted something (except for doll faces, which are quite different) so wasn't sure how this was going to come out, but in the end I can't complain (well, maybe a little, but I'll keep it to myself). The coloring of the birds are based on the yellow finch.

Painted silk is historically accurate (Hallie at Sign of the Golden Scissors has been talking about it, for instance, here). Whether there ever existed a painted stomacher, and the whole gown was not also made from painted silk, I don't know, and haven't made any effort to find out.

I wasn't sure how much fabric I would need to get over the pannier, petticoat, and petticoat, but it turned out pretty simple. The gown is two widths of the 60" wide fabric for the back, and one width, split in half, for the front. Front and back join along the side skirt with straight cuts (the pattern has one straight, and one diagonal cut, I assume so that the front pulls open in the expected V shape). The fabric that extends out from the waist then got stacked into fat pleats and tacked to the bodice lining, which you can (sort of) see here:


 Here's the interior of the bodice, where you can maybe see the tacking stitches for those pleats, and two lines of stitches that keep the side back of the bodice attached to the lining:


Here you can also see pattern cheat #2: the pattern calls for a set of ties along center back, so that you can expand or contract the bodice. I wanted to 1) not deal with ties and boning; 2) save time; and 3) my torso dimensions don't fluctuate much, which makes this a "nice to have." So, I just put in a big fat dart, and if I do really need to adjust I can let the dart out.

Around the hem and open front of the skirt I put a deep facing, using silk taffeta:


Here you can also see the gold thread that keeps the lace attached. I like facings, because they provide body in key places. The damask here has a lot of body, but the addition of a facing forces it to behave. Along the hem, the facing also helps defend the fancy fabric from dirt and snags.

The gown comes off, and here's the petticoat:


To make the petticoat I ditched the pattern completely. I took three widths of the fabric (which was somewhat more than enough to go over the under structure), seamed them into a tube, and then pin-fit it to the dress form, pulling up the sides to make the hem level. I tried to make the front very flat, but was having trouble getting the fabric to behave, so ended up with a wide box pleat at center front. The flounces along the hem go pretty far around because I anticipate wearing the gown "retroussée dans les poches" (meaning with the skirt pulled through the pocket slits) so that I can get the train mostly off the ground.

The sides I pleated to a strip of grosgrain, leaving an opening so that I can get to my pockets.


This method is more-or-less suggested by Jean Hunnisett in Period Costume for Stage and Screen: 1500-1800.

Here's something that I tried with this petticoat that I can't document, but that did help control the front and back halves while putting this on:


I put a couple of loops on the inside of the front waistband that I thread the ties through. On the back, the loops should have been on the outside, but I muffed up and put them on the inside. They're still usable, but a bit more of a hassle.

Lastly, this is what happens when ya' plum run out of time:


The petticoat's hem facing is just based on, and the ruching is held on with pins. Yeah, big mess.

Geeze, this ended up being a really long post. Sorry about that! Hopefully you didn't get bored halfway through. :)

Saturday, July 16, 2011

1750 Court Gown, Part 2: The Gold Lace

The prominent trim on this gown is the gold lace.


As before, I've got higher res photos (and many more of them) on my website. Stop by here.

I made this lace using the embroidery attachment on my sewing machine. In machine embroidery parlance, this is called "freestanding lace," because it is embroidery that is not fixed to a fabric (hence, freestanding).

For thread I used Madeira FS Supertwist Gold 7. I used 50 weight because I wanted a fine, lightweight lace, but I started running short, so switched to 40 for the top and 50 for the bobbin.This heavier lace only made it onto the front of the petticoat and the very last repeat in the curving section you see above.

I must say, that the Madeira Supertwist was FANTASTIC. Through hours and hours (and hours) of stitching, it suffered very little breakage.As a freestanding lace it's a little stiff, but looks great.

There are three widths of lace on this dress:

Small lace along the top of the stomacher.
Medium lace along the open edge of the skirt.
Large lace along the skirt ruching.
The small and medium lace were digitized by Dainty Stitches, who I found at Secrets of Embroidery. To make the large lace, I took the medium lace pattern and added more scallops.

Test stitch-outs of the small and medium lace (on top of my
messy sewing notebook).
Test stitch-out of the large lace. I used machine sewing thread for
all these test stitch-outs.
What it looks like "in the hoop." The segments
get cut out and stitched together with a zig-zag
before they hit the water for soaking.
Pinning segments onto the sleeve flounces.
Because they needed to curve, I didn't connect
these segments beforehand.

Now, there is a problem with this lace: it's in the style of crochet lace.

Crochet lace wasn't developed until the 19th century.

OH WELL. I didn't have time to digitize lace from scratch, especially since I had never digitized lace before this. If I had had the time, I would have created some lovely punto in aria lace. Ultimately, only lace junkies and those who crochet a lot will notice. I used to crochet. To me, this is so obviously in the style of crochet. :(

And finally, just for giggles:
These are 5000 meter (5500 yard) spools.
40 weight on the left, 50 weight on the right.

After. Still have a lot of the 40, but the 50 is toast.


Sunday, July 10, 2011

Soiree of the Year, and Costume Preview...or Post-view...or...


Last night, the Greater Bay Area Customers Guild (GBACG, also on Facebook) hosted an "Evening at the Petit Trianon" at the Bellevue Club in Oakland, California. Visit our Flickr Pool for loads of photos (and keep visiting, photos will keep getting added). The costumes were fabulous. The venue was perfect. Accolades are inadequate. Of course, what makes GBACG events so much fun for me, is the company. The Guild is filled with great people.

Here is what I wore at the party: a French gown, or robe à la française, or sack/saque back gown (please don't call it a Watteau or I may smack you) c. 1750,  and some monumental hair.


This outfit has preoccupied me more-or-less-and-more since March. I'll blog it to pieces in the next few weeks to describe what you're looking at now, and will continue to blog about it as I *ahem* finish it.

Wednesday, July 6, 2011

Mid-1700's Sleeve Flounces

Ok, for real this time, a post about something new! I finished these last weekend: sleeve flounces, a.k.a. false sleeves, a.k.a. engageantes (a française).


Mostly cotton machine embroidery on cotton organdy, pleated to a muslin band. Embroidery digitized by someone else, and arranged by me into the flounce shape. The embroidery is asymmetrical, so the pair mirror each other.

Yes, there is something these are going to be attached to...more on that later.