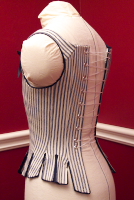
The last layer underneath my 1750 Court Gown is a set of stays (more photos here):
Yes, I KNOW the lowest layer should be a shift...I don't have one...it's on the list...I'll get to it eventually!!!
Front laced stays are not common, but not unheard of. My old stays lace in back only, and are fully boned, so this was an attempt to do something completely different. Front lacing really does make putting this on super easy.
I started with the Butterick pattern, 4254, because the shape of the pieces are, essentially, documentable. I suspect this pattern is based on an illustration in Norah Waugh's Corsets & Crinolines but I don't have the book handy, and can't check.
Aside from the the approximate correct shape of the pattern pieces, the pattern was BAD. It had the typical "Big 3" problem, in that for my measurements it expects to be worn with back edges touching. The bigger problem, though, was that it's extremely short. My body runs a tiny bit short from bust to waist to hip, and it was waaay to short for me. I started with one size smaller than the pattern recommended, added length, removed tabs, moved the shoulder tabs...it's not really the same pattern anymore. I went through three mockups (and one expert fitting consultation) before I was satisfied.
It's made of two layers of linen canvas, heavily starched, and one layer of what I think is an upholstery linen (it's quite thick ).To get the look of hand-stitched channels, I used a heavy linen thread on the exterior (35/2 from Burnley and Trowbridge), lighter cotton thread for the bobbin. I used the same heavy linen thread for the eyelets.The boning is "artificial whalebone" (aka German Plastic).
The binding is natural pigskin.
Since I'm teaching a class on lucet weaving at Costume College this year, I felt I had to put rubber to the road, so the speak. So, the straps and front of the stays are laced with standard lucet cord, made from cotton crochet cord, and the back is laced with double lucet cord. I think the cord is certainly sturdy enough for this application...I just need to get all the stretch out.
I feel like I've been making these stays for 10 years...that's when I bought the tomato red linen that makes up the exterior. They have, of course, evolved in those years (for instance, I had originally planned to hand stitch the whole thing, and Butterick 4254 didn't even exist back then) and despite making the first mock-up two years ago, it took me until March of this year to actually CUT the red linen. Costumer's sewing block? Nah, I've just had so many other things to do, and have a great set of stays already...but the old stays has issues...hence, new stays!
Showing posts with label undergarments. Show all posts
Thursday, July 21, 2011
Wednesday, July 20, 2011
What's Underneath: Quilted Petticoat and Pannier c. 1750
Egads, I have a lot going on in the next two weeks! But I have two more posts related to the 1750 Court Gown, so I'll get them out lickity-split.
Here are the pannier and quilted petticoat that go under the gown. First, the pannier (these and more photos here):
For a pattern I used the illustration in Jean Hunnisett's Period Costume for Stage & Screen: Patterns for Women's Dress 1500-1800. I did shorten it, since apparently I'm not as tall as the typical stage actress.
The fabric is silk taffeta, flat-lined it with a heavy weight silk organza. The hoops are modern hoopsteel; I would have like to use a natural, period material (such as basket cane) but that was proving to be too much of a pain, so I gave up.
The hoop channels, waistband, ties, and trims around the ruffle are all polyester ribbon, either grosgrain or double-faced satin, in the same shade of blue. I tried to find a silk ribbon that matched the blue stripe in the fabric, but this poly ribbon was the best match I could find. C'est la vie.
The bows along the ruffle are "butterfly pull bows." When I was a kid, I had some pull bows for gift wrapping. A little of 'net surfing (first to figure out what the heck these bows were called), and I reverse engineered how to make them. I made mine with just four loops; commercial gift wrap bows have eight to twelve. The bows come off, too. I just used the pull ties to tie them onto loops stitched onto the pannier.
I made the pannier to be tied on, but it's really difficult to tie it on tight enough on my dress form (it would be a little easier on the body, because I can sit down and thus alleviate the weight). So, on each side, I tied a loop in the back tie and tied a heavy hook onto the front tie. Problem solved! It' much easier to put on that way.
Hunnisett suggests putting a pad in the back, so I gave it a shot. The effect is to tilt the pannier back, and I liked it, because it made the front of the pannier flatter.
Over the pannier goes a quilted petticoat (more photos here):
It's made from a single king-sized quilt, and yes, it's a little short but it does it's job (hiding the ridges made by the pannier's hoops) so I can't be bothered.
Period quilted petticoats don't have batting from hem to waist; the batting normally ends a few inches below the waist. I find this quite logical, because it makes the waist less chunky, and easier to pleat into the waistband. So, I pulled the quilting stitches out of the top of each panel, removed the batting, then re-quilted the area. Yeah, seriously tedious. But I'm very pleased with the result. I also removed the batting from the seam allowance at the side seam, before doing a modified fell seam.
The quilted petticoat is easily the heaviest part of the whole garment, heavier than the pannier. But it does give the gown an excellent shape and look, and, really, well fitted stays help to carry the weight.
Here are the pannier and quilted petticoat that go under the gown. First, the pannier (these and more photos here):
For a pattern I used the illustration in Jean Hunnisett's Period Costume for Stage & Screen: Patterns for Women's Dress 1500-1800. I did shorten it, since apparently I'm not as tall as the typical stage actress.
The fabric is silk taffeta, flat-lined it with a heavy weight silk organza. The hoops are modern hoopsteel; I would have like to use a natural, period material (such as basket cane) but that was proving to be too much of a pain, so I gave up.
![]() |
| Control ties and hoop channels. |
![]() |
| Hem ruffle and trim. |
![]() |
| This is my tester, so it's sloppy. |
![]() |
| Inside are two pull ties. |
![]() |
| Pull the ties and gather up the main ribbon. |
![]() |
| And we have a bow! |
![]() |
| Side hook. |
![]() |
| Bum pad. |
Hunnisett suggests putting a pad in the back, so I gave it a shot. The effect is to tilt the pannier back, and I liked it, because it made the front of the pannier flatter.
Over the pannier goes a quilted petticoat (more photos here):
It's made from a single king-sized quilt, and yes, it's a little short but it does it's job (hiding the ridges made by the pannier's hoops) so I can't be bothered.
Period quilted petticoats don't have batting from hem to waist; the batting normally ends a few inches below the waist. I find this quite logical, because it makes the waist less chunky, and easier to pleat into the waistband. So, I pulled the quilting stitches out of the top of each panel, removed the batting, then re-quilted the area. Yeah, seriously tedious. But I'm very pleased with the result. I also removed the batting from the seam allowance at the side seam, before doing a modified fell seam.
The quilted petticoat is easily the heaviest part of the whole garment, heavier than the pannier. But it does give the gown an excellent shape and look, and, really, well fitted stays help to carry the weight.
Thursday, July 7, 2011
Cap c. 1760 and Bed Ticking Stays, c. 1715
These things are really rather old, but they're new now because I just uploaded galleries to my sad little website (it needs a lot of work...I'll get to it, eventually!)
First is a mid-1700s cap, which I think I finished in late 2007 or early 2008 (full gallery is here):
I love caps. They're one of those things that really make a costume complete. I made one cap before this, but gave it to a friend without taking pics.
The pattern is from La Fleur De Lyse. The drafter, Suzanne Gousse, dates her caps to the mid-eighteenth century, so I've arbitrarily slapped the date 1760 on this cap. It's made of cotton organdy, which can hold those pleats without pressing! Amazing stuff. The tape is linen.
I forgot to take a pic of the cheat I use to keep it on my head. Soon as I remember, I'll add that.
Next is a set of stays from around 1715, which I think I made in 2005 (full gallery, with a ton of pics, is here):
Yes, they are made from bed ticking. The interior is muslin, the boning is "artificial whalebone" (a.k.a. German plastic), the binding is poly grosgrain and the grommets (gasp! yeah, I was in a hurry) are nickel.
Here are the slightly edited notes I wrote up on my website:
These were my very first set of stays. At the time, I just really needed something, and fast, so that I would have a foundation to make gowns over. Hence, I made no effort to use period-accurate materials, and used whatever I could get from the local fabric store (except the grommets and plastic whalebone, which I already had).
For the pattern I used the Custom Corset Pattern Generator as the base, and modified the result using an illustration from Cut of Women's Clothes by Norah Waugh. Waugh apparently based this illustration on one in Maurice Leloir's Histoire du Costume. Interestingly, Leloir dates these stays to 1715, while Waugh dates them to the mid-eighteenth century. Since Leloir came before Waugh, I'm un-scientifically going with his date.
In constructing these stays, I used what I read to be a historically accurate method: make up each of the ten panels individually (sew channels; insert boning), attach the panels to each other, then bind the edges. The stays should probably have a lining, but I didn't bother.
I never used these stays. They have two problems: first, the center front point bends up, though that can easily be fixed by adding a busk pocket and busk to the inside. The second problem is harder to fix, which is that the straps are set too close to center front. While this doesn't affect the fit, the wide, deep necklines that are common with 18th century clothes mean the straps would show.
But probably what really happened with these stays is that I made the set that I actually use, and moved on without them.
First is a mid-1700s cap, which I think I finished in late 2007 or early 2008 (full gallery is here):
I love caps. They're one of those things that really make a costume complete. I made one cap before this, but gave it to a friend without taking pics.
The pattern is from La Fleur De Lyse. The drafter, Suzanne Gousse, dates her caps to the mid-eighteenth century, so I've arbitrarily slapped the date 1760 on this cap. It's made of cotton organdy, which can hold those pleats without pressing! Amazing stuff. The tape is linen.
I forgot to take a pic of the cheat I use to keep it on my head. Soon as I remember, I'll add that.
Next is a set of stays from around 1715, which I think I made in 2005 (full gallery, with a ton of pics, is here):
Yes, they are made from bed ticking. The interior is muslin, the boning is "artificial whalebone" (a.k.a. German plastic), the binding is poly grosgrain and the grommets (gasp! yeah, I was in a hurry) are nickel.
Here are the slightly edited notes I wrote up on my website:
These were my very first set of stays. At the time, I just really needed something, and fast, so that I would have a foundation to make gowns over. Hence, I made no effort to use period-accurate materials, and used whatever I could get from the local fabric store (except the grommets and plastic whalebone, which I already had).
For the pattern I used the Custom Corset Pattern Generator as the base, and modified the result using an illustration from Cut of Women's Clothes by Norah Waugh. Waugh apparently based this illustration on one in Maurice Leloir's Histoire du Costume. Interestingly, Leloir dates these stays to 1715, while Waugh dates them to the mid-eighteenth century. Since Leloir came before Waugh, I'm un-scientifically going with his date.
In constructing these stays, I used what I read to be a historically accurate method: make up each of the ten panels individually (sew channels; insert boning), attach the panels to each other, then bind the edges. The stays should probably have a lining, but I didn't bother.
I never used these stays. They have two problems: first, the center front point bends up, though that can easily be fixed by adding a busk pocket and busk to the inside. The second problem is harder to fix, which is that the straps are set too close to center front. While this doesn't affect the fit, the wide, deep necklines that are common with 18th century clothes mean the straps would show.
But probably what really happened with these stays is that I made the set that I actually use, and moved on without them.
Subscribe to:
Posts (Atom)