Friday, November 12, 2021

Stitch Markers for Tunisian Crochet

In knitting, stitch markers are used to keep track of key points in the work, such as where to place increases or decreases, the starts and ends of stitch patterns, or just to break up a long row of stitches into smaller block so that the stitches are easier to count. Knitting patterns will have instructions such as "place marker (PM)" or "slip marker (SM)" that should help you check that your work is in line with where you are in the pattern.

I've done a little bit of Tunisian crochet (also called Afghan crochet), and in the couple of patterns for shaped garments that I've looked at I didn't see use of stitch markers. Likely this is because knit-type stitch markers, which are typically rings of some kind that you thread onto your needles, don't work in crochet. Tunisian crochet patterns seem to solve the lack of stitch markers by providing stitch counts. All well and good if you're working narrow pieces without increases or decreases, but once the piece is wider and maybe a bit more complicated? You spend a lot of time counting, losing track of the count, starting over counting, etc. Moreover, the written pattern can get very long and tough, or even tedious, to read.

Now, I don't do a lot of crochet, but I do like to make amigurumi animals from time to time, and from one pattern I learned about using scrap yarn to mark the beginning of each row. You can see example of using scrap yarn as a stitch marker here.

Stitches n Scraps does a fine job of explaining how to use scrap yarn for stitch markers, but I'm going to provide my own tutorial as applied more specifically to Tunisian crochet. I hope that Tunisian designers will adopt the use of stitch markers, and start writing more concise, easier to follow patterns.

Step 1:


I've cast on 16 stitches, and will use a marker to indicate the middle of this piece. I cut a piece of scrap yarn about 4" long. It's best to use a really smooth yarn, like cotton, and to stay away from a really grabby yarn, like wool.

Step 2:


Using a yarn needle or small crochet hook, pull the scrap yarn between the stitches where you want the marker to be.

You can also lay the scrap yarn in place when picking up the stitches, and I would if I'm casting on a lot of stitches and am using stitch markers to count them. I find picking up the first row a bit fiddly, though, so like to add the stitch marker after the stitches are on the hook.

Step 3:


Work the first reverse pass. The scrap yarn should be hanging out between two loops.

Step 4:


Work the next forward pass (note that I'm doing Tunisian Knit Stitch (TKS) in this example). Once you've picked up the loop that is one stitch before the stitch marker, flip the scrap yarn over to the back of the work. Make sure your working yarn is on your left (or right, if you're working left-handed) to avoid the scrap yarn getting wrapped around the yarn in the back.


Finish the forward pass, work a reverse pass.


This is what the work looks like after the reverse pass.

Step 5:


Work the next forward pass. Once you've picked up the loop before the stitch marker, flip the end of the yarn from the back of the work to the front of the work. Again, make sure the working yarn is on the left before you flip the scrap yarn.

It's OK if the scrap yarn gets caught under the bit of yarn that sits between stitches, but the scrap yarn gets harder to pull out.

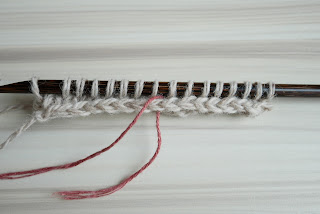
Complete the forward pass and work a reverse pass.


Continue flipping the scrap yarn from front to back or back to front on each forward pass (sometimes I flip the yarn only every other row).


After you've done a number of rows, you should have what looks like sewn stitches between two columns of the work.

Once the scrap yarn starts to become too short to flip to over the work, pull it until you have enough to flip. This is why the scrap yarn needs to be smooth: it's going to get dragged through your work as you go along. Be careful to not pull so hard that you pull the scrap yarn completely out.

I hope you will find these instructions helpful, and I encourage all Tunisian crochetters out there to use stitch markers everywhere and anywhere!

Wednesday, October 7, 2020

Bobbin Lace Bolster Pillow

I've started making bobbin lace! Here's my first weaving, a shape usually called a bookmark, from a pattern I found on Alexandra Stillwell's blog. This one is bookmark 3.

 
My first bobbin lace weaving, a bookmark.

This lace is made from a fairly heavy crochet cotton whose weight I don't exactly know since I no longer have the label (I'll make the effort to figure it out eventually). It was good for learning the stitches and pattern, and made it easy to see what I was doing when…undoing.

I have a bobbin lace kit, which I got as a gift (mrfmfl) years ago. It came with a big round "cookie" style pillow.

A basic "cookie" style lace making pillow, made from polystyrene.

My aim is to make lace yardage, so I made a bolster style pillow. The core of the pillow is a pad of shredded denim and other materials, which comes as insulation in our meal prep kits. Rolled it around a dowel, and wrapped the roll with a couple of layers of wool flannel.

My bolster pillow is made of a pad of shredded cloth
wrapped in wool flannel.

The cover, in traditional blue, is cotton twill. Excluding washing the cover fabric, from cutting the dowel to stitching down the ends of the cover, the whole thing took me maybe an hour and a half to make.

The finished pillow, covered in traditional blue.

I used a square dowel on the theory that if the pillow is resting on the dowel, the square shape will keep it from rolling too much. But I'm using my little Ashford rigid heddle loom (darn handy thing it's turned out to be) as a stand, and the pillow wedges nicely between the front beam, the horizontal support, and an empty heddle. I'm leaving the dowel, though, because it serves well as a handle for rotating the pillow.

My very small rigid heddle loom works great
as a stand.

Working a very simple lace edging.

In action, I've found the pillow to maybe be not quite firm enough. Pins flexed a little as I pulled stitches around them. I may wrap a few more layers of wool flannel around the core, and see if that makes it a bit more firm.

Monday, August 13, 2018

Fly Fringe Redux

Clever and talented butterball_bunny has been posting pics on Instagram of fly fringe she's making, so now I have fly fringe on the brain.

I started some fly fringe AGES ago...maybe three years ago?

Some bow tie flies made from Japanese cotton floss.

I thought I had silk floss, but if I do I have no idea where it's go to. The flies pictures above are made from Japanese cotton. It takes a lot of work to make the flies super fluffy, so this is not really a great material for fly fringe.

Some flies I made today, along with my bone tatting shuttle.

I'm also trying to figure out how to use a tatting shuttle to put the knots where I want them. I don't recall where or when I got this bone shuttle -- probably Costume College some years ago -- and I've never tatted a darn thing.

The plan is to eventually weave these bow tie flies into a tape. Naturally, I've picked a style of fly that will requires dozens upon DOZENS for even a yard of fringe. Stay tuned.

What's up with this blog: oy, it's been a very, very long time since I've added anything to this blog. Truth is, I'm just not a very good blogger. The other truth is that my creative endeavors have become even more sporadic and random than ever. I post (sporadically) on Instagram, so hop on over there if you're curious about what I've been up to.

Monday, October 17, 2016

A short post about weaving

Geeze, it's been over a year since I've posted anything.

So why am I here now? Well, a recent visitor to this blog had a question about weaving, which it so happens I have been doing lately. Some time back I acquired a Schacht Rigid Heddle loom (this one though without the stand). I've done some rigid heddle weaving with a paddle loom, and also a little bit of card weaving (which is totally fun and I need to do it again), and at one point I had some ambitious weaving ideas, including crazy long shawls seen in Regency fashion plates, and period accurate fringe (eventually, one of these ideas will come to fruition...)

Anyway, I wanted to be able to do more weaving than I could do with the paddle or the cards, but wasn't about the shell out big bucks for a floor loom. So, I went with a table loom with two rigid heddles.

My first weaving project was pretty much a total failure, due to poor yarn choice. Maybe fuzzy angora-style yarns can be woven, but THIS particular fuzzy angora-style yarn SUCKED. I gave up on the weaving after only a few inches


For my second weaving project, I used what I think is a cotton or cotton-blend yarn.


Yeah, that's me sitting on the floor with the loom, which is not how it's supposed to be used, and is not good for my back. Ahem.

Here's the scarf that I wove.

The yarn was slightly variegated, which serendipitously resulted in a plaid pattern.

 
This scarf was for the charity knitting (to which I've added weaving) a group of us at my work have been doing. This one will join the Red Scarf Project donations.

Saturday, August 29, 2015

House Cleaning

I think that I'm a typical costumer, in that, over time, I've accumulated a lot of costuming "stuff." I managed to clear out a few things at the GBACG Costumers Bazaar last weekend, but still have many extra bits that need to go. So, I've set up shop at Bonanza, and listed many costuming accessories, including some of the things you see below. A link to my Bonanza shop also appears in the pane on your right.

Here's a preview of some of the things I've listed. Funnily enough, they're pretty much all left from workshops I've taken or taught.

Edwardian-style parasol.

18th century embroidered neckerchief.

18th century fancy pocket.

18th century fancy pocket.

18th century linen pocket.

18th century linen pocket.

18th century linen pocket.

What is Bonanza:
Bonanza advertises itself as an alternative to eBay. I find that it's a bit more of a cross between eBay and Etsy. It's a marketplace for folks like you and me to buy and sell stuff. Like Etsy, sellers set up a shop.

Why am I using Bonanza:
Frankly, Bonanza has a much simpler and affordable fee structure than eBay or Bonanza. I'm not a very active seller, and it can take me a long time to sell things. So I chose to use Bonanza because listing and maintaining listings for a long time is easy and affordable.

Tuesday, August 11, 2015

Costume College 2015

Time for a brief Costume College recap.

I didn't make any new costumes for Costume College this year, and I didn't want to go without costumes, so I brought the three most recent things I've made or acquired.

At the Friday Night Social, I wore a 1950s-inspired cocktail dress. I made this for a special occasion in March, and will do a separate post on it later.

1950s-inspired silk cocktail dress, with my best attempt at a '60s bouffant.
For part of Saturday I wore the 1920s ensemble Lynn McMasters made for her new turban pattern. I'm really lucky that Lynn likes to use me as one of her models. I'm not super fond of having my photo taken, but frankly I'll do anything Lynn asks.

1920s party dress designed and constructed by Lynn McMasters. Photo courtesy of Val Labore. She blogs over at Time Traveling in Costume. Val is funny and creative, go check her out!

And finally, for the red carpet walk prior to the Gala, I wore the gown I made for the Bustle Tea last year. It has some updates, and deserves a full blog post (which I'll get to sometime soon).


Costume College 2015
Photo courtesy of Noelle Paduan. See more at her Flickr.
Other highlights from Costume College include: seeing the ladies from The Tudor Tailor again, for the first time since I attended a workshop with them back in 2007; the always fabulous Cathy Hay; seeing some of the Web's most beautiful and talented costumers in person; lectures with fantastic folks like Jennifer at Historical Sewing, Ithylwyn, Amanda Irwin, Rory Cunningham, Heath Hammond, who I think said he was affiliated with the English Warbow Society, and many others; the goodies I had not meant to buy but that came home with me anyway; and, of course, catching up with everyone in my costuming "family," I love you guys, your talent, and your endless creativity.

Jane Malcom-Davies of The Tudor Tailor with your author.

Jennifer of Festive Attyre (as the Grey Lady from Harry Potter) with Merja of Before the Automobile (which has got to be one of the best blog names ever).
Goodies from The Tudor Tailor! An autographed copy of "The Tudor Child," a copy of "The King's Servants," a pamphlet titled "'And her black satin gown must be new-bodied': The Twenty-First Century Body in Pursuit of the Holbein Look," and an updated edition of their "gable hood" pattern. All of these, except the pamphlet, can be had from their website.

More from The Tudor Tailor! My understanding is that this fan was used by the interpreters at Hampton Court Palace, and before that this was a prop in the movie "Shakespeare in Love." For real. Ray Fiennes may have touched it.

And yet more from The Tudor Tailor! I believe the necklace an earrings were used by the interpreters at Hampton Court. The necklace needed a minor repair, so I got it for a steal. The lace is just-to-die-for reproduction Reticella that can also be had from their website.

From Dawn Sklar, the trims and buttons vendor. I normally reject ribbon trims because they look too machine made and modern, but this one is pretty darn passable. Stay tuned, this may some day soon appear on an 18th century dress....
Antique rhinestone parure that I picked up in an antiques shop in Santa Barbara. I don't have a date for this set, and I'd wager a guess that it's no older than the 1950s, but it could pass for Edwardian. Besides, it's blue, it's pretty, and so it's MINE.

Sunday, June 7, 2015

Turbans! Turbans! Turbans! (Photo Shoot)

I'm back for another quick, catch-up post. Back in April I spent a day hanging out with Lynn McMasters to model for her. She was (or still is) working on a pattern for turbans for various time periods. She has lots of friends who model for her millinery, including, on occasion, me.

If you follow Lynn on Facebook at her page, "Out of a Portrait" you've seen this photos before, as well as pics of her other fabulous models and hats. If you're a member of Facebook and don't follow Lynn, scoot on over there and follow here to get the scoop on her up-and-coming hat patterns.

Turban No. 1:

This one is based on a late 18th century headdress. I can't recall the name or artist of the portrait that Lynn used as a model. The outfit was provided by me.


Turban No. 2:

Jumping forward over a century, I don't recall what time period Lynn attaches to this turban, but given the hairstyle she probably means


Turban No. 3:

Still in the Jazz Age. This one features a fun sash and crazy feathers. Lynn made the dress.


Turban No. 4:

1920s or '30s. This one came in two pieces. The "dress" is one of my favorite sari's, creatively wrapped.


Lastly: this is not a turban, but Lynn needed photos of this really cool, lace-brim hat.