Monday, December 26, 2011

Yet Another Cockade Tutorial (Part 2)

In this post I'm going to show you a few things you can do with the technique you learned in Part 1 of this series. These photos are imperfectly categorized, but as you read along you should get the idea.

Hopefully this will give you some ideas so that you can go and make your own unique cockades!

1. Tail variations.

In Part 1 I chose to tuck the tails of the ribbon into a loop so that they don't show. Here are a few cockades where I left the tails dangling out.
Two cockades with their tails left out. Both ribbons are
1 inch wide, and the loops are 2 inches long.
Closer view. I like the tails to separate, and they tend to
want to stay stacked on top of each other (which is
another look worth trying).
This one has the tails left out and every third loop is extra
long. 1 inch wide ribbon with 2 inch long loops.
2. Ribbon width variation.

In this variation I've used a wider ribbon, but the length of the loops are the same: two times the ribbon width. A wider ribbon, of course, results in a larger cockade.

An unfinished cockade made from 1 and 1/2 inch wide
ribbon, with loops 2 times the ribbon width. This is a very
large cockade, measuring almost 6.5" across. The cockade
from the Part 1 tutorial is pictured for comparison.
3. Loop length variation.

In this variation I changed the loop length to one times the ribbon width. With the one inch ribbon, this made a wonderfully springy little cockade.

The loops on this cockade are 1 times the ribbon width (so,
1 inch here). It's finished with two brass beads stacked on
top of each other.
This one looks great from the back, and would have worked
equally well with the back as the front.
4. Stacking variations.

I made another cockade with a one inch ribbon, with two inch loops, but instead of attaching it to the felt, I stitched the loops to each other.

Don't cut the thread after making the loops. Instead of
stitching the loops directly to the felt, after pinning them
to each other (Step 5 in Part 1) stitch the loops to each other.
I made another cockade from a much wider ribbon (two and a quarter inches wide).

This cockade is made from a massive 2 and 1/4 inch wide
ribbon. The loops are 3 inches long (yeah, that's not really
a multiple of the ribbon width, but it worked for the look
I was after).
The back side of this one also looks really great.
I then stacked one on top of the other, and stitched the back sides of the top cockade to the bottom cockade.
I stitched the smaller cockade on top of the bigger one and
finished it with a brass button.
This one also has a lot of potential on the back side (sorry,
photo came out a bit dark).
Here are a couple where I added a ruffle instead of stacking multiple cockades.

The unfinished cockade here is a 1 and 5/8 inch ribbon with
1 inch loops (ok, I'm ignoring the proportions again). To the
back of it I've stitched a simple knife-pleated ruffle.
This cockade is made from 1 and 1/2 inch ribbon with
1 and 1/2 inch loops. The lower layer is loops cut and sewn
individually to the back, a total cheat to save ribbon.
I also attached the tails separately. It's finished with a
brass button.
And that covers all the cockades I've made in experimenting with this technique. There are a few other variations I want to try, so stay tuned for future pics.And please share any cockades that you've made! I love to see other people's creativity.

Saturday, December 24, 2011

Yet Another Cockade Tutorial (Part 1)

There are quite a few tutorials on the web that explain how to make a cockade. So why am I adding another? For a simple and selfish reason: I figured out a method that works for me, and when I wanted to show some friends I couldn't remember the details anymore, and had to figure it out all over again! Hence, this post is as much for my own reference as perhaps to teach anyone who happens upon it.

Anyway! My method is based on a tutorial I found at instructables.com, with tweaks and additional steps to make the process easier. Here's what you need:

1. Ribbon. I'm using a one inch wide grosgrain in this tutorial, and suggest you use a ribbon at least one inch wide for your first cockade. I haven't tried any other type of ribbon for this type of cockade, and imagine satin and wired ribbons would work just fine, but for the first time grosgrain is the easiest material to use.

2. A small piece of felt. I'm using a polyester eco-felt, made from recycled materials.

3. A ruler and air soluble pen, or chalk, or anything that will come out without water.

4. Thread to match the ribbon, thread wax, and a sharp needle. If you haven't gotten into the habit of waxing hand sewing thread, I highly recommend it. It helps keep the thread from tangling around itself.

5.  Lots of sharp pins. I like using steel silk pins because they are VERY sharp, and don't leave any mark after they come out.
One inch wide striped grosgrain ribbon.
I like using striped ribbons, because the stripes
make interesting shapes in the finished cockade.

Step 1: mark fold points on the ribbon.

Mark folds on the ribbon.  I'm making 2" long folds here.
Leave a generous tail, at 3-4 times the length of the folds.
I'm experimenting with measurements in multiples of ribbon width, the way Candace Kling does for flower making. Here I'm using 2 times the ribbon width, so my folds are two inches long. The air soluble marker was a bit hard to see in the photo, so I've gone over them digitally. Since the marks will fade, I only make about a dozen marks or so, and mark more as I go along.

Step 2: fold the loops of the cockade and pin them together.

First fold and pin.
Second and third fold, makes your second loop. Pin.
Many folds later, I have 4 loops (counting on the left side).
In this step you make the loops of the cockade. I'm right handed, so I keep the roll of ribbon to my right. I make two folds at once, one to the left, one to the right, so that I have one loop, when you look at the left side. Pin each loop to the previous loops. After the first loop, there isn't really any way to pin through all the layers, so I pin through just enough to keep the top loop in place.
Finished stack of loops. Leave a generous tail
at the beginning and end.
I find 10 to 12 loops makes a nice cockade. Sixteen is great for a denser cockade. More than 18 is probably overkill.

Step 3: stitch the loops to each other.

For this step I use a matching thread, doubled up and knotted at the ends (for demonstration purposes, and laziness, the thread here is white). Pass the needle through the tail and through both layers of the first loop, close to the corner. Secure the thread.

Start by going through the bottom tail and the first loop.
Secure the thread by passing the needle between
the threads and under the knot.
Finish by pulling taught.
For the remainder of this step, you are essentially back stitching each loop to the previous loop.

Pass the needle through the first and second loops,
close to the corner. Be sure to go through all layers.

Pass the needle through the second and third loops.
Repeat, two loops at a time, until you've gone through
the whole stack and the end tail.
Take an extra stitch through the last loop and the bottom tail, to secure the thread. Do not cut the thread off!

Step 4: remove the pins and connect the start and end. 

Remove all the pins.
Pinch the tails together and stitch through both twice.
At this point you can tie off the thread.
Yes, the thread has mysteriously changed color here. I needed a better photo of this step, so took one of a cockade I made after the one in this tutorial.

What to do with the tails: you can leave them hanging out, and trim them at an angle in or a dove tail. Here I made another loop from one of the tails, folded the other
tail inside, and stitched the end of the outer tail to the inner.

One tail is folded into an additional loop and the other
tail is tucked inside. I then stitched the outer tail to the
inner near the cut end.
Step 5: arrange the loops.

Turn the cockade over so that the stitches are on the underside.
Arrange the loops so that they're all going in the same direction.
At this point I like to pin the loops to each other so that
they are spaced evenly.
This is the bottom side of the cockade, but note that this
can also be your top side, which results in a slightly
different style.
Step 6: attach the felt and finish the center.

A piece of felt on the back of the cockade supports the loops and helps them maintain their spacing. It also gives you a foundation to, say, attach a pin back or a clip, something to stitch to if you want to attach it permanently to something.
Cut a circle of felt smaller than the cockade.
Pin the felt in place and whip stitch it in place.
Finish by putting something in the center to cover up
the hole. Fancy buttons, beads, or flowers work well.
Here I've used a pearl bead.
And now we're done! I hope this tutorial is clear. I welcome any and all feedback, and am happy to edit this tutorial so that it works for everyone.

This is now an abominably long post, so I will end. In Part 2 I'll talk about a few variations, and show you some of the cockades I've made in the process of learning this technique.

Happy stitching!

Wednesday, December 21, 2011

1870 Hat by Lynn McMasters

I'm proud and privileged to be the owner of another custom hat by Lynn McMasters, milliner, friend, and occasional mentor (the last one was a really wonderful 1880s straw hat). In this post you'll also be treated...or horrified...by photos of yours truly! I'm not fond of having my photo taken. :)


This hat is the View D from Lynn's 1870-1880 Bustle Hat Pattern (eep! also featuring yours truly...I keep forgetting about that). Lynn based this view on several illustrations from around 1870.


I've got a big fat braid pinned to the back of my head to support the hat. There's a hat pin holding it on, but Lynn and I discussed attaching one or two combs or clips that will really hold it on.


The hat will got with a walking dress from around 1875 that, well, exists in my head...someday, hopefully SOON, I'll actually make the dress.


Finally I can't go without giving a plug to my friend Lynn. Making custom hats is something she does on the side; her primary business is making excellent hat patterns. Check them out here, or got to www.lynnmcmasters.com and click on "Pattern Orders" at the top. She's even got instructions on manipulating straw braid and blocking buckram! Even if you have no interest in home millinery, stop by her site and check out her amazing work.

Sunday, December 18, 2011

Too much shopping...er, fun, at the Dickens Fair

Last weekend was my yearly visit to the Great Dickens Christmas Fair in San Francisco. My costume was the same old, same old 1868 gown I've had for years, so I'm not going to talk about that. Instead, I'm going to talk about the lovelies I bought during my visit!

For several years I've admired the feather arrangements and ornaments by PiumaMia Feather Creations. This year, I decided I wanted a feather ornament to put in my hair for the office holiday party. I picked out this collection of blue feathers, flowers, and clear crystals.

Hair clip in shades of blue and clear crystals,
by PiumaMia Feather Creations.

But buying one gave me the encouragement, for better or worse(!), to buy another! So I also bought this large arrangement with red cock feathers, peacock eyes, black ostrich plumes, red flowers and copper leaves. This one works great at so many different angles.

Red and black feather clip or pin
by PiumaMia Feather Creations.


I also paid a visit to Morgyn Owens-Celli of Strawbenders, and picked up this utterly FABULOUS straw hat. It's a modern design, but I find that it works for 1900 or 1930 or 1940 or 1950, depending on how I wear it. I really need to get photos of it on my head, but wasn't set up to take proper photos.

Straw and feather hat by Strawbenders.

Unrelated to shopping, my 1830s bonnet also had its first outing, on the head of my friend Sahrye (this is her blog, check it out, she's extremely talented and creative!)

The very talented Sahrye, in a late 1830s gown by her, and wearing my 1830s bonnet.

Sahrye made her FABULOUS late 1830s gown, inspired by the movie "Young Victoria." Read more about this amazing gown at her blog, It Came From The Stash!.

Friday, December 2, 2011

Inside the Parasol, Part 1

The parasol canopy that's featured in my earlier workshop posts on parasol restoration (Part 1 and Part 2) wasn't turning out as good as I wanted, so I took it off. This gives me a chance to talk about some of the innards of the parasol canopy. Fair warning: this is going to be a rather pedantic post, but I find these details just SO interesting, and if you're an aficionado of parasols, then hopefully you will, too.

Today I'll be discussing two common features you'll find underneath a parasol canopy. For lack of being able to find consistent terminology, I call these the "donut" and "joint wraps." More on terminology in a moment. I say they are "common" specifically because they are not universal, or at least there is no way for me to prove that they are universal. In the dozens and dozens of parasols I've seen either in person or online, however, I see them more often than not, and thus feel safe to conclude that they are common.

Ok! So first: the "donut" (I'm going to keep putting it in quotes to underscore that this is terminology I made up). This is a circle of fabric or leather that sits between the ribs and the canopy.
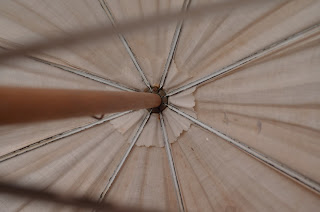
Fabric donut (cotton) on an 1890-1910 parasol.
When made of fabric, it's often (but not always) the same fabric as the canopy.

Donut that is made from some sort of canvas. The canopy
was silk taffeta. The parasol is from 1870-1890.


My guess is that the primary purpose for the "donut" is to protect the canopy from the metal, moving parts of the frame. I've also found that it's sometimes used as an anchor to stitch the canopy to, around the base of the parasol tip.
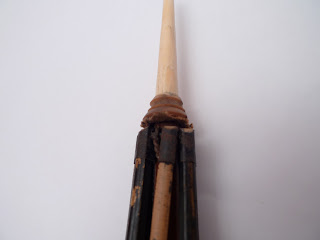
Remnants of a leather donut on an 1855-1870 parasol.
 Another purpose I've found served by the "donut" is to hide the spring mechanism of pagoda parasols. I've seen one "donut" that had this function that was enormous. This was on a friend's parasol, and unfortunately I don't have a photo.
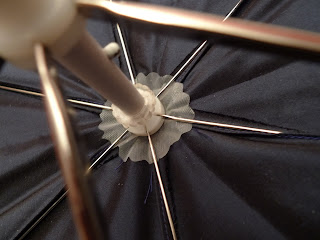
Vinyl donut on a modern parasol (note the plastic top notch).

The Fox Umbrella Company ("Keeping you dry since 1968") calls this thing an "inside cap". I've also seen it called a rosette, but I like to think of rosettes as gathered, scrunchy rings of fabric, and the "donut" is invariably a flat, circle.

Here is the "donut" I put on the workshop frame:
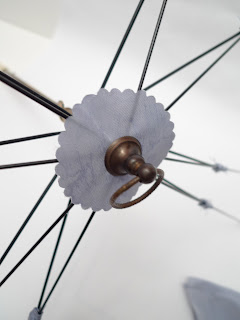
Reproduction donut made from silk taffeta.
It's the same powder-blue silk taffeta as the canopy. It's a little big for the scale of the frame, but I can't be bothered to do anything about it. Now, fraying is completely historically accurate. But I hate fraying, so this little ring was completely soaked in fray check. Don't hate.

Next: "joint wraps." These are bits of fabric, also commonly the same as the canopy, that are wrapped around the point where the spanner ribs meet the canopy ribs.

Remnants of silk joint wraps on an 1890-1910 frame (this one).
The Fox Umbrella Company calls these "prevents," and, indeed, their purpose appears to be to prevent the canopy from rubbing the metal at the joint. On older frames, where this joint could have some sharp edges, this was probably quite necessary. Newer frames, however, (say, 1875 and later) have pretty clean joints, and I would think the "joint wrap" isn't as necessary. But tradition is hard to overcome, and I have an 1910-ish frame that was refurbished sometime after the invention of nylon and the commercialization of plastic that has vinyl "joint wraps."
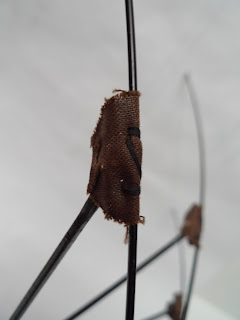
Canvas wrap from the 1870-1980 parasol picture above.
I've found that "joint wraps" come in two styles: either a simple oval of fabric, as seen immediately above and below, or a tidily folded bit of fabric, as seen two photos up.

Cotton wrap on the 1890-1910 parasol pictured above.
Loosely and broadly speaking, the folded type of "joint wraps" that I have found are made from silk, because, well, an oval of silk would fray away. Both styles, though, are attached the same way: doubled thread wrapped a few times above the joint and a few times below.

Here are the "joint wraps" on the workshop parasol:
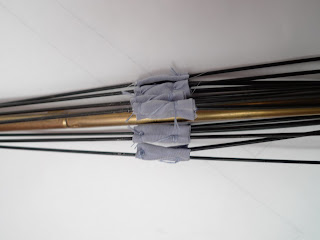
Fold silk taffeta joint wraps.
I've attached them with doubled Gütermann silk thread in a matching color (from ye old big box store), with a simple knot at the first stitch and last.


And that's the end of today's lecture.

I've ambitiously labeled this post "Part 1" because I figure I'll be talking more about the innards of parasols in the future. I just find them so ridiculously interesting, but I'll try to focus my posts on restoration issues. Anyway, I'm done for tonight, but I'll leave you with a teaser of where the workshop parasol is going: