Tuesday, December 25, 2012

Steampunk Has Gone WAY Mainstream

I was flipping through some old junk mail and came across an ad for this:

Devon Tread 1 Steampunk watch. Photo snagged from ablogtowatch.com
This is the Tread 1 watch by Devon, the "Steampunk Watch". It is...*ahem*...$25,000 (supposedly being produced in a limited edition of 150). This is just my opinion, but when something this expensive is marketed at the genre, then I think it's safe to say that steampunk has gone mainstream. Don't mistake me, though, I think this watch is GORGEOUS...but, well, yeah, if I had that kinda' money, I'd be blowing it on custom woven silk.

I'm also not ready to abandon steampunk, not when folks are making such awesomeness like this:

Gwendolyn, from Idlewild Illustré
Holey crap, that's so HOT. And I must mention this:

ColeV, from the inequitable Diary of a Mantua Maker
I'm seriously in love with these outfits. I was losing interest in steampunk, but these ladies are poking my imagination.

Also: hello! I'm back, mostly. Yeah, I had to take a real hiatus from this blog for the last four months. I had piled on so much "other stuff" that costuming had to go on the shelf for a while. Not to say I've been idle, crafting keeps me sane when I'm under stress. I'll write up some post about what I've been up to, after I take care of some more important business. Thanks for sticking with me!

One more thing: Merry Christmas, everyone! Whether you're Christian or not, it's a day to relax, be with family, play board games, and EAT (one of my favorite things to do!)

Thursday, September 13, 2012

I got a Liebster Blog award!!!

Wow, being recognized by fellow costumers is really special. Idle Hands is now officially Liebster Blog recipient!


Yesterday, Angela of The Merry Dressmaker extended this lovely honor to this blog. Read about her other honorees, and visit her fantastic blog!

What is the Liebster Blog Award? It's a way for bloggers to recognize the talent, effort, craftsmanship, writing, photography, and all-around coolness of fellow bloggers who have fewer than 200 followers. "Liebster" means "favorite" in German, so it's a "favorite blog award."

Part of the Liebster Blog Award is to pass it on. So, very soon, as soon as I can carve out some time, I will announce my list of Liebster Blog Award recipients!

Thank a bunch, Angela, and stay tuned for more mis-use of power tools. :)

Sunday, September 2, 2012

Learning Card Weaving, Part 2

Ok, I'm back, with another quick post about my card weaving project.

When I left off, I had gotten my warp wrapped around my improvised warp beam, and had strung up the cards. I just had to secure the warps to my "cloth beam" and then I could get started weaving.

The "cloth beam" is just another clamp. I rather
lazily secured the warps with a medium Gem clip.
They weren't super secure, but good enough for
me to get started.
For this project I'm using size 10 cotton crochet thread (probably Aunt Lydia's brand; I don't have the labels anymore), because I have a lot of it laying around (it's my favorite thread for lucet work). I'm using the same thread for the weft, in red to match the selvedge edges.

When I started weaving, scroll frame arms tended
to pivot and cause slack in the warps. I flipped
the clamp around, which helped but didn't
eliminate the pivoting.
I had several objectives with this project:

1. Could I get the warps properly rolled onto a warp bar?

The warps here are 80 inches long, which makes them only slightly longer than the 72 inch warps for my pink stocking garters. The stocking garters have 37 warps, though, whereas this project has 64! Anyway, with the exception of the pivoting problem, I got a very satisfactory wrap round my improvised warp bar.

2. Can I really work a pattern where the cards rotate only one way?

I don't think so, but I must be missing something. After I had woven about a foot, the warps behind the cards had turned into ropes.

By turning the cards only one way, the warps
got twisted to the point where I couldn't move
the cards back any more.
Candace Crockett, in her book Card Weaving (I have a copy, and it's quite excellent) suggests untwisting the warps. I'm thinking, after all the time it took me to roll up the warps (and it really did take a while), do I really want to unroll them? My conclusion was, what's the worst that could happen, and I went ahead and unrolled the warps. Well, the worst didn't happen, but pretty near: I ended up with a twisted, snarly mess that I was not going to be able to get back onto the bar (I have no photo evidence of this...it's too embarrassing). I soldiered on and just wrestled with the twisty mess, replace the scroll frame with the clamp by itself and clipping the warps to the clamp's bar. Needless to say, I had an issue with keeping even tension.

Also: I decided I should just turn the cards in the reverse direction.

Two turnaround points, where I reversed the turning
direction of the cards.

There's probably something I'm not understanding yet, but so far I'm not sure you can work a pattern where the cards only turn one direction. At least not with a piece that's this long.

Anyway, my third goal was to get a better understanding of how card weaving works.

My fourth goal is to find a solution for Laura's weaving problem, which she talks about partway through this post. I don't think I have an answer yet.

In the meantime, the piece is done!
The back side looks nice, too!

The color combination makes me think of traffic signs, but I'm still quite fond of it. I hereby dub this piece: "The Road Goes This Way!"

I got the pattern from eqos at Deviantart (she calls this one "Korba"). Check her out, she generously gives these patterns away.

I was aiming for 60 inches and ended up just one inch short. The weave is tight but not totally consistent; I think that once I can keep the warp evenly tensioned, I can achieve better consistency.

But I must find a solution to Laura's problem....

Friday, August 31, 2012

Learning Card Weaving, Part 1

My blog has gone rather idle, sorry about that! Ever since I got back from Costume College, I've been utterly swamped. My hands haven't been idle, despite how busy I am.

My latest thing has been card weaving, aka tablet weaving, aka inkle weaving (though I think "inkle weaving" really means weaving with an inkle loom, with or without cards, so that might be a bit of a misnomer).

This is just a quick post to show Laura (aka Rocking the Frock) my improvised loom (and my equally improvised photo box).

Improvised card weaving loom, using two clamps and part
of an embroidery scroll frame.
Laura is reproducing the gown worn by Eleonora di Toledo as painted by Bronzino. She's considering weaving the gold and silver trim on the gown herself. I'm hoping to help her out by figuring out a way to for her to do it by card weaving.

Warps wound around a dowel and cards loaded.
At one end I've got the warps wrapped around one of the two dowels from a scroll frame for embroidery. I clamped the sides of the frame to a scrap of board I had laying around. The pink paper is something like heavy construction paper, somewhat similar in weight to grocery bags. I'm not sure what it is exactly, since it came from a roll a contractor left at my house. The Gem clips are keeping the cards (sixteen, for this pattern) under control while I load them.

In-progress warping, not quite ready to weave yet.

At the other end I have the warps wrapped around the bar of another clamp. I still need to tighten up the warps before I get started actually weaving. I'm using a pair of not-separated restaurant take-away chop sticks to keep the warps under control in the mean time.

By my next post I'll probably have woven this piece. I'll talk more about the process then. Stay tuned!

Sunday, July 15, 2012

The Pink Parasol's New Handle, Part 1

Give a woman power tools, and creative things will happen (whether they were meant to be that way or not).

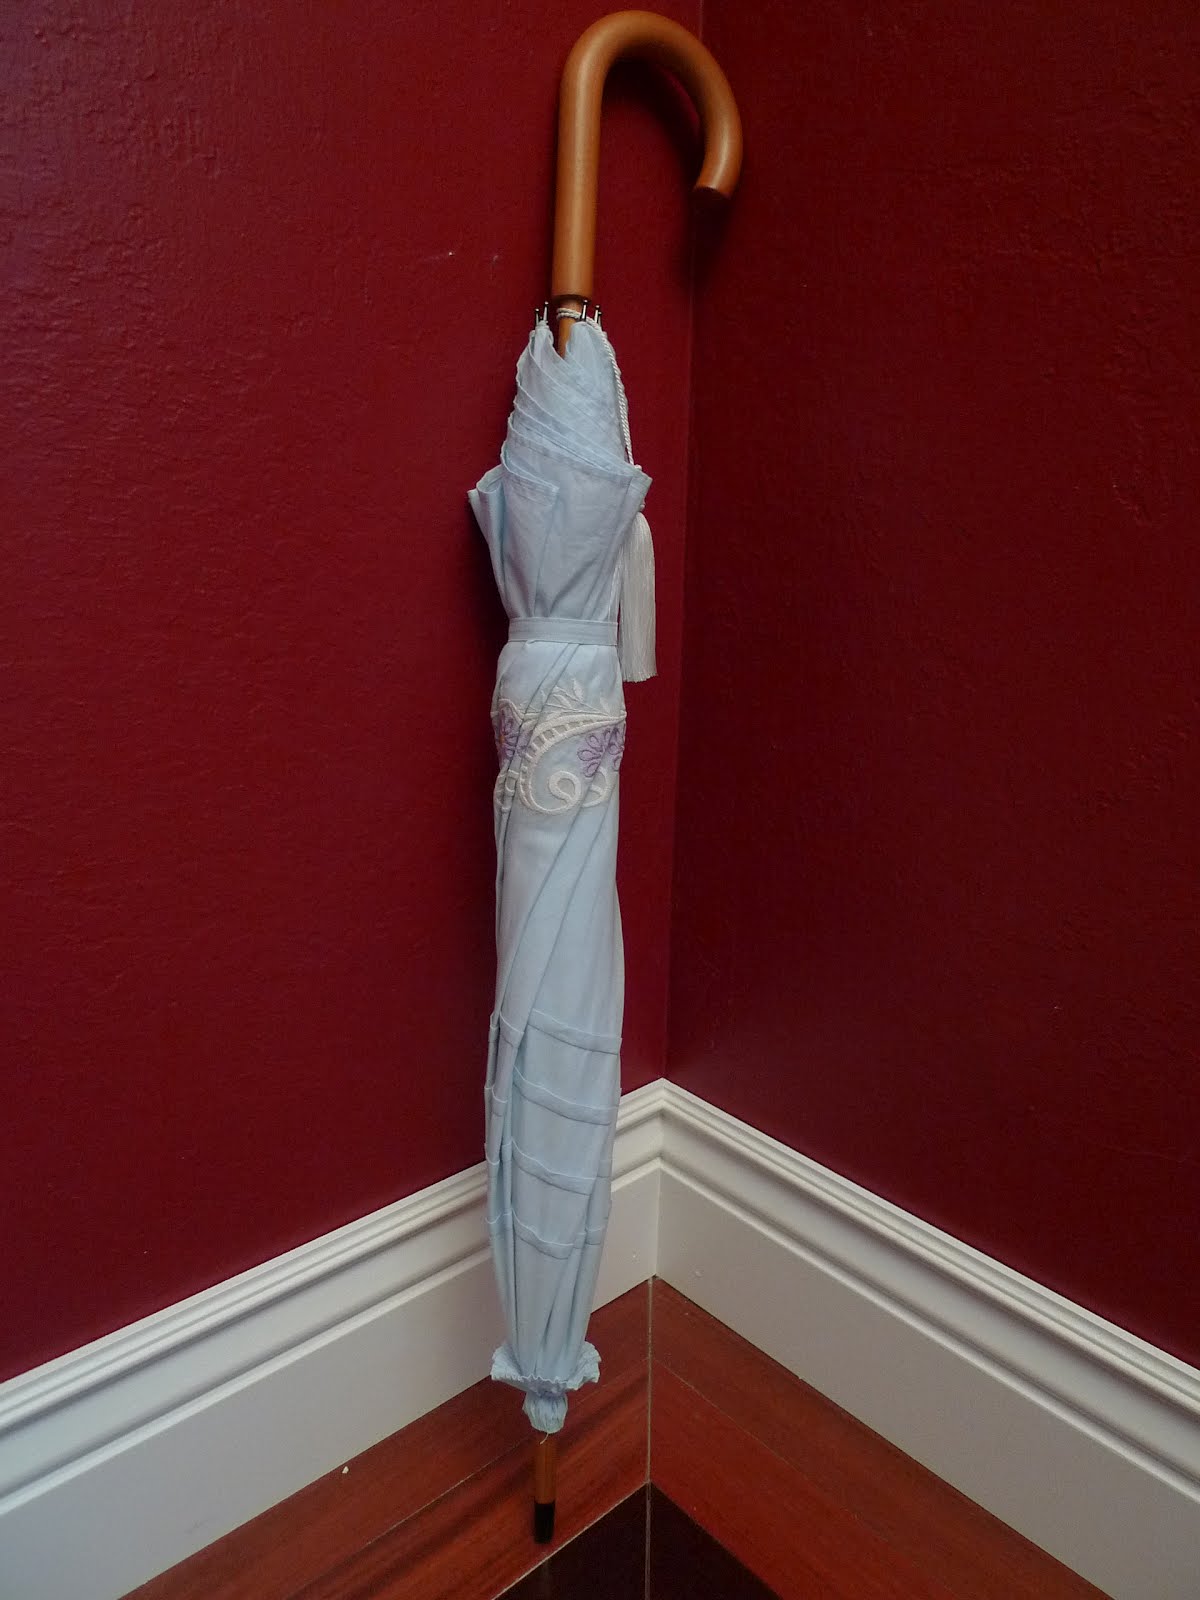
Some years ago I bought this little parasol:

Small parasol that's lost it's handle. Hard to
date, could have been made anywhere
between 1890 and 1930.
It was cheap. Even in its day it was must have been cheap, its construction is mediocre, its parts are economy. And your eyes do not deceive you, its handle is broken off and irretrievably lost. But that made it unloved, and cheap.

This isn't the only parasol I have that has lost its handle, but because it's such a budget frame it's going to be my first full-handle-replacement project. Over the last few weeks I've been gathering the tools and parts I need. Today I went at it (though I'm REALLY supposed to be doing Costume College prep. Oh well.)

First thing is the replacement handle. I had originally planned to use an ordinary dowel, but went with the top end of a walking cane instead. A dowel would have had uniform thickness from top to bottom, while canes are generally a bit tapered, and that made, I think, for a more natural shape. The cane I used was *ahem* cheap, not very round, and not even meant to be used as a cane (it's only decorative). But it was a tapered stick of wood, which would do the job.

What's left of the cane. I was too trigger-
happy with the saw to take a photo before
cutting it up. It has an orange stain that
would look fine, but it also has a nasty-
varnish on top.
And now I had to solve a problem: how to drill a straight, centered hole into the end of a dowel? I explored a narrow handful of options (including buying a drill press, but I don't have anywhere to put a 100+ lbs tool), and then Lynn McMasters said, go buy this:

My doweling jig.
This is a doweling jig, which one uses to drill holes into the ends of planks in order to join them with dowel pins. Lynn has one that she's used to build a table, or something (Lynn is a master at technical solutions).

The doweling jig solved half the problem. I still need a way to hold the dowel itself, because if I just clamped it into the jig, the dowel would likely just rotate with the drill bit (or so I read on woodworking websites). So, I needed a dowel jig...for the doweling jig. Yeah, stay with me here.

I found the solution here: http://www.woodworkingonline.com/2008/04/08/dowel-drilling-jig/  I just needed to adapt it for the doweling jig.

First, to drill a big hole. So happens I have these big drilling bits (don't ask why, I do a lot of DYI on my house).

Big old bore drilling bits.
The big one is missing because it's stuck in the mount
(long story).
And here's what happened.
"Clamp" for the work piece on the left,
piece-to-be-clamped on the right. If I
had planned better, it wouldn't have split.
I wanted to fix a second piece of wood at a right angle to the one with the dowel hole, so I drilled holes for two dowel pins into the piece on the right (and used the doweling jig for this, yep, it works every bit as well as advertised!) Then I went to drill two holes into the piece on the left, and, well, I tried to drill into the kerf and split the wood.

I went at it with a file to see if I could make it work anyway. I got the other dowel pin to fit, but notice here that the upright piece is at an angle.

How they fit together (off-kilter; that'll need
to be fixed.

Yeah, that's not helpful when you're trying to line things up perfectly. These are postmortem photos, and I only noticed the off-kilter angle when I took them. I'll have to fix that before I try this again.

Now to put it all together. I clamped the work piece, the new handle, into the hole, and clamped the whole thing into the doweling jig. Yes, that made quite a contraption.

All clamped together.
Ready to drill. Here you can see the work piece.
And here's what it looks like. Bit off center, but it'll do.
3/8 inch bore hole for the new stick.
On the left, the new handle with new
partial stick. On the right, the frame with
a brass tube on the end, which will
connect and support the joint.
Notice that the frame, with the tube attached, is bent. I don't know what the original frame's stick is made of but it's certainly not a great piece of wood.

At this point I need to trim the brass tube, and I want to sand the handle some more. But it was late, I was hot and hungry, and decided to call it an evening.

Sunday, July 1, 2012

Powder Blue Parasol, Part 2 (the last)

I finished the powder blue cotton parasol that I was embroidering in this earlier post. This parasol was the finished sample for my class last week, though it wasn't really done until I picked up the tassel from Lynn McMasters at the class. Here's the full photo spread I took after the class.

The finished parasol.
The large canopy panels gave me lots of room
to embellish, first with some simple embroidery.
In the upper area I put four rows of tucks.
A small rosette covers the opening in the
center of the canopy..
Small touches make this modern frame
look more period, like these rosettes
on the underside of the canopy.
A full view of the underside.
Another finishing touch, a custom-made tassel
by Lynn McMasters.
Lynn is teaching a class on tassel making at Costume College. She and I have been lamenting how modern tassels and fringe just don't look like the silk tassels and fringe of 100 years ago. She's been developing tassels. I've been developing fringe. But more on that later.

This parasol uses a ring-and-button closure mechanism I've
seen on extant parasols.
And propped in a corner.
For your amusement, here's the reverse sequence of how this parasol came from a modern umbrella.


Sunday, June 24, 2012

Edwardian Parasol Workshop

What a fun day! Yesterday I taught a class for the Greater Bay Area Costumer's Guild, "Edwardian Parasol Recovering Workshop." I had eleven enthusiastic, talented, and creative students. No one finished, but just about everyone just had to do the final attaching-to-the-frame.

This was the first class I've ever taught for the GBACG (I've taught privately and at Costume College). I do wish everyone had been able to finish, and have some ideas for next time. Yes, there will be a next time, I had a ton of fun and would do it again!

Here's a photo recap of the day (scroll to the end to see some of the results!)

Umbrellas packed, student packets packed.
Parasols packed!
A handful of antiques from my collection. I brought them to
give a lecture on history and mechanics of parasols.
Some more antiques and two modern, recovered parasols.
AJ de-nuding her umbrella, with Tara and Leah.
Chris and Lynn stitching away.
Noelle, cutting deliciously striped silk.
Tara and Judith, who is deeply
contemplating her trims.
Lynn made her two smocking pleaters available for the
class (this one has been at my house for a few
weeks...I've had MUCH FUN with it).
We used them to gather up the rosettes.

And here are some of the results!!!

Judy's stripes.
Judy made her outside rosette extra long. Love it!
Anne's plaid.
Plaids just do GREAT on parasols.
Lynn's, with pinned on gimp
(there will also be FRINGE!)
Great deep dome.
Leah's cotton stripes. You can
run your stripes around, or up and down!
Manon's sea foam blue silk.
Tara's printed silk.
When we stepped outside, it positively
GLOWED.
I'll have follow-up posts for the two frames I prepared as demo's for this workshop, and then maybe I'll, like, stop talking about parasols for a little while. Maybe. ;)