I've gotten a couple of requests to explain the process of doing machine embroidery. In this post I'll go through the steps, using as an example the embroidery for a parasol canopy. Restoring this particular parasol is something I've been working on in fits and starts for years and hey, it's time to get it done.
To manipulate embroidery designs, I use a popular software application called Embird (www.embird.com). It's immensely powerful, and quite a bit more affordable than the software put out by the sewing machine companies. I can arrange embroidery designs right on my machine, but I find using a computer far easier, flexible, and more accurate.
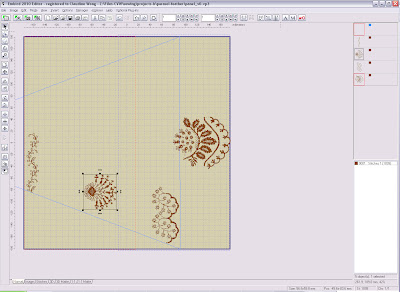
For this project, the first step was to scan the pattern for the canopy's panels (the process of making the pattern isn't relevant here, so I won't get into it). I uploaded the scan into Embird, and created an outline of stitches out of it. This is so that I know what area to fit the embroidery into; I won't actually stitch out the outline in this case, because it won't fit into the hoop and isn't strictly necessary (it would merely be handy).
Next, I picked the designs I want to have go onto the panel. These designs are from OESD (www.embroideryonline.com). I use purchased designs whenever I can. I've created designs from scratch before (a process called "digitizing") but doing so can be very time consuming. So, I try to find patterns that will do the job before I consider digitizing something from scratch. Here, I already had these patterns from earlier projects, so only had to pick what I wanted.
The next step is to arrange and duplicate the design elements. I shrank or grew the elements to fit the space, both of which can be troublesome. The software is good, but not perfect. When you grow a design, it may not increase or add stitches quite right, which creates distortions. When you shrink a design, it may not reduce the stitch sizes right. Shrinking is more difficult, because it can result in super-dense areas that can't be stitched out. Here, I had to futz with the rightmost elements, to shrink them and reduce the stitch count (and the oak leaves still ended up too dense. Oh well.)
When arranging these elements, I tried to place them so that the jumps between them are really short or insignificant. My machine trims jump stitches on the right side, but not on the wrong side. Thus, jumps on the wrong send will get stitched over, making them harder to remove. So, since I need the wrong side to look as clean as possible, I tried to keep the jumps short.
At this point I checked that trimming codes and stop codes were in the right places. This design is all one color, so I wanted no stops. I also made it trim almost all (but not all) the jumps.
You'll also notice fine blue and red lines running down the middle of the hoop. These indicate the right and left areas of the hoop. With this large hoop, the machine stitches all of one side, then all of the other, so the design needs to be placed such that stitches from one side don't overlap into the other.
Normally, you would now check that the design is ok, by doing a stitch out, on scrap fabric, of all or part of the design (it's a good idea to test elements you grew or shrank). I confess to being rather impatient with this project, however, and forging ahead.
The base fabric for the canopy was a medium weight, cream linen.
For the top thread, I used a cotton quilting thread. I figure this approached what might have been done historically. Also, it has a slightly heavier weight than sewing thread, closer to that of rayon embroidery thread (but without the shine of rayon). For the bobbin I used a poly sewing thread. Generally, I embroideries come out better if the bobbin thread is really light weight, and thus there's specialty "bobbin thread" for machine embroidery. As far as I know, however, it only comes in white and black, which wouldn't work here, since I expect the back side of the embroidery to be seen.
The next step is to hoop the fabric and stabilizer. Since I expect the wrong side of the embroidery to be seen, I used a water soluble stabilizer underneath the fabric.
And away we go!
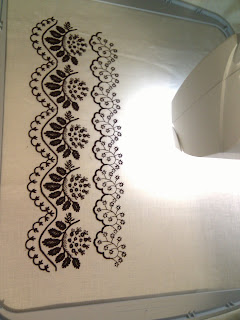
After one side finished, I rotated the hoop and continued on the other side.
And now the whole thing is done.
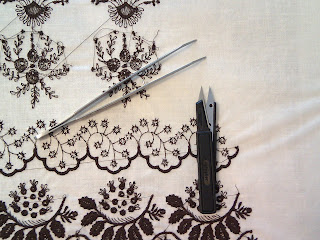
Before I popped it out of the hoop, I trimmed any remaining jump stitches on the front side, and also the jump stitches and dangly threads from the back side. Leaving the fabric in the hoop keeps it taut and makes this step go faster. My favorite tools for trimming are a pair of long tweezers and short thread snips: the tweezers raise the thread from the fabric, and the thread snips can get close to the surface of the fabric.
Once I cleaned up jumps and loose threads, I removed the fabric from the hoop, I trimmed away extra stabilizer, re-hooped, and started the next repeat. I was stitching along the selvedge edge of the fabric, so once I had four repeats, they went into my kitchen sink for a short soak, and then over a rack to dry; once dry, they were ready to cut out.
And that's it!
Except: I need the other four panels to complete the canopy.
This, it turns out, is a large design, with over 55,000 stitches. Frankly, that quantity of stitches takes a long time to stitch out. I also learned that with this large hoop (the largest that fits the machine), the embroidery arm moves more slowly than it does with smaller hoops. Thus, each panel took a veeeery long time to stitch out, approximately THREE hours of stitch time. That's stitch time, which excludes time to change bobbins, rotate the hoop, and deal with broken threads (It happens. Often. You learn to live with it.) And I needed EIGHT panels!
I had wanted to finish this parasol before a certain date. I totally failed. So, I say lesson learned: pay attention to the stitch count! I could have simplified the design, and some areas are still too dense, which didn't cause problems but means the time wasted on unnecessary stitches.
I'm going to wrap this project up soon. As of this writing, I still need the eighth panel. I also need to do the restoration work the frame needs. When all of that is done, I'll report back. Stay tuned.
To manipulate embroidery designs, I use a popular software application called Embird (www.embird.com). It's immensely powerful, and quite a bit more affordable than the software put out by the sewing machine companies. I can arrange embroidery designs right on my machine, but I find using a computer far easier, flexible, and more accurate.
For this project, the first step was to scan the pattern for the canopy's panels (the process of making the pattern isn't relevant here, so I won't get into it). I uploaded the scan into Embird, and created an outline of stitches out of it. This is so that I know what area to fit the embroidery into; I won't actually stitch out the outline in this case, because it won't fit into the hoop and isn't strictly necessary (it would merely be handy).
 |
| Outline of the canopy panel (blue triangle), over the hoop (tan area), in Embird. It doesn't actually fit in the hoop, I'm only using it to figure out how to place the designs. I'll erase the outline from the final design. |
 |
| The design contains five purchased elements (four pictured here) from OESD. Since I already had these elements, I didn't need to digitize any from scratch. |
When arranging these elements, I tried to place them so that the jumps between them are really short or insignificant. My machine trims jump stitches on the right side, but not on the wrong side. Thus, jumps on the wrong send will get stitched over, making them harder to remove. So, since I need the wrong side to look as clean as possible, I tried to keep the jumps short.
At this point I checked that trimming codes and stop codes were in the right places. This design is all one color, so I wanted no stops. I also made it trim almost all (but not all) the jumps.
You'll also notice fine blue and red lines running down the middle of the hoop. These indicate the right and left areas of the hoop. With this large hoop, the machine stitches all of one side, then all of the other, so the design needs to be placed such that stitches from one side don't overlap into the other.
 |
| The finished design. I grew some elements and shrank others to get them to fit the space, checked the trimming and stop codes, and checked the left-to-right placement in the hoop. |
The base fabric for the canopy was a medium weight, cream linen.
 |
| The base fabric for the canopy: medium weight, cream linen. |
For the top thread, I used a cotton quilting thread. I figure this approached what might have been done historically. Also, it has a slightly heavier weight than sewing thread, closer to that of rayon embroidery thread (but without the shine of rayon). For the bobbin I used a poly sewing thread. Generally, I embroideries come out better if the bobbin thread is really light weight, and thus there's specialty "bobbin thread" for machine embroidery. As far as I know, however, it only comes in white and black, which wouldn't work here, since I expect the back side of the embroidery to be seen.
 |
| Left: poly sewing thread, for the bobbin. Right: cotton quilting thread for the top. |
 |
| Layering order when hooping: lower hoop, stabilizer (water soluble in this case), fabric, and upper hoop. |
 |
| The machine goes to work. For the first panel, I hung around and kept an eye on it, but after the first I wandered off and did other things. |
 |
| After one half is done, rotate the hoop and do the other half. |
 |
| Finished front side. |
 |
| Finished back side. |
 |
| Tools for cleaning up extra threads: tweezers and thread snips. |
 |
| Four panels getting a soak to remove the stabilizer. |
Except: I need the other four panels to complete the canopy.
This, it turns out, is a large design, with over 55,000 stitches. Frankly, that quantity of stitches takes a long time to stitch out. I also learned that with this large hoop (the largest that fits the machine), the embroidery arm moves more slowly than it does with smaller hoops. Thus, each panel took a veeeery long time to stitch out, approximately THREE hours of stitch time. That's stitch time, which excludes time to change bobbins, rotate the hoop, and deal with broken threads (It happens. Often. You learn to live with it.) And I needed EIGHT panels!
I had wanted to finish this parasol before a certain date. I totally failed. So, I say lesson learned: pay attention to the stitch count! I could have simplified the design, and some areas are still too dense, which didn't cause problems but means the time wasted on unnecessary stitches.
I'm going to wrap this project up soon. As of this writing, I still need the eighth panel. I also need to do the restoration work the frame needs. When all of that is done, I'll report back. Stay tuned.

No comments:
Post a Comment